Quantcast
Channel: Unixmen » Fedora
Viewing all 343 articles
Browse latest View live

How To Install Node.js On CentOS 7

$
0
0

Lately, I have been interested in learning Node.js which is a Javascript platform for server-side programming that allows the developer to write javascript code on the server and since there are many CentOS users struggling to prepare a development environment for this language I thought to make this tutorial.

Before going any further make sure you have CentOS version 7 because it is the only version I have been playing with and there is no absolute guarantee this guide will work on another.

Install Node.js From Source

First we will try to install Node.js from source. I really love installing software from source. So open a new terminal tab on your CentOS 7 machine and run the following command to download the archive file which we need to use for the installation.

wget http://nodejs.org/dist/v0.12.0/node-v0.12.0.tar.gz

As you can see from the above command we make use of the wget utility.

Then extract the tar file as shown below.

tar xvf node-v0.12.0.tar.gz

 Then use the following command to change the working directory to node.

cd node-v*

Now before compiling our code we need to install some packages in our CentOS machine that will help us to do so. So in the opened tab of your terminal enter the followings.

sudo yum install gcc gcc-c++

Wait for these packages to install and run the following commands to configure and compile.

./configure
make

Don’t worry if the above takes some time to complete because the compilation will take awhile. Then use the following command to install Node.js on your system.

sudo make install

 Once the installation is finished you can start using Node.js and to make sure that the correct version is installed you can use the following command in order to check it.

node --version

I get the following when running the above command.

v0.12.0

How To Install Node.js From The EPEL Repository

Another efective but very easy way to install Node.js on your machine is to do it from the official repository. To this make sure you have access to to the EPEL repository, you can do this by running the following command.

sudo yum install epel-release

Now use the yum command to install Node.js

sudo yum install nodejs

And since I want to manage node packages during the development I also need to install the npm package manager for Node.js by using the following command.

sudo yum install npm

Write Our First Node.js Program

Writing a hello world app in Node.js is very easy! Easier than python. All you have to do is type the following piece of code on a file that needs to be saved as something.js.

console.log("Hello World");

I am saving mine as hello.js. Then to run the Node.js application we just created we need to use the following command.

node hello.js

Now open the hello.js with your text editor and use the following piece of code. You can copy and paste it but I highly recommend to type because this is a very good you can get familiar with Node.js.

var http = require('http');

http.createServer(function (request, response) {
 response.writeHead(200, {'Content-Type': 'text/plain'});
 response.end('Hello World\n');
 }).listen(8080);

console.log('Server started');

Use the following command to run the application.

node hello.js

What do you see now? This example is a bit complicated for a beginner but not really hard to understand.What the above code does is that it will display ‘Hello World’ on your browser if you visit http://www.localhost:8000/.

If you want to learn more about Node.js then visit nodejs.org.

Conclusion

Installing Node.js on CentOS operating system is not that hard if you find the right guide and follow the instructions very carefully. I hope this tutorial helps to install it on your machine.


Advertise here with BSA

---------------------------------------------------------------------
How To Install Node.js On CentOS 7


Lm-sensors: Monitoring CPU And System Hardware Temperature

$
0
0

It is very important to keep an eye on your system temperature. Because overheating may cause unexpected hardware failures. This brief tutorial describes how to monitor your CPU and other system hardware temperatures, fan speeds, and voltages using a command line utility called lm-sensors.

Installation

Lm-sensors will be available in the default repositories of most modern Linux operating systems.

On DEB based systems:

sudo apt-get install lm-sensors

On RPM based systems:

sudo yum install lm-sensors

Usage

After installing lm-sensors on your system, run the following command to determine which kernel modules you need to load to use lm_sensors most effectively. It is generally safe and recommended to accept the default answers to all questions, unless you know what you’re doing.

sudo sensors-detect

Sample output:

I go with default answers. Simply press Enter key to accept the default answers.

# sensors-detect revision 6170 (2013-05-20 21:25:22 +0200)
# System: Dell Inc. Inspiron N5050 [Not Specified] (laptop)
# Board: Dell Inc. 01HXXJ

This program will help you determine which kernel modules you need
to load to use lm_sensors most effectively. It is generally safe
and recommended to accept the default answers to all questions,
unless you know what you're doing.

Some south bridges, CPUs or memory controllers contain embedded sensors.
Do you want to scan for them? This is totally safe. (YES/no): 
Module cpuid loaded successfully.
Silicon Integrated Systems SIS5595...                       No
VIA VT82C686 Integrated Sensors...                          No
VIA VT8231 Integrated Sensors...                            No
AMD K8 thermal sensors...                                   No
AMD Family 10h thermal sensors...                           No
AMD Family 11h thermal sensors...                           No
AMD Family 12h and 14h thermal sensors...                   No
AMD Family 15h thermal sensors...                           No
AMD Family 15h power sensors...                             No
AMD Family 16h power sensors...                             No
Intel digital thermal sensor...                             Success!
    (driver `coretemp')
Intel AMB FB-DIMM thermal sensor...                         No
VIA C7 thermal sensor...                                    No
VIA Nano thermal sensor...                                  No

Some Super I/O chips contain embedded sensors. We have to write to
standard I/O ports to probe them. This is usually safe.
Do you want to scan for Super I/O sensors? (YES/no): 
Probing for Super-I/O at 0x2e/0x2f
Trying family `National Semiconductor/ITE'...               No
Trying family `SMSC'...                                     No
Trying family `VIA/Winbond/Nuvoton/Fintek'...               No
Trying family `ITE'...                                      No
Probing for Super-I/O at 0x4e/0x4f
Trying family `National Semiconductor/ITE'...               Yes
Found unknown chip with ID 0xfc11

Some hardware monitoring chips are accessible through the ISA I/O ports.
We have to write to arbitrary I/O ports to probe them. This is usually
safe though. Yes, you do have ISA I/O ports even if you do not have any
ISA slots! Do you want to scan the ISA I/O ports? (YES/no): 
Probing for `National Semiconductor LM78' at 0x290...       No
Probing for `National Semiconductor LM79' at 0x290...       No
Probing for `Winbond W83781D' at 0x290...                   No
Probing for `Winbond W83782D' at 0x290...                   No

Lastly, we can probe the I2C/SMBus adapters for connected hardware
monitoring devices. This is the most risky part, and while it works
reasonably well on most systems, it has been reported to cause trouble
on some systems.
Do you want to probe the I2C/SMBus adapters now? (YES/no): 
Using driver `i2c-i801' for device 0000:00:1f.3: Intel Cougar Point (PCH)
Module i2c-i801 loaded successfully.
Module i2c-dev loaded successfully.

Next adapter: i915 gmbus ssc (i2c-0)
Do you want to scan it? (yes/NO/selectively): 

Next adapter: i915 gmbus vga (i2c-1)
Do you want to scan it? (yes/NO/selectively): 

Next adapter: i915 gmbus panel (i2c-2)
Do you want to scan it? (yes/NO/selectively): 

Next adapter: i915 gmbus dpc (i2c-3)
Do you want to scan it? (yes/NO/selectively): 

Next adapter: i915 gmbus dpb (i2c-4)
Do you want to scan it? (yes/NO/selectively): 

Next adapter: i915 gmbus dpd (i2c-5)
Do you want to scan it? (yes/NO/selectively): 

Next adapter: DPDDC-B (i2c-6)
Do you want to scan it? (yes/NO/selectively): 

Now follows a summary of the probes I have just done.
Just press ENTER to continue: 

Driver `coretemp':
  * Chip `Intel digital thermal sensor' (confidence: 9)

To load everything that is needed, add this to /etc/modules:
#----cut here----
# Chip drivers
coretemp
#----cut here----
If you have some drivers built into your kernel, the list above will
contain too many modules. Skip the appropriate ones!

Do you want to add these lines automatically to /etc/modules? (yes/NO)

Unloading i2c-dev... OK
Unloading i2c-i801... OK
Unloading cpuid... OK

Next, run the following command to find the temperature.

sudo sensors

Sample output:

acpitz-virtual-0
Adapter: Virtual device
temp1:        +55.5°C  (crit = +84.0°C)

coretemp-isa-0000
Adapter: ISA adapter
Physical id 0:  +59.0°C  (high = +80.0°C, crit = +85.0°C)
Core 0:         +59.0°C  (high = +80.0°C, crit = +85.0°C)
Core 1:         +59.0°C  (high = +80.0°C, crit = +85.0°C)

As you in the above output, our system temperature is normal. Also, the output what is the higher and critical temperature. If you reached that critical level, It is recommended to take steps to reduce the temperature. Whether we shall power off the system or close/stop some running unwanted programs/processes if any.

If you’re using Laptop and having overheating issues, you might want to check the following article.

Displaying Temperature results in Fahrenheit

If you want to get the output in Fahrenheit instead of Celsius, use -f parameter.

Example:

sudo sensors -f

Sample output:

acpitz-virtual-0
Adapter: Virtual device
temp1:       +137.3°F  (crit = +183.2°F)

coretemp-isa-0000
Adapter: ISA adapter
Physical id 0: +141.8°F  (high = +176.0°F, crit = +185.0°F)
Core 0:        +141.8°F  (high = +176.0°F, crit = +185.0°F)
Core 1:        +140.0°F  (high = +176.0°F, crit = +185.0°F)

Use Lm-sensors plugins

Also, lm-sensors plugins are available for various desktop environments like GNOME, LXDE, XFCE. If you want to monitor your GUI desktop, you can download and install these plugins. These plugins can be installed via Synaptic package manager.

For example, to install plugin for XFCE desktop, open Synaptic package manager, search for XFCE4-sensors-plugin, and install it.

Synaptic Package Manager _001

For LXDE desktops, you can download and install sensors plugin here.

Want to check your hard disk temperature?

Install hddtemp package:

sudo apt-get install hddtemp

And, run the following command to find the temperature of your Hdd.

sudo hddtemp /dev/sda

Sample output:

/dev/sda: ST9500325AS: 41°C

Watching Temperature

To watch temperature values updating every two seconds, run the following command:

sudo watch sensors

Sample output:

sk@sk: ~_002

As you see in the above output, the temperature values will be updated after each 2 seconds.

That’s it. Cheers!

Lm-sensors homepage


Advertise here with BSA

---------------------------------------------------------------------
Lm-sensors: Monitoring CPU And System Hardware Temperature

Remove The Password Of A Password Protected PDF Files

$
0
0

This brief tutorial describes how to remove the password protection from the PDF files. Please note that we are not going to hack or crack the password of PDF file. Instead, we just remove the known password of the PDF file using qpdf application from Terminal. It is really easy and fun. Let us get started.

What is Qpdf?

From the man pages,

The  qpdf program is used to convert one PDF file to another equivalent PDF file. It is capable of performing a variety of transformations such as linearization (also known as web optimization or fast web viewing), encryption, and decryption of PDF files. It also has many  options for inspecting or checking PDF files, some of which are useful primarily to PDF developers

Install Qpdf

Install Qpdf in Debian based system using command:

sudo apt-get install qpdf

In RPM based systems, we can install it using command:

sudo yum install qpdf

Remove Password Protection from PDF file

I have a password protected PDF file in my home folder, and I know the password. Be mindful that you should have your PDF file password. Otherwise, you can’t remove the password protection using this method.

My password protected PDF file name is password.pdf.

When opening the pdf file, It asks me to enter the password.

password.pdf — Password Required_001

Ofcourse, I know the password ,and I can easily open it using the password. But I really don’t want password protection.

Using the following command, I am going to remove the password from the password.pdf file, and save it with a name nopassword.pdf in the home directory.

qpdf --password='mypassword' --decrypt password.pdf nopassword.pdf

Done!

Then, I opened the PDF file, It didn’t ask to enter the password. Very easy, isn’t it?

For more details about Qpdf, I suggest you to read the Qpdf manual.

Remove password Using Pdftk

Also, you do it using pdftk.

To install Pdftk, use the following command on Debian based system.

sudo apt-get install pdftk

On RPM based systems:

Refer the pdftk installation page.

After installing it, run the following command to remove the password.

pdftk password.pdf input_pw mypassword output nopassword.pdf

Thanks Mr.David to let us know about Pdftk via Comment.

That’s it. happy weekend!


Advertise here with BSA

---------------------------------------------------------------------
Remove The Password Of A Password Protected PDF Files

Install Sublime Text 3 On Linux [Quick Tip]

$
0
0

Sublime Text is one of the text editors I love so much. switching over Linux distributions,  I find it difficult sometimes installing it on some distros. Recently it was Fedora 21. Yes I know Fedy can be used to install Sublime Text 3 but it failed this time round.

I came across Simone Vittori’s post about how to install sublime on any distro thanks to his script.

To install open Terminal and run the command below:

curl -L git.io/sublimetext | sh
➜ ~ curl -L git.io/sublimetext | sh
 % Total % Received % Xferd Average Speed Time Time Time Current
 Dload Upload Total Spent Left Speed
 0 0 0 0 0 0 0 0 --:--:-- 0:00:03 --:--:-- 0
 0 0 0 0 0 0 0 0 --:--:-- 0:00:05 --:--:-- 0
 100 1286 100 1286 0 0 198 0 0:00:06 0:00:06 --:--:-- 1427
 % Total % Received % Xferd Average Speed Time Time Time Current
 Dload Upload Total Spent Left Speed
 100 7380k 100 7380k 0 0 289k 0 0:00:25 0:00:25 --:--:-- 457k
 [sudo] password for seth:
 % Total % Received % Xferd Average Speed Time Time Time Current
 Dload Upload Total Spent Left Speed
 100 170k 100 170k 0 0 57142 0 0:00:03 0:00:03 --:--:-- 57160
Sublime Text 3 installed successfully!
Run with: subl

You should see Sublime Text 3 (Build 3065) installed now.

Credit


Advertise here with BSA

---------------------------------------------------------------------
Install Sublime Text 3 On Linux [Quick Tip]

Install VMware Tools On Linux

$
0
0

This method should work on ESXi/Vsphere/Vmware Workstation. Please follow the following instructions, It is same for installing vmware tools for linux.

How to install VMware Tools in a CentOS Guest

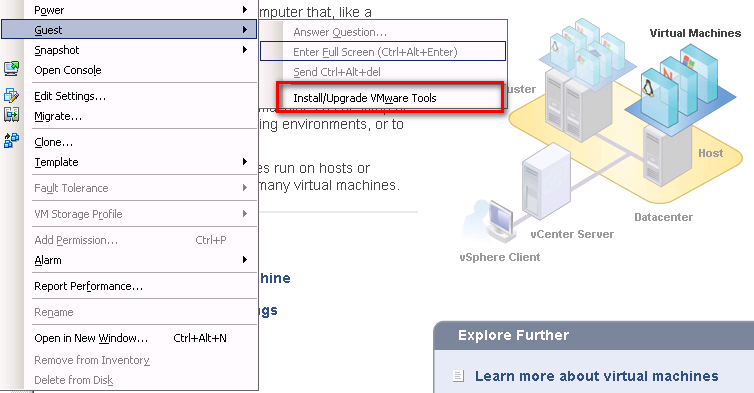
First, you must select option for Install/Upgrade Tools in your eSXI./Vshere/Vmware Workstation  To this,
Right click on virtual machine→ Guest Menu → Install/Upgrade Vmware Tools.

For Fusion: Virtual Machine > Install VMware Tools.
For Workstation: VM > Install VMware Tools.
For Player: Player > Manage > Install VMware Tools.

vmware

install Development tools first

CentOS:

yum groupinstall "Development Tools"

Ubuntu:

apt-get install build-essential linux-headers-$(uname -r)

Now, copy and paste the following commands in your terminal:

mkdir /mnt/cdrom
mount /dev/cdrom /mnt/cdrom
cp /mnt/cdrom/VMwareTools-*.tar.gz /tmp
umount /mnt/cdrom
tar zxf /tmp/VMwareTools*.tar.gz -C /tmp
cd /tmp/vmware-tools-distrib/
./vmware-install.pl –default

Please  follow  the instructions one by one.

Now,

Remove the installation files

rm f /tmp/VMwareTools*.tar.gz
rm -rf /tmp/vmware-tools-distrib

Done!


Advertise here with BSA

---------------------------------------------------------------------
Install VMware Tools On Linux

VeraCrypt: Secure Your Data On An Encrypted Volume

$
0
0

Introduction

As you may know, CIA, Confidentiality/Integrity/Availability, is the main key elements of Information Security. The main Job of a System Administrator/Security expert is to protect the data from unauthorized access, use, disclosure, disruption, destruction, and modification. There are n number of tools and methods are available out there to secure your data. The one we will discuss today is VeraCrypt.

VeraCrypt is a free disk encryption software. It is based on TrueCrypt, and solves many vulnerabilities and security issues found in TrueCrypt. Using VeraCrypt anyone can make an encrypted volume. Whenever you store data in VeraCrypt volume, the data will automatically be encrypted before it is saved, and decrypted after it is loaded, without any user intervention. Nobody can steal/read/edit your data on the encrypted volume without using the correct password/keyfile(s). The entire filesystem will be encrypted including file names, folder names, contents of every file, free space, meta data, etc.

You can store files on VeraCrypt volumes as the way you do in normal volumes. Data that are being written on VeraCrypt volumes will be encrypted automatically, and data that are being copied or read from the encrypted volumes will be decrypted automatically. Once you unmount the VeraCrypt vloume, the data are inaccessible and encrypted. To access the data, you should mount the VeraCrypt volume with the correct password and/or keyfile. VeraCrypt is completely free for use, and it works well on GNU/Linux, Windows, and Mac OS X.

In this tutorial, we will see how to create a encrypted volume in local and external drive. This guide is tested on Ubuntu 14.04, and is worked for me as explained.

Installation

Download the latest version from the VeraCrypt download page.

Extract the tar file using command:

tar -xjvf veracrypt-1.0f-1-setup.tar.bz2

The above command will extract and save the files in the current directory. typically, there will be for files. Two files for command-line installation(x86 & x64 bit), and two files for GUI mode installation. I am going to install the 64bit version GUI file.

You will see the following screen. Click Install Veracrypt.

xmessage_001

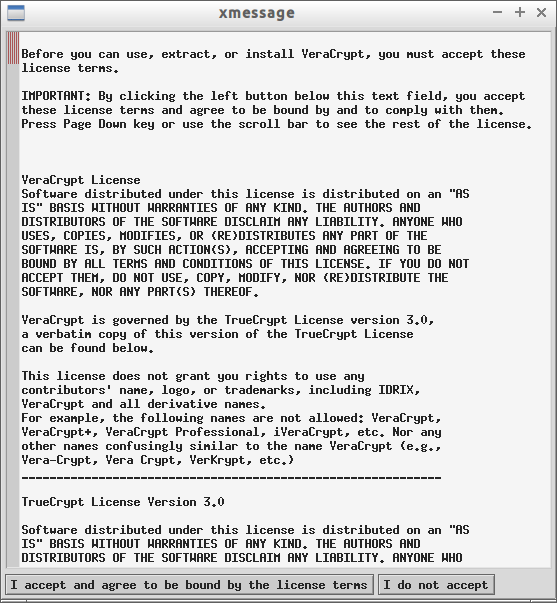
Accept the license agreement.

xmessage_002

Click OK to continue.

xmessage_003

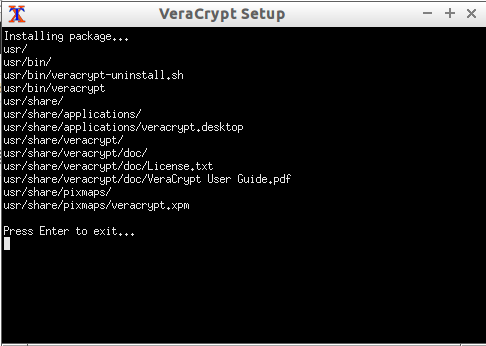
Finally press Enter to exit and complete the installation.

VeraCrypt Setup_004

We have successfully installed VeraCrypt. Let us see how to use and encrypt a volume.

1. Creating VeraCrypt Container

In this method, we will create an encrypted container inside a file. Let us see how to do it.

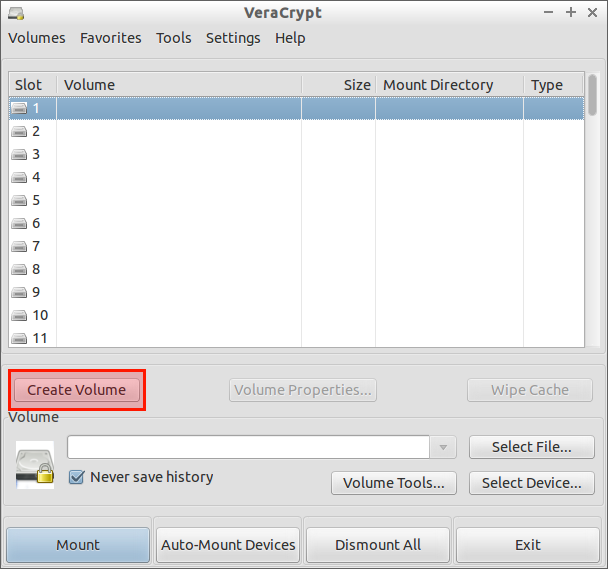
Launch it either from the Menu or Dash. VeraCrypt interface will look like below.

Click Create Volume.

 VeraCrypt_001

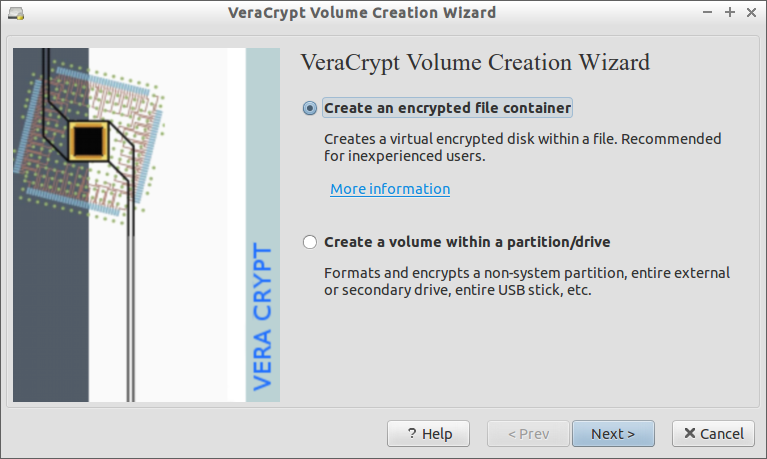
Select Create an encrypted container option.

VeraCrypt Volume Creation Wizard_002

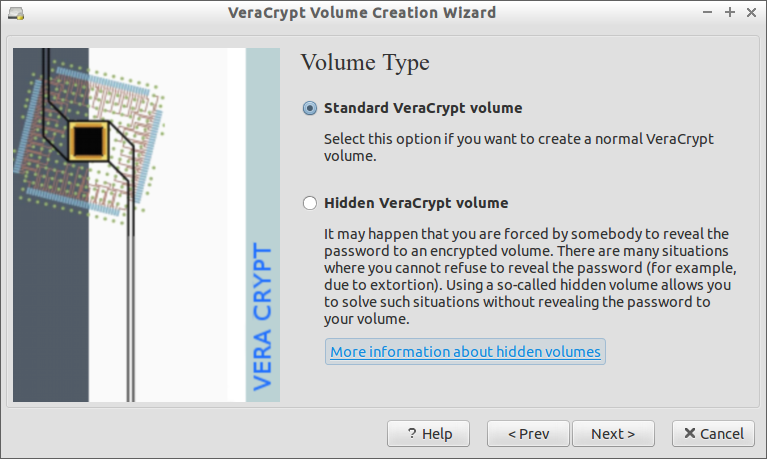
Select Standard VeraCrypt volume.

VeraCrypt Volume Creation Wizard_003

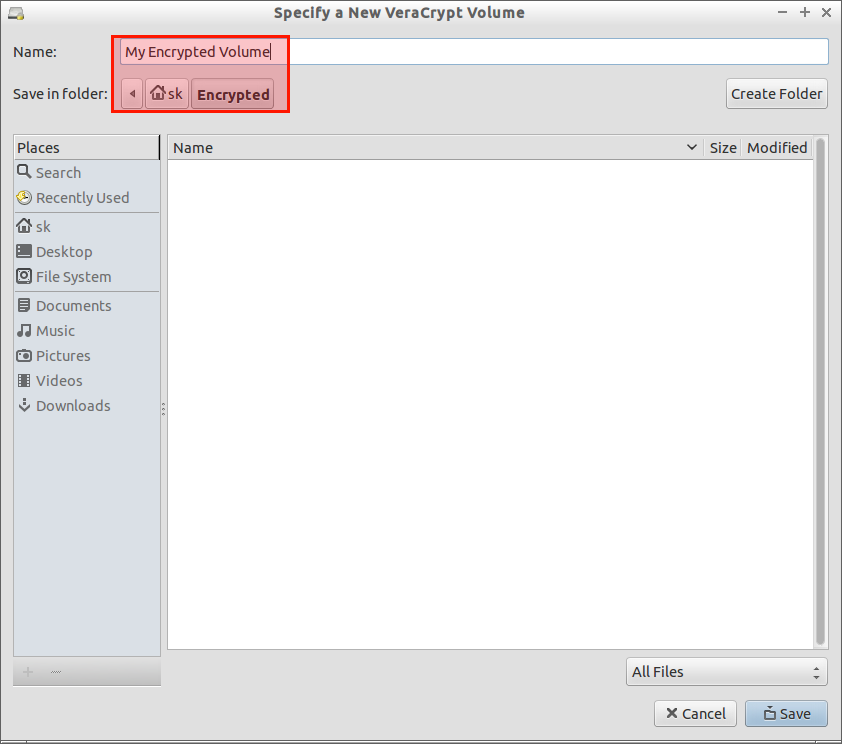
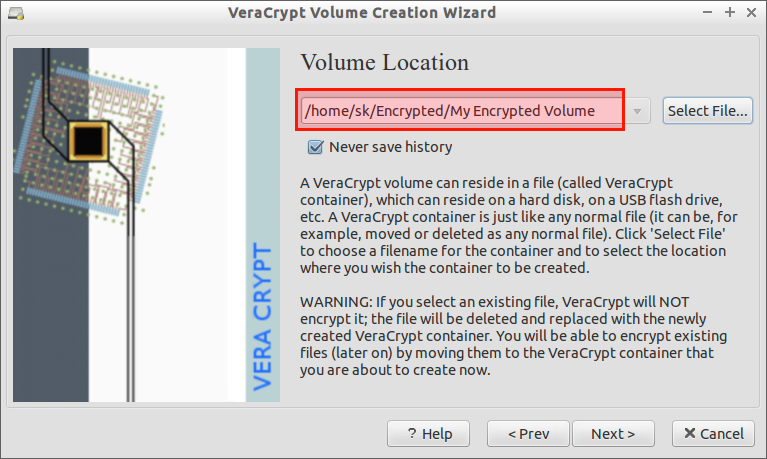
Next, you have to specify where you want to store the encrypted volume. In my case, I created a folder called “Encrypted” in my Home folder. So, I am going to use the folder to create and mount VeraCrypt volume. Also, you have to name the file container.

VeraCrypt Volume Creation Wizard_004

Specify a New VeraCrypt Volume_005

Click Next after selecting the Volume location.

VeraCrypt Volume Creation Wizard_006

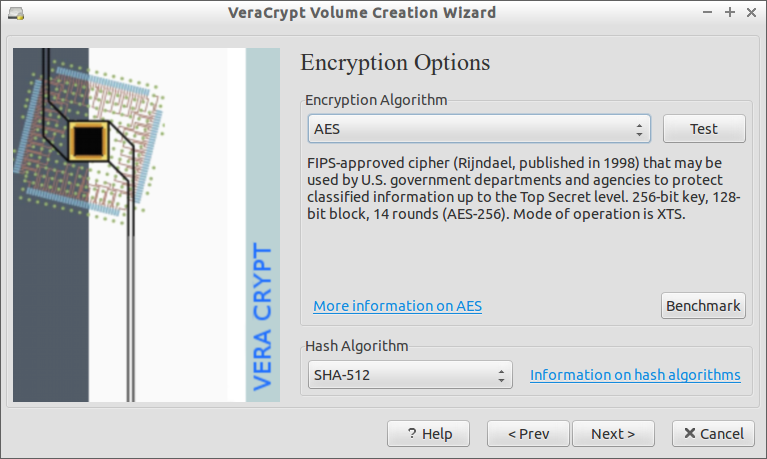
Select the Encryption Algorithm. You can choose any algorithm type. I will go with default selected encryption algorithm.

VeraCrypt Volume Creation Wizard_010

Specify the size of the container in KB, MB, or GB.

VeraCrypt Volume Creation Wizard_007

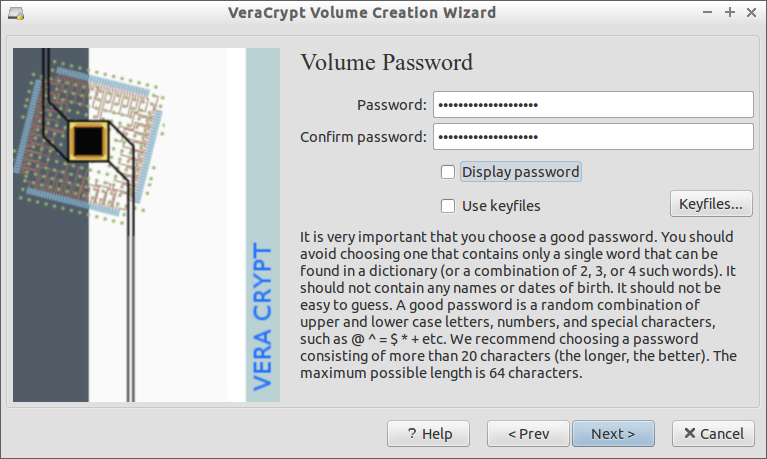
Now, we reached the important part. You should enter a strong a password consisting of minimum 20 characters, and maximum 64 characters. The password must contain a random combination of lower/upper case letters, numbers, and special characters.

VeraCrypt Volume Creation Wizard_011

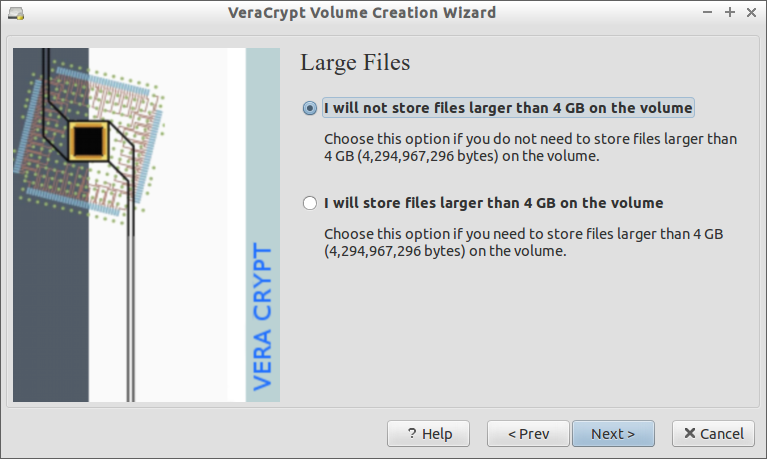
Now, you have to choose any one of the option. If you want to store files larger than 4GB or less than 4GB. I will go with first option.

VeraCrypt Volume Creation Wizard_008

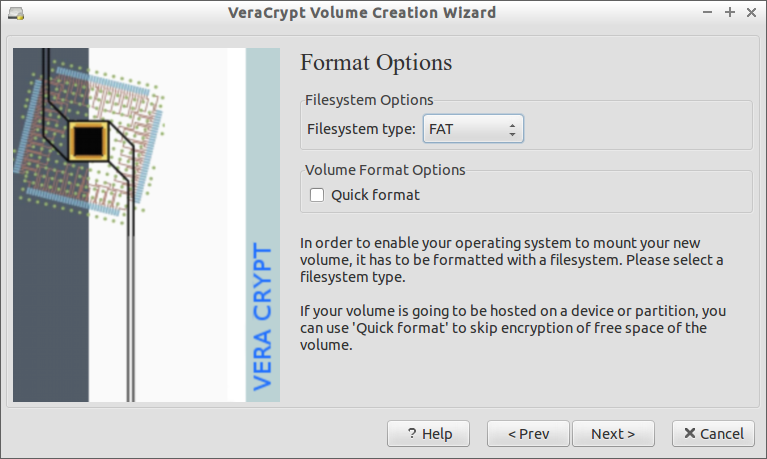
Select the file system.

VeraCrypt Volume Creation Wizard_012

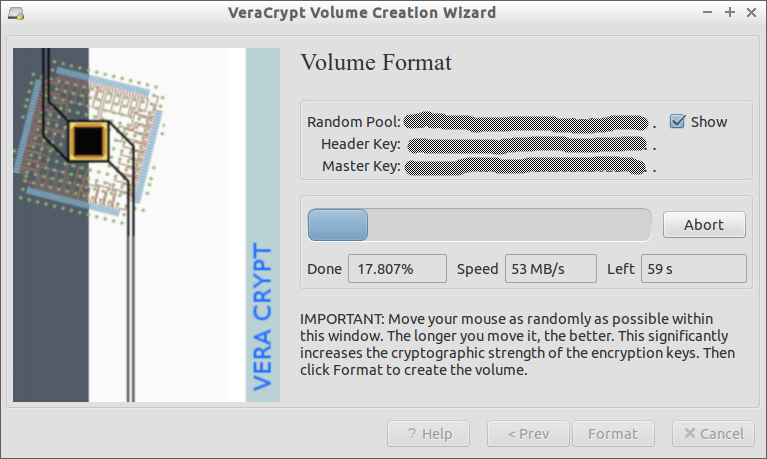
Move your mouse pointer as randomly as possible within the following window atleast 30 seconds. This significantly increases the cryptographic strength of the encryption keys. The longer you move it, the better.

VeraCrypt Volume Creation Wizard_013

I did this for 50 seconds. Finally, click Format.

VeraCrypt Volume Creation Wizard_014

The format process will take few minutes depending upon the size.

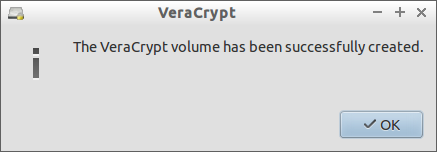
Finally, you will see a successful installation completed wizard. Click Ok.

VeraCrypt_015

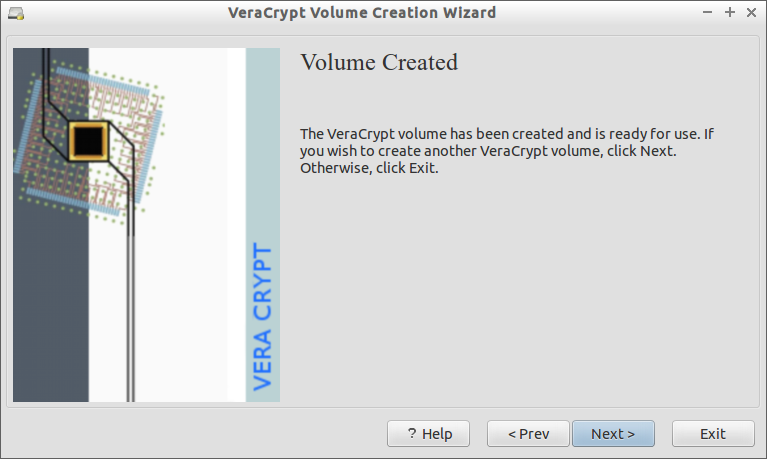
If you wish to create another volume, click Next, else click Exit.

VeraCrypt Volume Creation Wizard_016

That’s it. We successfully created the Volume. We will see how to mount and dismount it.

Mount/Dismount Volumes

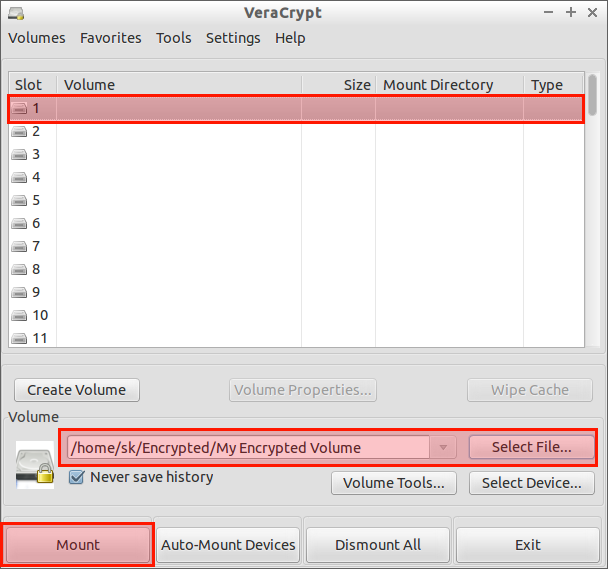
Once you created the encrypted volumes, go back to the main window of VeraCrypt. Select a slot, browser to the file container location, and click Mount.

VeraCrypt_009

Enter your VeraCrypt password.

Enter password for "-home-sk-Encrypted-My Encrypted Volume"_010

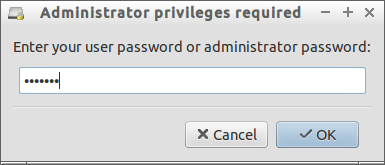
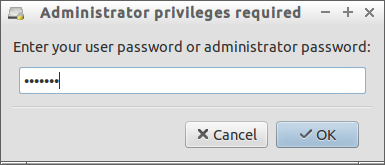
Then, enter your root user password of your local system.

Administrator privileges required_011

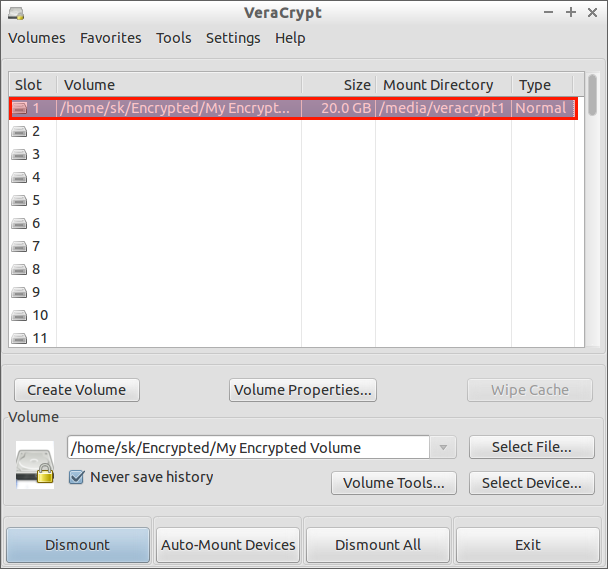
Voila! The virtual drive has been created and mounted.

VeraCrypt_012

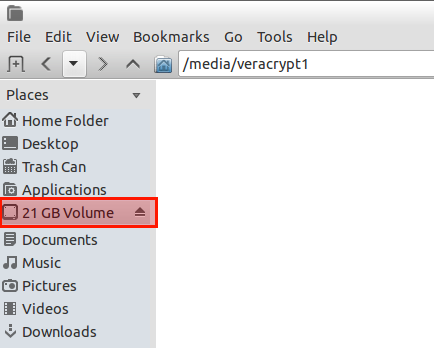
You can check it on your file manager too.

Selection_013

Now, you can use this virtual disk as the way you use a normal volume. Store the highly confidential data in the VeraCrypt volume and be relax. Nobody can steal your data without the correct password or/and keyfile(s).

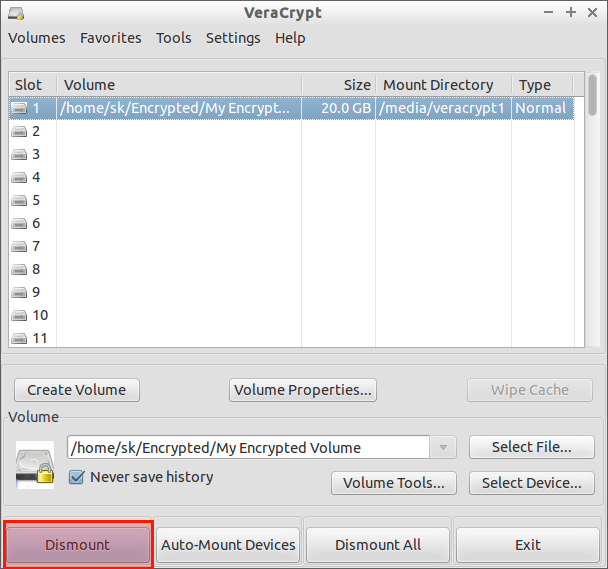
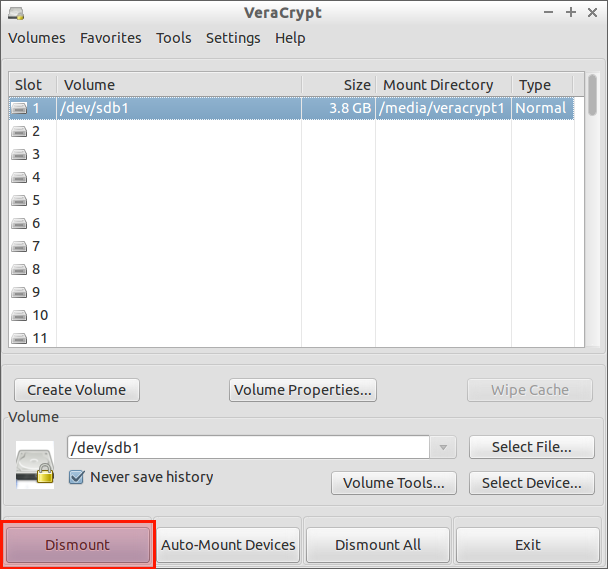
To dismount the volume, click on the Dismount button on the VeraCrypt main interface.

VeraCrypt_014

Now, your volume will be dismounted. You or anyone no longer can access the volume. The data stored in the volume is inaccessible, safe and encrypted.

What we have seen so far is just a created a file in our local hard disk, and mount the encrypted volume on it. The second part describes how to make an encrypted volume on external drives like USB thumb drive.

2. Create Encrypted Partition/Drive

This is method is quite same as above, but with some little changes.

Launch VeraCrypt either from the Menu or Dash.

Now, Plug your USB drive, and make sure there aren’t any important data on it.

Click Create Volume.

VeraCrypt_005

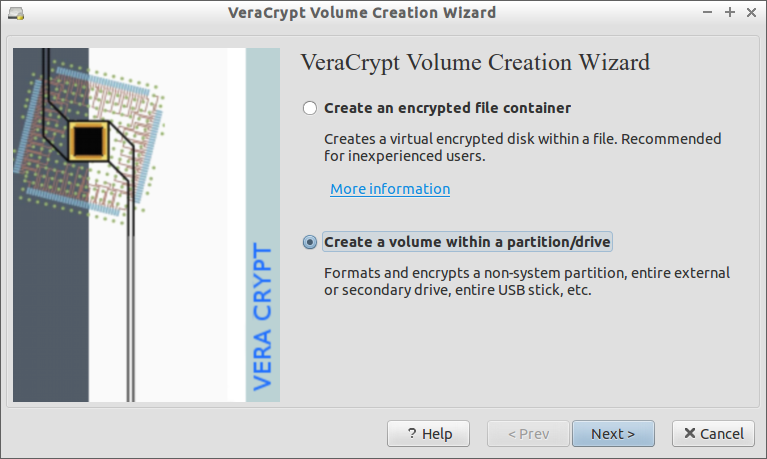
Select Create a volume within a partition/drive option and click Next.

VeraCrypt Volume Creation Wizard_006

We have to choose whether you want to create a standard or Hidden veracrypt volume. I will go with default option. So I selected the first option: Standard VeraCrypt volume.

VeraCrypt Volume Creation Wizard_007

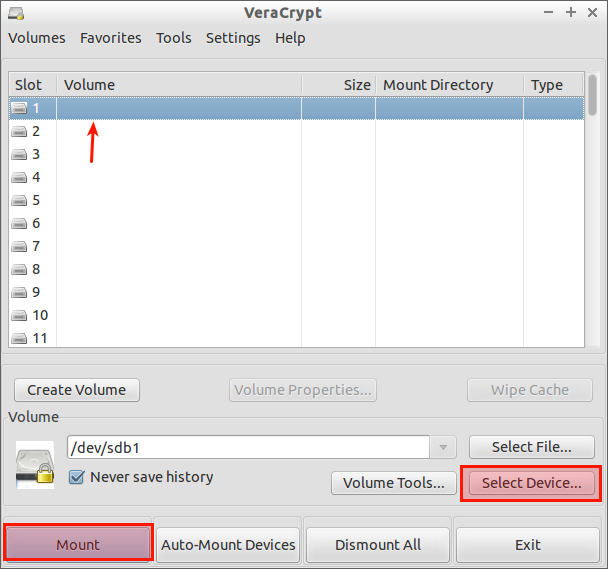
Now, select your device that you want to encrypt.

In my case, I selected my USB drive. And, make sure “Never save history” option is checked.

VeraCrypt Volume Creation Wizard_008

You may now be asked to enter your root user password.

Administrator privileges required_009

Select the Encryption Algorithm. You can choose any algorithm type. I will go with default selected encryption algorithm.

VeraCrypt Volume Creation Wizard_010

Now, we reached the important part. You should enter a strong a password consisting of minimum 20 characters, and maximum 64 characters. The password must contain a random combination of lower/upper case letters, numbers, and special characters.

VeraCrypt Volume Creation Wizard_011

Select the file system.

VeraCrypt Volume Creation Wizard_012

Move your mouse pointer as randomly as possible within the following window atleast 30 seconds. This significantly increases the cryptographic strength of the encryption keys. The longer you move it, the better.

VeraCrypt Volume Creation Wizard_013

I did this for 50 seconds. Finally, click Format.

VeraCrypt Volume Creation Wizard_014

The format process will take few minutes depending upon the size.

Finally, you will see a successful installation completed wizard. Click Ok.

VeraCrypt_015

If you wish to create another volume, click Next, else click Exit.

VeraCrypt Volume Creation Wizard_016

Mount/Dismount Volumes

Once you created the encrypted volumes, go back to the main window of VeraCrypt, select a slot and click Mount.

VeraCrypt_020

Enter the password.

Enter password for "-dev-sdb1"_021

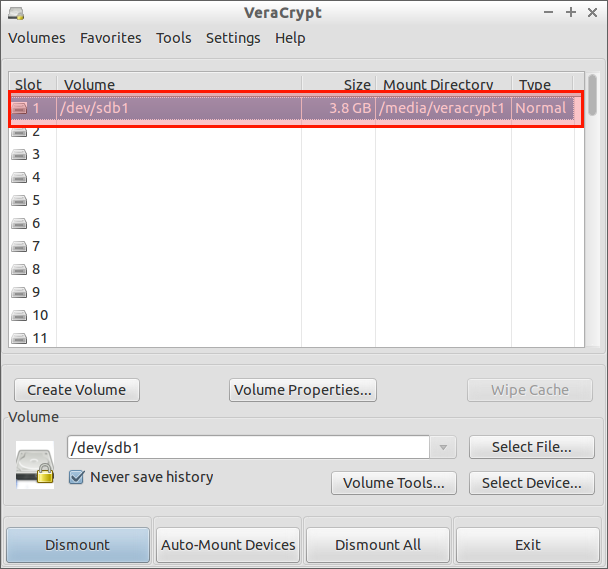
After that, you’ll see the USB drive is mounted.

VeraCrypt_022

Now, open your file manager, and start using the encrypted volumes.

To dismount the volume, simply click on the Dismount in the VeraCrypt main window.

VeraCrypt_025

Uninstallation

If you not satisfy with VeraCrypt, you can uninstall it using command:

sudo /usr/bin/veracrypt-uninstall.sh

For more detailed usage details, refer the official VeraCrypt Documentation.

Conclusion

We have seen how to install VeraCrypt on Ubuntu and create encrypted volumes, and unmount them when not used. As far as I know, VeraCrypt is a must have and useful tool if you’re having some confidential data. Try and find yourself. You won’t be disappointed.

Cheers!


Advertise here with BSA

---------------------------------------------------------------------
VeraCrypt: Secure Your Data On An Encrypted Volume

Linux Basics: How To Check The State Of A Network Interface Card

$
0
0

Normally, we can easily check the state of a network interface card like whether the cable plugged in to the slot or the network card is up or down in Graphical mode. What if you have only command line mode? Ofcourse, you can turn around the system and check for the cable is properly plugged in, or you can do the same easily from your Terminal. Here is how to do that. This method is almost same for Debian and RPM based systems.

Check Network Card State

I have two ethernet cards on my laptop. One, eth0,  is wired, And another, wlan0, is wireless.

Let us check the state of the eth0.

cat /sys/class/net/eth0/carrier

Sample output:

0

Or, use the following command to check the status.

cat /sys/class/net/eth0/operstate

Sample output:

down

As you see in the above results, the NIC is down or cable is not connected.

Let me plug a network cable to the eth0 slot, and check again.

After plugged in the cable, I executed the above commands:

cat /sys/class/net/eth0/carrier

Sample output:

1

Or,

cat /sys/class/net/eth0/operstate

Sample output:

up

Voila, the eth0 is up or the cable is connected to eth0.

Be mindful, it doesn’t mean that the IP address has been assigned to the eth0. The cable is just connected to that slot. That’s all.

Let us check for the wlan0 state.

cat /sys/class/net/wlan0/carrier

Sample output:

1

The result is 1, which means the wlan0 is up and connected.

Or,

cat /sys/class/net/wlan0/operstate

Sample output:

up

Likewise, you can check all the network cards on your machine.

Cheers!


Advertise here with BSA

---------------------------------------------------------------------
Linux Basics: How To Check The State Of A Network Interface Card

How To Send Alerts From Nagios Core Using Gmail And Yahoo

$
0
0

Introduction

One of the most important feature of the monitoring platform is the notification system; by default  they use the local mail daemon (postfix,mail,exim) installed on the server to send the notifications.

Using local mail daemon has many issues :

  • You need to install and configure your smtp server.
  • Maybe your mail server go down so you can’t receive the alert.
  • Maybe this kind of emails from a not verified source like nagios can be filtered by the same company antispam system.

In order to avoid all issues, In this article I am going to explain how to send alert from monitoring tool Nagios Core using an external smtp server with authentication like Gmail and Yahoo.

This task was not so easy since communicating with Gmail through a linux server was requiring permissions and certifications but with sendEmail you can do it easily.

Installation and Configuration Of SendEmail

SendEmail is an email program for sending SMTP mail from a command line. SendEmail is a lightweight program written in Perl and is unique in that it requires NO MODULES. It has an intuitive and flexible set of command-line options, making it very easy to learn and use.

SendEmail is licensed under the GNU GPL and supported many platforms like: Linux, BSD, OS X, Windows 98, Windows NT, Windows 2000, & Windows XP

System Requirements

SendEmail requires certain technical requirements to be met for the store to operate properly. You should check to see that these server requirements are provided and installed on your monitoring servers.

The following commands should be run as root user privileges.

To install those requirements use this command:

On Ubuntu:

apt-get install libio-socket-ssl-perl libnet-ssleay-perl perl

On CentOS:

yum install libio-socket-ssl-perl libnet-ssleay-perl perl

In order to send email via gmail you also need additional libraries “Net::SSLeay” and “IO::Socket::SSL” which are needed for authentication.

To install those libraries use this command:

On Ubuntu:

apt-get install 'perl(Net::SSLeay)' 'perl(IO::Socket::SSL)'

On CentOS:

yum install 'perl(Net::SSLeay)' 'perl(IO::Socket::SSL)'

Download and Installation of sendEmail

In order to start the installation , download the sendEmail tar archive:

wget http://caspian.dotconf.net/menu/Software/SendEmail/sendEmail-v1.56.tar.gz

Then extract it:

tar -zxvf sendEmail-v1.56.tar.gz

Then copy the sendEmail script to /usr/local/bin. Make use that you have root permission.

sudo cp -a sendEmail-v1.XX/sendEmail /usr/local/bin

The script needs to be executable, so go make it.

sudo chmod +x /usr/local/bin/sendEmail

Then, go ahead and run:

sendEmail

If everything work fine, you will see a usage summary of sendEmail.

send

In order to troubleshoot any eventual problem, you can  create a log file fro senEmail.

touch /var/log/sendEmail
chmod 666 /var/log/sendEmail

In order to test sending an email via Gmail, the command should look like this:

sendEmail -v -f $username -s $host -xu $username -xp $password -t $recipient -o tls=yes -u $subject -m $content

Configure Nagios Core to Send notification Using Gmail

In order to configure Nagios core to send alert using sendEmail and external smtp server like Gmail, you need to flow those steps:

Start by editing the resource.cfg file located in /usr/local/nagios/etc/resource.cfg :

vi /usr/local/nagios/etc/resource.cfg

Add the following lines with your particular smtp configuration:

$USER5$=email@address.tld
$USER7$=smtp.server.tld:25
#If you don’t use smtp authentication skip this variables and use the version B) of commands.cfg
$USER9$=username
$USER10$=password
On the case of Gmail smtp you can see this example:
$USER5$=email@gmail.com
$USER7$=smtp.gmail.com:587
$USER9$=email
$USER10$=password
Save the file resource.cfg and exit.
After this go under /usr/local/nagios/etc/objects/ and edit the file commands.cfg but that perform a backup of the config file:
cd /usr/local/nagios/etc/objects/
cp commands.cfg commands.cfg.old
Edit the commands.cfg file and you will find two commands ‘notify-host-by-email’ and ‘notify-service-by-email’
A – SMTP AUTHENTICATION COMMANDS
Now, if you use SMTP authentication replace the two commands with the following:
# 'notify-host-by-email' command definition define command{command_name notify-host-by-email command_line /usr/bin/printf "%b" "***** Nagios *****\n\nNotification Type: $NOTIFICATIONTYPE$\nHost: $HOSTNAME$\nState: $HOSTSTATE$\nAddress: $HOSTADDRESS$\nInfo: $HOSTOUTPUT$\n\nDate/Time: $LONGDATETIME$\n" | /usr/local/bin/sendEmail -s $USER7$ -xu $USER9$ -xp $USER10$ -t $CONTACTEMAIL$ -f $USER5$ -l /var/log/sendEmail -u "** $NOTIFICATIONTYPE$ Host Alert: $HOSTNAME$ is $HOSTSTATE$ **" -m "***** Nagios *****\n\nNotification Type: $NOTIFICATIONTYPE$\nHost: $HOSTNAME$\nState: $HOSTSTATE$\nAddress: $HOSTADDRESS$\nInfo: $HOSTOUTPUT$\n\nDate/Time: $LONGDATETIME$\n" }
# 'notify-service-by-email' command definition define command{command_name notify-service-by-email command_line /usr/bin/printf "%b" "***** Nagios *****\n\nNotification Type: $NOTIFICATIONTYPE$\n\nService: $SERVICEDESC$\nHost: $HOSTALIAS$\nAddress: $HOSTADDRESS$\nState: $SERVICESTATE$\n\nDate/Time: $LONGDATETIME$\n\nAdditional Info:\n\n$SERVICEOUTPUT$" | /usr/local/bin/sendEmail -s $USER7$ -xu $USER9$ -xp $USER10$ -t $CONTACTEMAIL$ -f $USER5$ -l /var/log/sendEmail -u "** $NOTIFICATIONTYPE$ Service Alert: $HOSTALIAS$/$SERVICEDESC$ is $SERVICESTATE$ **" -m "***** Nagios *****\n\nNotification Type: $NOTIFICATIONTYPE$\n\nService: $SERVICEDESC$\nHost: $HOSTALIAS$\nAddress: $HOSTADDRESS$\nState: $SERVICESTATE$\n\nDate/Time: $LONGDATETIME$\n\nAdditional Info:\n\n$SERVICEOUTPUT$" }
B- NO SMTP-AUTHENTICATION 
This is pretty much the same but without passing the authentication triggers to sendemail:
# 'notify-host-by-email' command definition define command{command_name notify-host-by-email command_line /usr/bin/printf "%b" "***** Nagios *****\n\nNotification Type: $NOTIFICATIONTYPE$\nHost: $HOSTNAME$\nState: $HOSTSTATE$\nAddress: $HOSTADDRESS$\nInfo: $HOSTOUTPUT$\n\nDate/Time: $LONGDATETIME$\n" | /usr/local/bin/sendEmail -s $USER7$ -t $CONTACTEMAIL$ -f $USER5$ -l /var/log/sendEmail -u "** $NOTIFICATIONTYPE$ Host Alert: $HOSTNAME$ is $HOSTSTATE$ **" -m "***** Nagios *****\n\nNotification Type: $NOTIFICATIONTYPE$\nHost: $HOSTNAME$\nState: $HOSTSTATE$\nAddress: $HOSTADDRESS$\nInfo: $HOSTOUTPUT$\n\nDate/Time: $LONGDATETIME$\n" }
# 'notify-service-by-email' command definition define command{command_name notify-service-by-email command_line /usr/bin/printf "%b" "***** Nagios *****\n\nNotification Type: $NOTIFICATIONTYPE$\n\nService: $SERVICEDESC$\nHost: $HOSTALIAS$\nAddress: $HOSTADDRESS$\nState: $SERVICESTATE$\n\nDate/Time: $LONGDATETIME$\n\nAdditional Info:\n\n$SERVICEOUTPUT$" | /usr/local/bin/sendEmail -s $USER7$ -t $CONTACTEMAIL$ -f $USER5$ -l /var/log/sendEmail -u "** $NOTIFICATIONTYPE$ Service Alert: $HOSTALIAS$/$SERVICEDESC$ is $SERVICESTATE$ **" -m "***** Nagios *****\n\nNotification Type: $NOTIFICATIONTYPE$\n\nService: $SERVICEDESC$\nHost: $HOSTALIAS$\nAddress: $HOSTADDRESS$\nState: $SERVICESTATE$\n\nDate/Time: $LONGDATETIME$\n\nAdditional Info:\n\n$SERVICEOUTPUT$" }
Now the configuration is finished. Before applying the new configuration, run the following command to check for any error or mistake:
/usr/local/nagios/bin/nagios -v /usr/local/nagios/etc/nagios.cfg

If there are no errors, restart the nagios service:

service nagios restart

To troubleshoot the sendemail command run the following to check in the log file:

tail -f /var/log/sendEmail

That all!.

Thanks for reading my article.


Advertise here with BSA

---------------------------------------------------------------------
How To Send Alerts From Nagios Core Using Gmail And Yahoo


How To Install Hiawatha Webserver On CentOS 7

$
0
0

In this tutorial I will teach you guys how to install Hiawatha on your CentOS 7 machine. But, what is it?

About Hiawatha

Hiawatha is a lightweight webserver which is built with security in mind both in code and features, preventing common web application attacks such as sql injection, cross-site scripting(xss) and CSRF. According to the official page you don’t need to be an expert on http or cgi to use this webserver as it is very easy to use.

This fully functional webserver started back in January 2002 as an opensource project in order to provide a very secure webserver to the user and also easy configuration syntax. Special techniques are used on the webserver to make it run even on old hardware, the fact that someone managed to run it on a raspberry pi means alot, doesn’t it?

Some Features Of Hiawatha

There are many features present in the Hiawatha webserver. It supports IPV6 which makes a very prepared webserver for the future, control the access to your websites via Basic or Digest HTTP authentication or by IP address, execution of CGI scripts and SSL.

Security is the key feature of this webserver, offering great protection from dangerous malicious attacks such as sql injections, xss attacks and csrf.

Hiawatha allows you to keep track of all your webservers via a PHP application called Hiawatha Monitor. There is also a CommandChannel which can be used to get detailed information on a single webserver or even control it.

“The Hiawatha Monitor is a monitoring tool for the Hiawatha webserver. It can be used to keep track of the performance and security of all your Hiawatha webservers via one single interface. It’s not a replacement for analytics software or the local logfiles, but it gives you a quick and easy overview of how your webservers are performing and which ones require some attention. The Hiawatha Monitor is a PHP5 web application with a MySQL database backend. It requires the cron daemon for periodic downloading of statistical information from the web servers it monitors.”, reads the official documentation.

Other features include:

  • Speed
  • URL rewriting
  • Reverse Proxy

Installation On CentOS 7

The installation of Hiawatha on CentOS 7 is very easy, easier than any installation you have done with another webserver. Open a new terminal tab and run the following command to download a repo we need before going any further.

wget http://anku.ecualinux.com/7/x86_64/anku-release-8-1.noarch.rpm

The following screenshot will help you to understand what is going on.

Once the download is finished, clear your screen and run the following command to become root.

su root

The rpm command will help us to install the rpm file we downloaded.

rpm -ivh anku-release-8-1.noarch.rpm

If the installation succeeds you will see the following output.

Run the following command to clear the screen.

clear

The yum program is used to maintain systems using rpm. Now it is time to enable the repo we just added and proceed with the installation.

yum --enablerepo=anku install hiawatha -y

When the installation starts you will see the following.

If the installation of the Hiawatha webserver succeeds you will see the following on your screen.

Once the installation is finished start the server by using the command service hiawatha start like shown below.

service hiawatha start

Then open a new tab on your web browser and visit http://www.127.0.0.1.

Done!


Advertise here with BSA

---------------------------------------------------------------------
How To Install Hiawatha Webserver On CentOS 7

How To Install VirtualMin On CentOS

$
0
0

Introduction

One of the most important consideration for a Linux system administrator is how to easily manage and configure  the server. Control Panel software is a the best solution to make that. It allows a user to configure and administer a server without the need to log in on the command line using a web interface. One of the more popular control panel is Virtualmin.

Virtualmin is a Webmin module for managing multiple virtual hosts through a single interface, like Plesk or Cpanel. It supports the creation and management of Apache virtual hosts, BIND DNS domains, MySQL databases, and mailboxes and aliases with Sendmail or Postfix. It makes use of the existing Webmin modules for these servers, and so should work with any existing system configuration, rather than needing it’s own mail server, web server and so on.

Two versions of Virtualmin exist:

  • Virtualmin GPL wichich is a free and the open source version.
  • Virtualmin Pro wichich is a the commercail version of Virtualmin.

In this article we will show you how to install Virtualmin under Centos 6.5.

System Requirements

It’s highly recommends using a freshly installed server to prevent conflicts when you start the installation and you need to update the system to ensure that we have all of the latest software installed.

sudo yum -y update

Also you need to make sure that you server has a hostname.Use the following command to check your current hostname.

hostname -f

And use the following command to change your hostname

hostname server.doamin.com

Download and install VirtualMin

Virtualmin can be installed in a number of ways an automated install script or manual Installation.It’s strongly recommend that you use the automated install script to install Virtualmin because the script contains the standard package management features of your OS, and software repositoriesof VirtualMin

To download the VirtualMin installer. Type the following to download it:

wget http://software.virtualmin.com/gpl/scripts/install.sh

Now it is time to install VirtualMin. To do so, use the command below:

sudo sh install.sh

You will be prompted with a license agreement. Press Y followed by Enter to continue.

It will begin performing several checks and installing the required components.

Once it has completed you should see a line similar to the following:

ssapi mod_ssl ruby ruby-devel rubygems perl-XML-Simple perl-Crypt-SSLeay: Succeeded.

Completing the installation

When the install script has finished installing, you can log  to log into your VirtualMin console. To do this point your web browser to  the following URL:

https://server.domain.com:10000/ or https://ip-address-of-server:10000

There you can login with your root username and password. Once you are logged in the “Post-Installation Wizard”, it will begin to configure your Virtualmin installation.

webmin

That all for this article. Hope this help you to install virtualmin.

The next article will be how to configure virtualmin, please hold on and don’t forget to share this article.


Advertise here with BSA

---------------------------------------------------------------------
How To Install VirtualMin On CentOS

Budgie – An Elegant, Lightweight And Simple Desktop

$
0
0

About Budgie

Budgie is the flagship desktop of the Evolve OS Linux Distribution. It is designed with the modern user in mind, it focuses on simplicity and elegance. A huge advantage for the Budgie desktop is that it is not a fork of another project, but rather one written from scratch with integration in mind. The Budgie Desktop tightly integrates with the GNOME stack, employing underlying technologies to offer an alternative desktop experience. In the spirit of open source, the project is compatible with and available for other Linux distributions including Fedora and openSUSE etc. Budgie can now emulate the look and feel of the GNOME 2 desktop, optionally, via a setting in the panel preferences.

Installation

On Ubuntu and derivatives:

sudo add-apt-repository ppa:evolve-os/ppa
sudo apt-get update
sudo apt-get install budgie-desktop

On Fedora 21, install Budgie as shown below with root user:

cd /etc/yum.repos.d/
wget http://download.opensuse.org/repositories/home:ikeydoherty:evolve/Fedora_21/home:ikeydoherty:evolve.repo
yum install budgie-desktop

On Fedora 20, install Budgie as shown below with root user:

cd /etc/yum.repos.d/
wget http://download.opensuse.org/repositories/home:ikeydoherty:evolve/Fedora_20/home:ikeydoherty:evolve.repo
yum install budgie-desktop

On openSUSE:

For openSUSE Factory run the following as root:

zypper addrepo http://download.opensuse.org/repositories/home:ikeydoherty:evolve/openSUSE_Factory/home:ikeydoherty:evolve.repo
zypper refresh
zypper install budgie-desktop

For openSUSE 13.2 run the following as root:

zypper addrepo http://download.opensuse.org/repositories/home:ikeydoherty:evolve/openSUSE_13.2/home:ikeydoherty:evolve.repo
zypper refresh
zypper install budgie-desktop

For openSUSE 13.1 run the following as root:

zypper addrepo http://download.opensuse.org/repositories/home:ikeydoherty:evolve/openSUSE_13.1/home:ikeydoherty:evolve.repo
zypper refresh
zypper install budgie-desktop

For GNOME STABLE 3.12 openSUSE 13.1 run the following as root:

zypper addrepo http://download.opensuse.org/repositories/home:ikeydoherty:evolve/GNOME_STABLE_3.12_openSUSE_13.1/home:ikeydoherty:evolve.repo
zypper refresh
zypper install budgie-desktop

Or you can directly download the binary files and install it.

Packages for openSUSE Factory:
Packages for openSUSE 13.2:
Packages for openSUSE 13.1:
Packages for GNOME STABLE 3.12 openSUSE 13.1:

After downloading the required rpm, install it as shown below with root user.

rpm -Uvh budgie-desktop-8.1-3.1.i586.rpm

Using Budgie desktop

Now log out and select Budgie as your default DE and log in to your system.

Workspace 1_005

Be mindful that Budgie is still under heavy development. Your system may crash, hang, or your Budgie menu will not even show the installed applications.

Hope the developers will release the stable version soon.

That’s it. More details can be found here.

Cheers!


Advertise here with BSA

---------------------------------------------------------------------
Budgie – An Elegant, Lightweight And Simple Desktop

Linux Basics: How To Find Maximum Supported RAM By Your System

$
0
0

Mostly, you will find maximum supported RAM by your system from the BIOS, Product catalog, or manuals. Here is the simple, yet useful trick, to find out maximum supported RAM using Dmidecode without opening the system chassis or referring the BIOS, product catalogs.

What is Dmidecode?

As you may know, Dmidecode is a tool for dumping a computer’s DMI (some say SMBIOS) table contents in a human-readable format. This table contains a description of the system’s hardware components, as well as other useful pieces of information such as serial numbers and BIOS revision. Using Dmidecode, you can retrieve this information without having to probe for the actual hardware.

Find out the maximum RAM supported by your system

Make sure you have installed dmidecode on your system. I think it will be automatically installed while installing your OS, but I am not sure though.

On Deb based system:

sudo apt-get install dmidecode

On RPM based system:

sudo yum install dmidecode

On SUSE/openSUSE:

sudo zypper in dmidecode

Well, we installed dmidecode. Let us find out the maximum RAM supported. To do that, enter the following command:

sudo dmidecode -t 16

Sample output:

# dmidecode 2.12
SMBIOS 2.6 present.

Handle 0x0014, DMI type 16, 15 bytes
Physical Memory Array
    Location: System Board Or Motherboard
    Use: System Memory
    Error Correction Type: None
    Maximum Capacity: 16 GB
    Error Information Handle: Not Provided
    Number Of Devices: 2

As you see in the above output, my system will support RAM upto 16GB, and it has two RAM slots. Pretty easy, isn’t it?

Well, let us find out the currently installed RAM details.

sudo dmidecode -t 17

Sample output:

# dmidecode 2.12
SMBIOS 2.6 present.

Handle 0x0017, DMI type 17, 28 bytes
Memory Device
    Array Handle: 0x0014
    Error Information Handle: 0x0000
    Total Width: Unknown
    Data Width: Unknown
    Size: No Module Installed
    Form Factor: DIMM
    Set: None
    Locator: DIMM_B
    Bank Locator: BANK 2
    Type: Unknown
    Type Detail: None
    Speed: Unknown
    Manufacturer: Not Specified
    Serial Number: Not Specified
    Asset Tag: Not Specified
    Part Number: Not Specified
    Rank: Unknown

Handle 0x0015, DMI type 17, 28 bytes
Memory Device
    Array Handle: 0x0014
    Error Information Handle: 0x0000
    Total Width: 64 bits
    Data Width: 64 bits
    Size: 4096 MB
    Form Factor: SODIMM
    Set: None
    Locator: DIMM_A
    Bank Locator: BANK 0
    Type: DDR3
    Type Detail: Synchronous
    Speed: 1067 MHz
    Manufacturer: 014F
    Serial Number: 00092AF2
    Asset Tag: 54114000     
    Part Number: JM1066KSN-4G      
    Rank: Unknown

As per the above output, I have installed one RAM in DIMM slot 1. The RAM size is 4GB, and it’s type and speed is DDR3 and 1067 MHz respectively.

Also, we can have the complete RAM details using the following commands.

sudo dmidecode -t memory
sudo dmidecode -t memory | less
sudo dmidecode -t memory | more

Sample output:

# dmidecode 2.12
SMBIOS 2.6 present.

Handle 0x0014, DMI type 16, 15 bytes
Physical Memory Array
    Location: System Board Or Motherboard
    Use: System Memory
    Error Correction Type: None
    Maximum Capacity: 16 GB
    Error Information Handle: Not Provided
    Number Of Devices: 2

Handle 0x0017, DMI type 17, 28 bytes
Memory Device
    Array Handle: 0x0014
    Error Information Handle: 0x0000
    Total Width: Unknown
    Data Width: Unknown
    Size: No Module Installed
    Form Factor: DIMM
    Set: None
    Locator: DIMM_B
    Bank Locator: BANK 2
    Type: Unknown
    Type Detail: None
    Speed: Unknown
    Manufacturer: Not Specified
    Serial Number: Not Specified
    Asset Tag: Not Specified
    Part Number: Not Specified
    Rank: Unknown

Handle 0x0015, DMI type 17, 28 bytes
Memory Device
    Array Handle: 0x0014
    Error Information Handle: 0x0000
    Total Width: 64 bits
    Data Width: 64 bits
    Size: 4096 MB
    Form Factor: SODIMM
    Set: None
    Locator: DIMM_A
    Bank Locator: BANK 0
    Type: DDR3
    Type Detail: Synchronous
    Speed: 1067 MHz
    Manufacturer: 014F
    Serial Number: 00092AF2
    Asset Tag: 54114000     
    Part Number: JM1066KSN-4G      
    Rank: Unknown

Curious to know the complete system details such as Motherboard, Memory, Bios etc? Well, enter the following command to get all details.

sudo dmidecode

Sample output:

# dmidecode 2.12
SMBIOS 2.6 present.
48 structures occupying 2173 bytes.
Table at 0x000EB840.

Handle 0xDA00, DMI type 218, 251 bytes
OEM-specific Type
    Header and Data:
        DA FB 00 DA B2 00 0D 5F 0F 37 40 7D 00 00 00 00
        00 7E 00 01 00 00 00 DC 01 00 80 02 00 DD 01 00
        80 03 00 75 01 01 80 01 00 76 01 02 80 01 00 2D
        01 03 80 01 00 2E 01 03 80 00 00 81 01 07 80 00
        00 82 01 07 80 01 00 83 01 08 80 00 00 84 01 08
        80 01 00 85 01 06 80 00 00 86 01 06 80 01 00 58
        02 05 80 00 00 57 02 05 80 01 00 9C 00 02 00 01
        00 9B 00 02 00 00 00 8A 01 03 00 01 00 89 01 03
        00 00 00 7F 01 04 00 00 00 80 01 04 00 01 00 53
        01 05 00 00 00 52 01 05 00 01 00 7B 01 06 00 00
        00 7C 01 06 00 01 00 94 01 07 00 00 00 93 01 07
        00 01 00 7D 00 08 00 00 00 2D 00 09 00 01 00 2E
        00 09 00 00 00 6E 00 0A 00 00 00 95 00 0B 00 01
        00 96 00 0B 00 00 00 2F 02 0C 00 01 00 30 02 0C
        00 00 00 50 02 0D 00 00 00 51 02 0D 00 01 00 52
        02 0D 00 02 00 FF FF 00 00 00 00

Handle 0xDA01, DMI type 218, 59 bytes
OEM-specific Type
    Header and Data:
        DA 3B 01 DA B2 00 0D 5F 0F 37 40 53 02 0D 00 03
        00 54 02 0D 00 04 00 56 02 0D 00 05 00 4B 01 0E
        00 01 00 4A 01 0E 00 00 00 EA 00 0F 00 01 00 EB
        00 0F 00 00 00 FF FF 00 00 00 00

Handle 0x0004, DMI type 4, 42 bytes
Processor Information
    Socket Designation: CPU 1
    Type: Central Processor
    Family: Core i3
    Manufacturer: Intel            
    ID: A7 06 03 01 FF FB AB BE
    Signature: Type 0, Family 6, Model 42, Stepping 7
    Flags:
        FPU (Floating-point unit on-chip)
        VME (Virtual mode extension)
        DE (Debugging extension)
        PSE (Page size extension)
        TSC (Time stamp counter)
        MSR (Model specific registers)
        PAE (Physical address extension)
        MCE (Machine check exception)
        CX8 (CMPXCHG8 instruction supported)
        APIC (On-chip APIC hardware supported)
        SEP (Fast system call)
        MTRR (Memory type range registers)
        PGE (Page global enable)
        MCA (Machine check architecture)
        CMOV (Conditional move instruction supported)
        PAT (Page attribute table)
        PSE-36 (36-bit page size extension)
        CLFSH (CLFLUSH instruction supported)
        DS (Debug store)
        ACPI (ACPI supported)
        MMX (MMX technology supported)
        FXSR (FXSAVE and FXSTOR instructions supported)
        SSE (Streaming SIMD extensions)
        SSE2 (Streaming SIMD extensions 2)
        SS (Self-snoop)
        HTT (Multi-threading)
        TM (Thermal monitor supported)
        PBE (Pending break enabled)
    Version: Intel(R) Core(TM) i3-2350M CPU @ 2.30GHz       
    Voltage: 1.1 V
    External Clock: 100 MHz
    Max Speed: 2300 MHz
    Current Speed: 2300 MHz
    Status: Populated, Enabled
    Upgrade: Other
    L1 Cache Handle: 0x0005
    L2 Cache Handle: 0x0006
    L3 Cache Handle: 0x0007
    Serial Number: To Be Filled By O.E.M.
    Asset Tag: To Be Filled By O.E.M.
    Part Number: To Be Filled By O.E.M.
    Core Count: 2
    Core Enabled: 1
    Thread Count: 2
    Characteristics:
        64-bit capable

Handle 0x0005, DMI type 7, 19 bytes
Cache Information
    Socket Designation: L1-Cache
    Configuration: Enabled, Not Socketed, Level 1
    Operational Mode: Write Back
    Location: Internal
    Installed Size: 64 kB
    Maximum Size: 64 kB
    Supported SRAM Types:
        Other
    Installed SRAM Type: Other
    Speed: Unknown
    Error Correction Type: None
    System Type: Unified
    Associativity: 8-way Set-associative

Handle 0x0006, DMI type 7, 19 bytes
Cache Information
    Socket Designation: L2-Cache
    Configuration: Enabled, Not Socketed, Level 2
    Operational Mode: Varies With Memory Address
    Location: Internal
    Installed Size: 512 kB
    Maximum Size: 512 kB
    Supported SRAM Types:
        Other
    Installed SRAM Type: Other
    Speed: Unknown
    Error Correction Type: None
    System Type: Unified
    Associativity: 8-way Set-associative

Handle 0x0007, DMI type 7, 19 bytes
Cache Information
    Socket Designation: L3-Cache
    Configuration: Enabled, Not Socketed, Level 3
    Operational Mode: Varies With Memory Address
    Location: Internal
    Installed Size: 3072 kB
    Maximum Size: 3072 kB
    Supported SRAM Types:
        Other
    Installed SRAM Type: Other
    Speed: Unknown
    Error Correction Type: None
    System Type: Unified
    Associativity: Other

Handle 0x0008, DMI type 8, 9 bytes
Port Connector Information
    Internal Reference Designator: J1A1
    Internal Connector Type: None
    External Reference Designator: PS2Mouse
    External Connector Type: PS/2
    Port Type: Mouse Port

Handle 0x0009, DMI type 8, 9 bytes
Port Connector Information
    Internal Reference Designator: J1A1
    Internal Connector Type: None
    External Reference Designator: Keyboard
    External Connector Type: PS/2
    Port Type: Keyboard Port

Handle 0x000A, DMI type 8, 9 bytes
Port Connector Information
    Internal Reference Designator: J2A2B
    Internal Connector Type: None
    External Reference Designator: Video
    External Connector Type: DB-15 female
    Port Type: Video Port

Handle 0x000B, DMI type 8, 9 bytes
Port Connector Information
    Internal Reference Designator: J3A1
    Internal Connector Type: None
    External Reference Designator: USB1
    External Connector Type: Access Bus (USB)
    Port Type: USB

Handle 0x000C, DMI type 8, 9 bytes
Port Connector Information
    Internal Reference Designator: J3A1
    Internal Connector Type: None
    External Reference Designator: USB2
    External Connector Type: Access Bus (USB)
    Port Type: USB

Handle 0x000D, DMI type 8, 9 bytes
Port Connector Information
    Internal Reference Designator: J3A1
    Internal Connector Type: None
    External Reference Designator: USB3
    External Connector Type: Access Bus (USB)
    Port Type: USB

Handle 0x000E, DMI type 8, 9 bytes
Port Connector Information
    Internal Reference Designator: J5A1
    Internal Connector Type: None
    External Reference Designator: LAN
    External Connector Type: RJ-45
    Port Type: Network Port

Handle 0x000F, DMI type 9, 17 bytes
System Slot Information
    Designation: J6B2
    Type: x16 PCI Express
    Current Usage: In Use
    Length: Long
    ID: 0
    Characteristics:
        3.3 V is provided
        Opening is shared
        PME signal is supported
    Bus Address: 0000:00:01.0

Handle 0x0010, DMI type 9, 17 bytes
System Slot Information
    Designation: J6B1
    Type: x1 PCI Express
    Current Usage: In Use
    Length: Short
    ID: 1
    Characteristics:
        3.3 V is provided
        Opening is shared
        PME signal is supported
    Bus Address: 0000:00:1c.3

Handle 0x0012, DMI type 11, 5 bytes
OEM Strings
    String 1: Dell System
    String 2: 5[0003]
    String 3: 13[P18F]

Handle 0x0013, DMI type 12, 5 bytes
System Configuration Options
    Option 1: To Be Filled By O.E.M.

Handle 0x001C, DMI type 21, 7 bytes
Built-in Pointing Device
    Type: Touch Pad
    Interface: Bus Mouse
    Buttons: 2

Handle 0x001D, DMI type 22, 26 bytes
Portable Battery
    Location: Sys. Battery Bay
    Manufacturer: Sanyo              
    Serial Number: 5390     
    Name: DELL 4YRJH22
    Chemistry: Lithium Ion
    Design Capacity: 45000 mWh
    Design Voltage: 10800 mV
    SBDS Version: 1.0                
    Maximum Error: 2%
    SBDS Manufacture Date: 2012-02-28
    OEM-specific Information: 0x00000001

Handle 0x001E, DMI type 32, 20 bytes
System Boot Information
    Status: No errors detected

Handle 0x0020, DMI type 27, 12 bytes
Cooling Device
    Type: Fan
    Status: OK
    OEM-specific Information: 0x00000000

Handle 0x0021, DMI type 28, 20 bytes
Temperature Probe
    Description: CPU Internal Temperature
    Location: Processor
    Status: OK
    Maximum Value: 127.0 deg C
    Minimum Value: 0.0 deg C
    Resolution: 1.000 deg C
    Tolerance: 0.5 deg C
    Accuracy: Unknown
    OEM-specific Information: 0x00000000

Handle 0xB000, DMI type 176, 5 bytes
OEM-specific Type
    Header and Data:
        B0 05 00 B0 00

Handle 0xB100, DMI type 177, 12 bytes
OEM-specific Type
    Header and Data:
        B1 0C 00 B1 1A 0E 00 00 00 00 00 00

Handle 0x0025, DMI type 209, 12 bytes
OEM-specific Type
    Header and Data:
        D1 0C 25 00 00 00 00 03 05 01 00 03

Handle 0x0026, DMI type 210, 12 bytes
OEM-specific Type
    Header and Data:
        D2 0C 26 00 00 00 00 03 05 20 01 03

Handle 0x0027, DMI type 211, 13 bytes
OEM-specific Type
    Header and Data:
        D3 0D 27 00 01 00 00 00 00 02 03 04 04
    Strings:
        Front               

Handle 0x0028, DMI type 212, 57 bytes
OEM-specific Type
    Header and Data:
        D4 39 28 00 70 00 71 00 01 49 50 48 9C 00 49 FC
        01 9B 00 49 FC 00 7F 01 4A FB 04 80 01 4A FB 00
        53 01 4A F7 08 52 01 4A F7 08 7B 01 4A EF 10 7C
        01 4A EF 10 FF FF 00 00 00

Handle 0x002A, DMI type 217, 8 bytes
OEM-specific Type
    Header and Data:
        D9 08 2A 00 01 02 00 00
    Strings:                                       

Handle 0x002B, DMI type 219, 11 bytes
OEM-specific Type
    Header and Data:
        DB 0B 2B 00 00 01 02 03 00 04 05
    Strings:                                                                                                    

Handle 0x002C, DMI type 220, 22 bytes
OEM-specific Type
    Header and Data:
        DC 16 2C 00 01 F0 00 00 02 F0 00 00 00 00 03 F0
        04 F0 00 00 00 00

Handle 0x002D, DMI type 221, 19 bytes
OEM-specific Type
    Header and Data:
        DD 13 2D 00 00 00 00 00 00 03 00 00 00 00 00 00
        00 00 00

Handle 0x002E, DMI type 222, 16 bytes
OEM-specific Type
    Header and Data:
        DE 10 2E 00 01 08 FF FF 00 00 00 00 00 00 00 00

Handle 0x0014, DMI type 16, 15 bytes
Physical Memory Array
    Location: System Board Or Motherboard
    Use: System Memory
    Error Correction Type: None
    Maximum Capacity: 16 GB
    Error Information Handle: Not Provided
    Number Of Devices: 2

Handle 0x0016, DMI type 20, 19 bytes
Memory Device Mapped Address
    Starting Address: 0x00000000000
    Ending Address: 0x000FFFFFFFF
    Range Size: 4 GB
    Physical Device Handle: 0x0015
    Memory Array Mapped Address Handle: 0x0018
    Partition Row Position: 1
    Interleave Position: 1
    Interleaved Data Depth: 1

Handle 0x0017, DMI type 17, 28 bytes
Memory Device
    Array Handle: 0x0014
    Error Information Handle: 0x0000
    Total Width: Unknown
    Data Width: Unknown
    Size: No Module Installed
    Form Factor: DIMM
    Set: None
    Locator: DIMM_B
    Bank Locator: BANK 2
    Type: Unknown
    Type Detail: None
    Speed: Unknown
    Manufacturer: Not Specified
    Serial Number: Not Specified
    Asset Tag: Not Specified
    Part Number: Not Specified
    Rank: Unknown

Handle 0x0018, DMI type 19, 15 bytes
Memory Array Mapped Address
    Starting Address: 0x00000000000
    Ending Address: 0x000FFFFFFFF
    Range Size: 4 GB
    Physical Array Handle: 0x0014
    Partition Width: 2

Handle 0x002F, DMI type 13, 22 bytes
BIOS Language Information
    Language Description Format: Abbreviated
    Installable Languages: 1
        eng
    Currently Installed Language: eng

Handle 0x0030, DMI type 131, 64 bytes
OEM-specific Type
    Header and Data:
        83 40 30 00 31 00 00 00 00 00 00 00 00 00 00 00
        F8 00 4B 1C FF FF FF FF 01 00 00 00 00 00 07 00
        AD 04 04 00 00 00 00 00 C8 00 FF FF 00 00 00 00
        00 00 00 00 32 00 00 00 76 50 72 6F 00 00 00 00

Handle 0x0029, DMI type 216, 9 bytes
OEM-specific Type
    Header and Data:
        D8 09 29 00 01 02 01 00 00
    Strings:
        INTEL
        0000

Handle 0x0000, DMI type 0, 24 bytes
BIOS Information
    Vendor: Dell Inc.
    Version: A05
    Release Date: 08/03/2012
    Address: 0xF0000
    Runtime Size: 64 kB
    ROM Size: 2048 kB
    Characteristics:
        MCA is supported
        PCI is supported
        BIOS is upgradeable
        BIOS shadowing is allowed
        ESCD support is available
        Boot from CD is supported
        Selectable boot is supported
        BIOS ROM is socketed
        EDD is supported
        5.25"/1.2 MB floppy services are supported (int 13h)
        3.5"/720 kB floppy services are supported (int 13h)
        3.5"/2.88 MB floppy services are supported (int 13h)
        Print screen service is supported (int 5h)
        8042 keyboard services are supported (int 9h)
        Serial services are supported (int 14h)
        Printer services are supported (int 17h)
        CGA/mono video services are supported (int 10h)
        ACPI is supported
        USB legacy is supported
        ATAPI Zip drive boot is supported
        BIOS boot specification is supported
        Targeted content distribution is supported
    BIOS Revision: 0.5
    Firmware Revision: 0.5

Handle 0x0002, DMI type 2, 15 bytes
Base Board Information
    Manufacturer: Dell Inc.
    Product Name: 01HXXJ
    Version: A05
    Serial Number: .JSQ7PA1.CN7117623M00J2.
    Asset Tag: Not Specified
    Features:
        Board is a hosting board
        Board is replaceable
    Location In Chassis: To Be Filled By O.E.M.
    Chassis Handle: 0x0003
    Type: Motherboard
    Contained Object Handles: 0

Handle 0x0003, DMI type 3, 21 bytes
Chassis Information
    Manufacturer: Dell Inc.
    Type: Portable
    Lock: Not Present
    Version: Not Specified
    Serial Number: JSR1
    Asset Tag: Not Specified
    Boot-up State: Safe
    Power Supply State: Safe
    Thermal State: Safe
    Security Status: None
    OEM Information: 0x00000000
    Height: Unspecified
    Number Of Power Cords: 1
    Contained Elements: 0

Handle 0x0001, DMI type 1, 27 bytes
System Information
    Manufacturer: Dell Inc.
    Product Name: Inspiron N5050
    Version: Not Specified
    Serial Number: JSR1
    UUID: 4C4C4544-0053-5110-8029-CAC05241
    Wake-up Type: Power Switch
    SKU Number: To be filled by O.E.M.
    Family:                       

Handle 0x0024, DMI type 208, 12 bytes
OEM-specific Type
    Header and Data:
        D0 0C 24 00 02 05 FE 00 04 05 01 02
    Strings:
        20120323
        20120323

Handle 0x0011, DMI type 10, 6 bytes
On Board Device Information
    Type: Video
    Status: Enabled
    Description: Mobile Intel SandyBridge HD Graphics

Handle 0x0015, DMI type 17, 28 bytes
Memory Device
    Array Handle: 0x0014
    Error Information Handle: 0x0000
    Total Width: 64 bits
    Data Width: 64 bits
    Size: 4096 MB
    Form Factor: SODIMM
    Set: None
    Locator: DIMM_A
    Bank Locator: BANK 0
    Type: DDR3
    Type Detail: Synchronous
    Speed: 1067 MHz
    Manufacturer: 014F
    Serial Number: 0009F2
    Asset Tag: 54114000     
    Part Number: JM1066-4G      
    Rank: Unknown

Handle 0x0031, DMI type 127, 4 bytes
End Of Table

That’s it. Happy weekend. Stay happy!


Advertise here with BSA

---------------------------------------------------------------------
Linux Basics: How To Find Maximum Supported RAM By Your System

Linux Basics: Convert IMG Files To VDI Format For Oracle VirtualBox

$
0
0

Today, we will see quick tip, yet useful one, about how to convert IMG Files to VDI format for Oracle VirtualBox.

What is .VDI Files?

As you may know, .VDI is the default and usable format in VirtualBox. VDI file, stands for Virtual Disk Image, is a standard virtual hard drive that can be mounted as a separate hard disk while creating a new virtual machine using VirtualBox. It can be created either fixed or dynamically allocated.

A dynamically allocated hard drive file will only use space on your physical hard drive as fills up up-to a maximum fixed size, although it will not shrink again automatically when space on it is freed. This will initially be very small and not occupy any space for unused virtual disk sectors, but will grow every time a disk sector is written to for the first time, until the drive reaches the maximum capacity chosen when the drive was created.

A fixed size hard drive may take longer to create on some systems but it is often faster to use. It will be created on your host system which has roughly the same size as the virtual disk’s capacity. So, for a 10G disk, you will have a 10G file. Note that the creation of a fixed-size image can take a long time depending on the size of the image and the write performance of your hard disk.

What is .IMG Files?

The .IMG files are normally bitmap files that contain image data. The image that is contained in the IMG file can be either a graphic bitmap or an image of a disc. When an IMG file contains an image of a disc, then the file can be used to play the disc media on your computer without the need for the physical disc. It is similar to an ISO file. You can use the IMG files to play video games or gaming application without having the actual gaming disc while you are playing.

Convert .IMG Files to .VDI files for Oracle VirtualBox

Now, let me show you how to convert IMG files to VDI format and vice versa. Make sure VirtualBox is installed and started first.

Convert IMG file to VDI file:

Go to the location where you have the IMG file, and convert it to VDI format as shown below.

Syntax:

VBoxManage convertdd source_file.img destination_file file.vdi

For example:

VBoxManage convertdd console-os-dr1v2-haswell.img console-os-dr1v2-haswell.vdi

Sample output:

Converting from raw image file="console-os-dr1v2-haswell.img" to file="console-os-dr1v2-haswell.vdi"...
Creating dynamic image with size 441679872 bytes (422MB)...

That’s it. Now we can use this VDI file for VirtualBox.

Convert VDI File IMG File:

In case you want to convert VDI file to IMG, enter the following command instead. It is very similar to the above command. Just exchange the source and destination format in reverse as shown below.

VBoxManage convertdd console-os-dr1v2-haswell.vdi console-os-dr1v2-haswell.img

Sample output:

Converting from raw image file="console-os-dr1v2-haswell.vdi" to file="console-os-dr1v2-haswell.img"...
Creating dynamic image with size 439353344 bytes (419MB)...

How to use VDI File in VirtualBox?

Well, We converted IMG file to VDI format, now what? We’ll add it to the Virtual machine and play it.

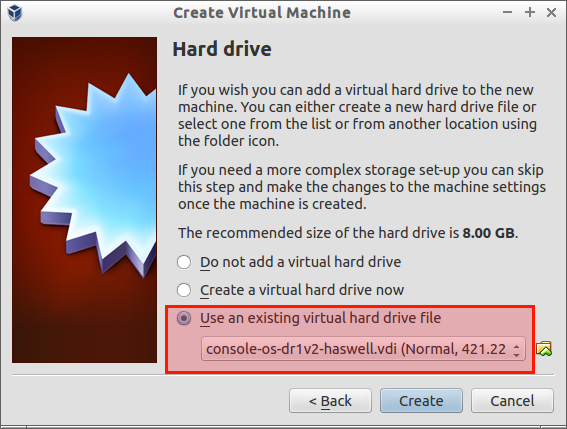
To do that, open Oracle VirtualBox and create a new virtual machine. When it ask you to create virtual hard drive file, select the option Use an existing virtual hard drive file, and browse to the VDI file which we just have converted from IMG file.

Create Virtual Machine_003

That’s all. Click the Create button and play the newly created virtual machine.

Cheers!


Advertise here with BSA

---------------------------------------------------------------------
Linux Basics: Convert IMG Files To VDI Format For Oracle VirtualBox

Install AVG Free Antivirus On Ubuntu

$
0
0

Why would I use Antivirus in a Linux system?

Some of you may be wonder why would we install an Antivirus while Linux is a virus free operating system. Well, let me give you some reasons why it is some important to use an antivirus for Linux OS’s.

  1. Linux is Virus free, right? But, not as secure as you think in some cases. There are so few virus programs available to infect a Linux system, but they might do only minor issues, and don’t any harmful or serious damage to the Linux system as like in a Windows or other operating system.
  2. You may have chance to copy some files/folders from a net-cafe system, and want to use them in your home Linux computer. In this case, your home computer installed with Linux OS might be attacked by the viruses which you copied from the net-cafe system along with some files.
  3. Still, many people use Windows OS for some reasons, like gaming. In such cases, if you have dual boot(Windows & Linux), It is advisable to use an antivirus program in your Linux system. Prevention is better than cure, right?
  4. If your Linux server acts like a central file server or something else in your home or organization network and connected with many different kind of computers(Linux, WIndows, Mac OS X etc.), then It is also recommended to use antivirus to prevent the unwanted virus issues.

Install AVG Free Antivirus On Linux

Download the latest edition depending upon your distribution from the free AVG download page.

Go to the download location and enter the following commands to install AVG Free edition. Be mindful that all commands should be run with root user privileges. I tested this article on Ubuntu 14.04, and also, I have included the installation steps for other distributions too.

On DEB based systems:

apt-get install gdebi
wget http://download.avgfree.com/filedir/inst/avg2013flx-r3118-a6926.i386.deb
gdebi avg2013flx-r3118-a6926.i386.deb

Sample output:

 Reading package lists... Done
 Building dependency tree
 Reading state information... Done
 Building data structures... Done
 Building data structures... Done

 AVG Anti-Virus for Linux/FreeBSD
 Do you want to install the software package? [y/N]:y
 Selecting previously unselected package avg2013flx.
 (Reading database ... 160172 files and directories currently installed.)
 Preparing to unpack avg2013flx-r3118-a6926.i386.deb ...
 Unpacking avg2013flx (2013.3118) ...
 Setting up avg2013flx (2013.3118) ...
 Installing 'avgd' service initscripts...
 Registering 'avgd' service to runlevels...
 Adding system startup for /etc/init.d/avgd ...
 /etc/rc0.d/K20avgd -> ../init.d/avgd
 /etc/rc1.d/K20avgd -> ../init.d/avgd
 /etc/rc6.d/K20avgd -> ../init.d/avgd
 /etc/rc2.d/S20avgd -> ../init.d/avgd
 /etc/rc3.d/S20avgd -> ../init.d/avgd
 /etc/rc4.d/S20avgd -> ../init.d/avgd
 /etc/rc5.d/S20avgd -> ../init.d/avgd
 Please do configuration with /opt/avg/av/bin/avgsetup
 Generating unique user id
 Processing command line ...
 Cfg file not specified using /opt/avg/av/cfg/diagcfg.xml.
 New installation ID succesffully generated.
 * Starting avgd ...                                                                                                                                             [ ok ]
 Processing triggers for man-db (2.6.7.1-1ubuntu1) ...

On RPM bases systems:

wget avg2013flx-r3118-a6926.i386.rpm
rpm -i avg2013flx-r3118-a6926.i386.rpm

Install AVG from ‘binary’ file:

Download the tar files and compile it your self as shown below.

wget http://download.avgfree.com/filedir/inst/avg2013flx-r3118-a6926.i386.tar.gz
tar xzvf avg2013flx-r3118-a6926.i386.tar.gz

Change to the location where you extracted the tar file.

Run the following command to install it.

./install.sh

Install AVG from ‘.sh’ file:

Download the .sh file. Set executable permission.

wget http://download.avgfree.com/filedir/inst/avg2013flx-r3118-a6926.i386.sh
chmod +x avg2013flx-r3118-a6926.i386.sh

Then, install it using command:

./avg2013flx-r3118-a6926.i386.sh

On BSD systems:

Download the AVG program for FreeBSD:

wget http://download.avgfree.com/filedir/inst/avg2013ffb-r3115-a6155.i386.tar.gz
tar xzvf avg2013ffb-r3115-a6155.i386.tar.gz

Change to the location where you extracted the tar file, and run the following command to install it.

./install.sh

Configure AVG

As you see in the installation method on Ubuntu, AVG is installed and started, but not configured. You may see the output that reads:

Please do configuration with /opt/avg/av/bin/avgsetup

Run the following command to configure AVG antivirus.

sudo /opt/avg/av/bin/avgsetup

Sample output:

Choose what you want to do. In our case, let us setup On-access for Real-time protection.

AVG command line setup
Copyright (c) 2013 AVG Technologies CZ

Your location:  Start
Welcome to the AVG for Linux/FreeBSD Deployment Wizard.
The Wizard will help you deploy AVG according to your needs.

Please choose what you want to do now:
M) Set up the TCPD protection for E-mail Server
O) Set up On-Access for Real-time protection
E) Exit

Type [M|O|E]: O

Select the on-access engine:

AVG command line setup
Copyright (c) 2013 AVG Technologies CZ

Your location:  Start -> On-Access Deployment

Deploying On-Acces for Real-time protection

Please select the On-Acces engine used for securing:

R) RedirFS engine (only Linux kernel up to 2.6.37 version)
F) Fanotify engine (only Linux kernel from 2.6.36 version)
S) Samba plugin (Linux and FreeBSD)
D) Dazuko module (FreeBSD up to 8.x or Linux up to 2.6.22 version)
B) Go to back
E) Exit

Type [R|S|D|F|B|E]: F

Enter the path of the directory you want to secure. In my case, I want to secure my /home directory, so I just pressed the Enter key.

AVG command line setup
Copyright (c) 2013 AVG Technologies CZ

Your location:  Start -> On-Access Deployment -> Fanotify engine

Checking the settings for fanotify in the /boot directory...
Please enter the full path to the directory you want to secure (e.g. /home/; do not use relative paths or links to the directory; for multiple directory use pipes - e.g. '/home/|/var/samba/' or type 'Enter' for default /home/ directory):

That’s it. We have configured AVG successfully and secured our /home directory.

AVG command line setup
Copyright (c) 2013 AVG Technologies CZ

Your location:  Exit: Success!

Congratulations, AVG pro Linux/FreeBSD has been deployed successfully.
If you experience problems with AVG, please refer to /opt/avg/av/log/0//deployment.pub.log or contact the technical support.

Please choose what you want to do now:

N) Continue deploying AVG for another kind of protection.
E) Terminate the deployment.

Type [N,E]:E

Choose the any one of the above options whether you want to complete(Terminate) the deployment or Continue deploying AVG for another kind of protection. In my case, I don’t want any other deployment, so I entered the letter ‘E’ to Terminate the deployment.

Updating AVG

The very first step is to check whether there are any new updates available to AVG.

To do that, enter:

sudo avgupdate

Sample output:

AVG command line update
Copyright (c) 2013 AVG Technologies CZ

Running update.
Initializing...
Downloading file:  avg13infolx.ctf
Analyzing...
100% [===================================>]

You are currently up-to-date
Update was successfully completed.

Scanning Files/Folders

Let us scan some directories to check for any viruses.

Syntax:

sudo avgscan <options> <path1> <path2> ...

Example:

Here, I am going to scan my  directory, and store the results in /tmp/avscan.log file.

sudo avgscan -aPcijk -r /tmp/avgscan.log /home/sk/Downloads/

Sample output:

AVG command line Anti-Virus scanner
Copyright (c) 2013 AVG Technologies CZ

Virus database version: 4257/9260
Virus database release date: Mon, 09 Mar 2015 08:36:00 +0530

Files scanned     :  10246(180)
Infections found  :  0(0)
PUPs found        :  0
Files healed      :  0
Warnings reported :  0
Errors reported   :  0

Hurray! I don’t have any infected location on the scanned directory. Let’s now check the output logfile.

cat /tmp/avgscan.log

Read the man pages to know more details of the available options.

man avgscan

Conclusion

I wouldn’t say Antivirus program for Linux is important, but it is recommended if you running Linux system in a mixed mode network environments. If you want to secure more efficiently, it is better to go for a firewall solution.

That’s it. Cheers!


Advertise here with BSA

---------------------------------------------------------------------
Install AVG Free Antivirus On Ubuntu

Install And Configure OpenVZ On CentOS

$
0
0

About OpenVZ

OpenVZ is a container-based virtualization solution for Linux. We can create ‘n’ number of Virtual machines depending upon the configuration of our physical system. Each virtual machine will act like a separate standalone physical system, and doesn’t conflict with one another. The virtual machines created using OpenVZ can be rebooted independently, and have root access, users, IP addresses, memory, processes, files, applications, system libraries and configuration files. Since it uses operating system level virtualization technology, unlike other virtualization methods such as VirtualBox, KVM, and Vmware, the guest systems uses the same kernel of the host system. Each virtual machine will efficiently share the CPU, Memory, Disk space, and network of your Physical server.

Installing OpenVZ on CentOS 6.5

System Requirements:

  • A decent Intel or AMD PC;
  • Atleast 128MB of RAM;
  • Hard drives with atleast 4GB free disk space;
  • Atleast 2NICs;
  • Internet connection.

It is recommended to use a separate partition for containers (by default /vz) and format it to ext4. You need to have set two IP addresses to your physical machine. One is for the original host and another IP is for Virtual machine.

1. Add OpenVZ Repository

Download OpenVZ Repository and put it in /etc/yum.repos.d/ directory.

yum install wget
wget -P /etc/yum.repos.d/ http://ftp.openvz.org/openvz.repo

Import OpenVZ GPG key:

rpm --import http://ftp.openvz.org/RPM-GPG-Key-OpenVZ

2. Install OpenVZ kernel

yum install vzkernel

3. Setting up Kernel parameters

Make sure you have added the following kernel parameters before logging into vz kernel.

vi sysctl.conf

Add the following lines:

# On Hardware Node we generally need
# packet forwarding enabled and proxy arp disabled
net.ipv4.ip_forward = 1
net.ipv6.conf.default.forwarding = 1
net.ipv6.conf.all.forwarding = 1
net.ipv4.conf.default.proxy_arp = 0

# Enables source route verification
net.ipv4.conf.all.rp_filter = 1

# Enables the magic-sysrq key
kernel.sysrq = 1

# We do not want all our interfaces to send redirects
net.ipv4.conf.default.send_redirects = 1
net.ipv4.conf.all.send_redirects = 0

4. Disable SELinux

Edit /etc/sysconfig/selinux file:

vi /etc/sysconfig/selinux

Set as disabled:

SELINUX=disabled

5. Install OpenVz usage statistics tools

The following tools to be installed to gather the OpenVZ usage statistics. Here is the reason why you should install these tools.

yum install vzctl vzquota ploop

That’s it. We have successfully installed OpenVZ.

Now, it’s time to reboot and log in to OpenVZ kernel(it should be the default choice in the boot loader).

CentOS 6.5 OpenVZ [Running] - Oracle VM VirtualBox_001

We’ll see how to create virtual machines using OpenVZ in our upcoming tutorials.

While creating VMs, make sure you have the same subnet on both physical and virtual machine. If you want to use different subnet, you have to edit /etc/vz/vz.conf file,

vi /etc/vz/vz.conf

Find and uncomment the line:

NEIGHBOUR_DEVS=detect

And, change it to:

NEIGHBOUR_DEVS=all

That’s it.

Want to instal OpenVZ in Ubuntu and derivatives, check the following link.

OpenVZ Home page:


Advertise here with BSA

---------------------------------------------------------------------
Install And Configure OpenVZ On CentOS


How To Create OpenVZ Container In OpenVZ

$
0
0

In our previous tutorials, we have discussed,

Today, we will see how to create OpenVZ Container in OpenVZ.

What is Containers?

The Virtual machines are known as Containers in OpenVZ. Unlike the traditional virtual machines of VMWare, KVM, Oracle VirtualBox, the main advantage of Containers is that they will share the resources of the physical machine dynamically. That means, a particular amount of RAM or Disk space will not be allocated to any particular container. The pool of resources will be equally shared by all Containers on demand.

Creating Containers in OpenVZ

The list of available pre-created templates will be found in this location: http://openvz.org/Download/template/precreated

Here, we’ll be creating a CentOS 7 Container and assign IP address to that container as 192.168.1.103/24.

Log in to OpenVZ physical server, and go to the /vz/template/cache which is the default directory to store the downloaded templates.

cd /vz/template/cache/

Download CentOS 7 minimal template:

wget http://download.openvz.org/template/precreated/centos-7-x86_64-minimal.tar.gz

Be mindful that you should unpack the tar file. Just place it in your Physical server as it was downloaded.

Now, Enter the following command to create the first virtual machine.

vzctl create 101 --ostemplate centos-7-x86_64-minimal

Sample output:

Creating image: /vz/private/101.tmp/root.hdd/root.hdd size=2306867K
Creating delta /vz/private/101.tmp/root.hdd/root.hdd bs=2048 size=4614144 sectors v2
Storing /vz/private/101.tmp/root.hdd/DiskDescriptor.xml
Opening delta /vz/private/101.tmp/root.hdd/root.hdd
Adding delta dev=/dev/ploop42825 img=/vz/private/101.tmp/root.hdd/root.hdd (rw)
mke2fs 1.41.12 (17-May-2010)
Discarding device blocks: done                            
Filesystem label=
OS type: Linux
Block size=4096 (log=2)
Fragment size=4096 (log=2)
Stride=0 blocks, Stripe width=0 blocks
144288 inodes, 576256 blocks
28812 blocks (5.00%) reserved for the super user
First data block=0
Maximum filesystem blocks=4294967296
18 block groups
32768 blocks per group, 32768 fragments per group
8016 inodes per group
Superblock backups stored on blocks: 
    32768, 98304, 163840, 229376, 294912

Writing inode tables: done                            
Creating journal (32768 blocks): done
Writing superblocks and filesystem accounting information: done

This filesystem will be automatically checked every 35 mounts or
180 days, whichever comes first.  Use tune2fs -c or -i to override.
tune2fs 1.41.12 (17-May-2010)
Setting maximal mount count to -1
Setting error behavior to 2
Setting interval between checks to 0 seconds
Creating balloon file .balloon-c3a5ae3d-ce7f-43c4-a1ea-c61e2b4504e8
Mounting /dev/ploop42825p1 at /vz/private/101.tmp/root.hdd/root.hdd.mnt fstype=ext4 data='' 
Unmounting device /dev/ploop42825
Opening delta /vz/private/101.tmp/root.hdd/root.hdd
Adding delta dev=/dev/ploop42825 img=/vz/private/101.tmp/root.hdd/root.hdd (rw)
Mounting /dev/ploop42825p1 at /vz/root/101 fstype=ext4 data='balloon_ino=12,' 
Creating container private area (centos-7-x86_64-minimal)
Unmounting file system at /vz/root/101
Unmounting device /dev/ploop42825
Opening delta /vz/private/101/root.hdd/root.hdd
Adding delta dev=/dev/ploop42825 img=/vz/private/101/root.hdd/root.hdd (rw)
Mounting /dev/ploop42825p1 at /vz/root/101 fstype=ext4 data='balloon_ino=12,' 
Performing postcreate actions
Unmounting file system at /vz/root/101
Unmounting device /dev/ploop42825
CT configuration saved to /etc/vz/conf/101.conf
Container private area was created

Here,

  • 101 – Container ID (It typically starts from 100)

Next, we have to setup the IP address to the Container, fro example: 192.168.1.103.

vzctl set 101 --ipadd 192.168.1.103 --save

Sample output:

CT configuration saved to /etc/vz/conf/101.conf

Assign DNS servers:

vzctl set 101 --nameserver 8.8.8.8 --save

Sample output:

CT configuration saved to /etc/vz/conf/101.conf

That’s it. We have successfully created and assigned IP address to the new container.

Starting Containers

Run the following command to start our newly created container.

vzctl start 101

Sample output:

Starting container...
Opening delta /vz/private/101/root.hdd/root.hdd
Adding delta dev=/dev/ploop42825 img=/vz/private/101/root.hdd/root.hdd (rw)
Mounting /dev/ploop42825p1 at /vz/root/101 fstype=ext4 data='balloon_ino=12,' 
Container is mounted
Adding IP address(es): 192.168.1.103
Setting CPU units: 1000
Container start in progress...

You can verify it by pinging the container from the Physical server.

ping 192.168.1.103

Sample output:

PING 192.168.1.103 (192.168.1.103) 56(84) bytes of data.
64 bytes from 192.168.1.103: icmp_seq=1 ttl=64 time=0.063 ms
64 bytes from 192.168.1.103: icmp_seq=2 ttl=64 time=0.081 ms
64 bytes from 192.168.1.103: icmp_seq=3 ttl=64 time=0.073 ms

Entering to the Container

Now, we can log in to the Container using command:

vzctl enter 101

Sample output:

entered into CT 101

From now on, you are in the newly created container. Just play with your new virtual machine and do what you want to do.

To exit, and return back to your original physical computer, just enter:

exit

Sample output:

logout
exited from CT 101

Adjust Firewall To Access Containers from Remote systems

Log in to the physical system(openvz server).

Edit /etc/sysconfig/iptables:

vi /etc/sysconfig/iptables

Find the following two lines:

:FORWARD ACCEPT [0:0]
:OUTPUT ACCEPT [0:0]

Add the following lines(marked in bold letters)  between the above two lines.

:FORWARD ACCEPT [0:0]
-P FORWARD ACCEPT
-F FORWARD
:OUTPUT ACCEPT [0:0]

Also, make sure the following has been commented out.

#-A FORWARD -j REJECT –reject-with icmp-host-prohibited

Refer the following screenshot of my testing machine.

root@openvz:-vz-template-cache_001

Save and close the file.

Then, Restart iptables service to take effect the saved changes.

service iptables restart

Now, you can access the newly created Container from outside of your network.

For example, I can SSH to the Vm from my Ubuntu desktop.

ssh root@192.168.1.103

root@openvz:~_002

Adding more RAM and Disk space to the Container

Please not that we haven’t assigned any specific RAM or disk size to the Container. By default, the new Container will have the 256 MB RAM, 512 MB vSwap Memory and 2 GB disk space. If you want to assign more RAM and disk space, you have to edit and adjust the /etc/vz/conf/101.conf file. Here 101.conf is the Container conf file which has the Container ID 101. You can view the list of configurations for all containers under /etc/vz/ directory.

Let us increase the RAM and disk size of tour new VM (ID: 101).

To do that, log in to the physical server(not in the VM) and edit file,

vi /etc/vz/conf/101.conf

Find the following lines, and change as per your wish.

# RAM
PHYSPAGES="0:256M"

# Swap
SWAPPAGES="0:512M"

# Disk quota parameters (in form of softlimit:hardlimit)
DISKSPACE="2G:2.2G"
DISKINODES="131072:144179"
QUOTATIME="0"

That’s it. Start using the VM in OpenVZ.

Want to know more about OpenVZ? Well, check out the official OpenVZ user documentation.

Cheers!


Advertise here with BSA

---------------------------------------------------------------------
How To Create OpenVZ Container In OpenVZ

How To Install Jenkins In Ubuntu 14.10 And CentOS 7

$
0
0

About Jenkins

From Wikipedia,

Jenkins is an open source continuous integration tool written in Java. The project was forked from Hudson after a dispute with Oracle. Jenkins provides continuous integration services for software development. It is a server-based system running in a servlet container such as Apache Tomcat. It supports SCM tools including AccuRev, CVS, Subversion, Git, Mercurial, Perforce, Clearcase and RTC, and can execute Apache Ant and Apache Maven based projects as well as arbitrary shell scripts and Windows batch commands. The primary developer of Jenkins is Kohsuke Kawaguchi, and it is released under the MIT License.

Install Jenkins in centos 7 (Master)

1. First install wget

yum install -y wget

2. Add jenkins repository

sudo wget -O /etc/yum.repos.d/jenkins.repo http://pkg.jenkins-ci.org/redhat/jenkins.repo
sudo rpm --import https://jenkins-ci.org/redhat/jenkins-ci.org.key

3. Install jenkins

sudo yum install jenkins

4. Install java

sudo yum install java-1.7.0-openjdk

5. Configure firewall

firewall-cmd --zone=public --add-port=8080/tcp --permanent
firewall-cmd --reload

6. Start Jenkins

sudo /etc/init.d/jenkins restart
systemctl restart jenkins.service

7. Open your browser http://ip-addre:8080

Screenshot from 2015-03-12 08:36:15

For Debian based systems (Master)

1. Update your system first

# apt-get update
# apt-get upgrade

2. You need apache installed configure jenkins

# apt-get install apache2

3. Install Java

# apt-get install openjdk-7-jdk

4. Check you java installed

# java -version

5. Install Jenkins

5.1 Add the key and source list to apt.

# wget -q -O - https://jenkins-ci.org/debian/jenkins-ci.org.key | sudo apt-key add -

5.2 Create a sources list for Jenkins:

# sh -c 'echo deb http://pkg.jenkins-ci.org/debian binary/ > /etc/apt/sources.list.d/jenkins.list'

6. Update the cache

# apt-get update

7. Start The installation

# apt-get install jenkins

8. Start Jenkins

/etc/init.d/jenkins start

The log file will be placed in /var/log/jenkins/jenkins.log.

9-Open your browser http://ip-addre:8080

That’s it. In our upcoming articles, we will see how to deploy things from master to slave systems.


Advertise here with BSA

---------------------------------------------------------------------
How To Install Jenkins In Ubuntu 14.10 And CentOS 7

OpenVZ Web Panel: Managing OpenVZ Containers Graphically

$
0
0

Install OpenVZ Web panel

In our previous tutorials, We have seen,

In this tutorial, let us see how to manage OpenVZ using OpenVZ web panel.

Why OpenVZ Web panel?

Very simple, just to make the OpenVZ management more easier. Working on command line might be tedious to new and intermediate users. Using openVZ Web panel, anyone can easily create, delete, manage VMs via a web browser in minutes without having to know all OpenVZ commands.

Installing OpenVZ Web panel

Well, let us install the Web panel.

Run the following command under root user to install OpenVZ Web Panel:

wget -O - http://ovz-web-panel.googlecode.com/svn/installer/ai.sh | sh

The above command will work on almost all Linux operating systems.

Sample output:

 Removing downloaded archive: rm -f /opt/ovz-web-panel//ovz-web-panel-2.4.tgz
 Installation finished.
 Product was installed into: /opt/ovz-web-panel/
 [...]
 Starting services...
 Starting OpenVZ Web Panel...
 Starting watchdog daemon...
 [OK] Watchdog daemon was started.
 Starting web server webrick on 0.0.0.0:3000...
 [OK] Web server was started.
 Starting hardware node daemon...
 [OK] Hardware node daemon was started.
 Syncing hardware nodes states...
 [OK] Hardware nodes information was synced.
 Adding localhost to the list of controlled servers...
 Panel should be available at:
 hostname: Unknown host

http://:3000

 Default credentials: admin/admin
 -----------------------------------

That’s it. OpenVZ Web panel has been installed now.

Adjust IPTABLES for RPM based distributions

If you’re accessing the URL from a remote system, you should allow the web panel default port 3000 through your firewall/router.

To do that edit:

vi /etc/sysconfig/iptables

Add the following line:

-A INPUT -m state --state NEW -m tcp -p tcp --dport 3000 -j ACCEPT

Save and exit. Restart iptables service.

service iptables restart

Accessing OpenVZ Web panel

Open up your web browser and enter the following URL in the address bar.

http://<your-host>:3000

Default administrator’s credentials are: admin/admin. Don’t forget to change default password.

Login - OpenVZ Web Panel 2.4 - Mozilla Firefox_001

Now, you’ll be redirected to the OpenVZ web panel dashboard:

Dashboard - OpenVZ Web Panel 2.4 - Mozilla Firefox_002

The Dashboard will have the information about logged user and statistics of panel usage. By default, the physical server is localhost itself. Also, it is possible to many physical servers without having to install Web panel on every physical server.

Changing Default Admin user password

As I mentioned before, the default user name and password to login to Wen panel is admin/admin. It is hightly recommended to change the admin user password to something different and stronger.

To do that, Click on the My Profile on the left pane of the Dash board. Enter the new password twice and click the Save button.

IP Addresses - OpenVZ Web Panel 2.4 - Mozilla Firefox_007

Now, let us see how to create Virtual machines, Virtual servers, and users etc.

Download And Install OS Templates

Before creating Virtual machines or VPS, the first step is to install OS templates.

To do that, click on the Physical server (localhost) on the left pane of the Dashboard. Then, click on the OS Templates button on the right side.

Physical Server localhost - OpenVZ Web Panel 2.4 - Mozilla Firefox_003

The installed OS templates will be listed here. As you see above I have already installed a CentOS 7 template. To create a new Template, click on the Install New OS Template button.

OS Templates on Physical Server localhost - OpenVZ Web Panel 2.4 - Mozilla Firefox_004

The list of available OS templates will be shown in the next window. Select the OS template of your choice and click Install button. In my case, I selected Ubuntu 14.04 minimal template.

OS Templates on Physical Server localhost - OpenVZ Web Panel 2.4 - Mozilla Firefox_005

The installing process will be scheduled and new templates will be appeared soon.

OS Templates on Physical Server localhost - OpenVZ Web Panel 2.4 - Mozilla Firefox_006

After few minutes(depending upon the size of the template), refresh the OS templates list. You’ll, there, see the newly installed OS templates.

OS Templates on Physical Server localhost - OpenVZ Web Panel 2.4 - Mozilla Firefox_008

As you see above, the Ubuntu 14.04 OS template has been installed now.

Creating Virtual Servers

We have installed the OS templates in our previous steps. Now, we will create new Virtual servers using the OS templates.

Go back to the localhost (Just click on the localhost button under the Physical Servers section) window. Click Create New Virtual Server button.

Physical Server localhost - OpenVZ Web Panel 2.4 - Mozilla Firefox_009

Enter the Server ID, select the OS template, enter IP address and hostname, enter the root password etc. Also, you can define the disk space size, RAM, Swap, DNS server etc,, in the Additional Settings. I go with default values. Finally, click Create button.

Physical Server localhost - OpenVZ Web Panel 2.4 - Mozilla Firefox_011

Hurray! We have created a new Virtual server.

Physical Server localhost - OpenVZ Web Panel 2.4 - Mozilla Firefox_012

If you don’t want the Virtual server, select the Virtual server, and click Remove Virtual server button.

Physical Server localhost - OpenVZ Web Panel 2.4 - Mozilla Firefox_013

Also, you can change the settings of the Virtual server by clicking on the Change Settings button next to the Remove Virtual Server button. And, you also can start/stop/restart the virtual server using the Change state button next to the Change Settings button..

Creating Server Templates

Server templates are used as a source of quality of service limits during virtual server creation. They could be used to simplify new virtual servers creation for different purposes. You can create, edit and remove templates, but, you can’t remove the default template for the physical server.

Click on the localhost button under the Physical Servers section on the left pane of the Dashboard. Then, click Server Templates on the right side.

Physical Server localhost - OpenVZ Web Panel 2.4 - Mozilla Firefox_014

The list of available Server Templates will be shown. Select the template of your Choice and Click Add Template button.

Server Templates on Physical Server localhost - OpenVZ Web Panel 2.4 - Mozilla Firefox_015

Adding more Physical servers

As I mentioned before, the localhost itself is the default Physical server. You can add more physical server if you want. You don’t have to install OpenVZ web panel on extra physical servers.

To add an extra physical server, click on the Physical Servers button on the left pane of the Dashboard. Then, click Connect new server button.

Physical Servers - OpenVZ Web Panel 2.4 - Mozilla Firefox_016

Enter the hostname, and root password of the new OpenVZ server. Then, click Connect.

Physical Servers - OpenVZ Web Panel 2.4 - Mozilla Firefox_017

New virtual servers or OS templates can be installed directly on the server using command line tools. In such case need to select physical server and click “Synchronization” button to perform synchronization between panel’s database and actual state of the server.

Creating Users

By default, there will be two users automatically created while installing OpenVZ. One is admin, the infrastructure administrator, and the another is virtual server owner. If you want new users, you can add them too. Also, you can assign any user as a owner to any VPS. The owners can manage, edit the particular VPS details.

To create a new user, Click on the Users button on the left. Then, click Add user.

Users - OpenVZ Web Panel 2.4 - Mozilla Firefox_019

Fill up the user details, and select the role of the new user(infrastructure owner or Virtual server owner). Finally, click Create.

Users - OpenVZ Web Panel 2.4 - Mozilla Firefox_020

Now, we can assign the new user to any VPS.

Physical Server localhost - OpenVZ Web Panel 2.4 - Mozilla Firefox_021

Viewing Event logs

Event logs will give you the recent activities of the OpenVZ server.

Events Log - OpenVZ Web Panel 2.4 - Mozilla Firefox_022

Conclusion

In this series of tutorials, we have seen how to install and configure OpenVZ on CentOS and Ubuntu systems. Also, we have seen how to create and manage VMS both in text and graphical mode methods. As far as I know, OpenVZ will be very useful in development environments and other R&D departments that are using multiple and different kind of Virtual machines. You can easily create, edit, delete VM in minutes using OpenVZ within minutes. Hope this tutorial series will give you a basic usage and ideas about OpenVZ. For more details, refer the OpenVZ official website.

OpenVZ Web Panel Home page:


Advertise here with BSA

---------------------------------------------------------------------
OpenVZ Web Panel: Managing OpenVZ Containers Graphically

An Introduction To MySQL Database

$
0
0

About MySQL

MySQL is an open source database management software that helps users store, organize, and retrieve data. It is a very powerful program with a lot of flexibility.

mysql

This tutorial will explains how to install MySQL, create a sample database, create a table, insert records into the table, and select records from the table.

Installation

You can install mysql using the following command:

On Ubuntu:

sudo apt-get install mysql-server

On Centos:

sudo yum install mysql-server

Follows the steps below to stop and start MySQL

service mysql start 
Starting MySQL.                                            [  OK  ]
service mysql status
MySQL running (12588) 
service mysql stop
Shutting down MySQL.                                       [  OK  ]

Verifying Installation

You can check the MySQL installed version by performing mysql -V as shown below:

[local-host]# mysql -V
mysql  Ver 14.14 Distrib 5.1.25-rc, for redhat-linux-gnu (i686) using readline 5.1

Access the MySQL shell

Once you have MySQL installed on your droplet, you can access the MySQL shell by typing the following command into terminal:

mysql -u root -p

After entering the root MySQL password into the prompt, you will be able to start building your MySQL database.

mysql -u root -p
Enter password: password
Welcome to the MySQL monitor.  Commands end with ; or \g.
Your MySQL connection id is 13
Server version: 5.1.25-rc-community MySQL Community Server (GPL)

Type 'help;' or '\h' for help. Type '\c' to clear the buffer.

mysql>

Creating Databases

After connecting as MySQL root user, you can use this command to create database.

In this example, we will create unixmen database.

mysql> create database;

You can check what databases are available by typing this command:

SHOW DATABASES;

Your screen should look something like this:

 mysql> SHOW DATABASES;
+--------------------+
| Database           |
+--------------------+
| information_schema |
| mysql              |
| performance_schema |
| test               |
| unixmen            |  
|                    |
+--------------------+
5 rows in set (0.01 sec)

Creating Tables

Before you create a mysql table, you need to choose the database that you want to use:

USE unixmen;
Database changed

The following example creates a article table.

create table article (
id INT AUTO_INCREMENT PRIMARY KEY,
name varchar(20),
number varchar(10),
page int(10)
writing_date DATE);

The command show tables to view all the tables available in the database.

mysql> SHOW TABLES;
+------------------+
| Tables_in_unixmen |
+------------------+
| article         |
+------------------+
1 row in set (0.01 sec)

To view the table description, do the following command

 mysql>DESCRIBE article;
+-------------+-------------+------+-----+---------+----------------+
| Field       | Type        | Null | Key | Default | Extra          |
+-------------+-------------+------+-----+---------+----------------+
| id          | int(11)     | NO   | PRI | NULL    | auto_increment |
| name        | varchar(20) | YES  |     | NULL    |                |
| number      |  int(11)    | YES  |     | NULL    |                |
| page        | char(1)     | YES  |     | NULL    |                |
| writing_date| date        | YES  |     | NULL    |                |
+-------------+-------------+------+-----+---------+----------------+
5 rows in set (0.01 sec)

Add Information to Tables

Use the following sample insert commands to insert some records to the article table.

insert into article values(1,'article1','4','a','2012-04-13');
insert into article values(2,'article2','5','b','2012-04-14');
insert into article values(3,'article3','6','C','2012-04-15');
insert into article values(4,'article4','7','d','2012-04-16');

You can take a look at your table using this command

mysql> SELECT * FROM article
+----+------- +----------------+-----------+-------------+
| id | name   | number         | page      |wrinting_date|
+----+------- +----------------+-----------+-------------+
|  1 |article1| 1              | a         | 2012-04-13  |
|  2 |article2| 2              | b         | 2012-04-14  |
|  3 |article3| 3              | c         | 2012-04-15  |
|  4 |article4| 4              | d         | 2012-04-16  |
+----+--------+----------------+-----------+-------------+
4 rows in set (0.00 sec)

Update Information in the Table

You can update a stored information in the table with this command:

UPDATE `article` 
SET 
`number` = '6' 
WHERE `article`.`name` ='article4';

Delete a Row, a Column and a Table

You can  delete rows from the table with the following command:

DELETE from  where [column name]=[field text];
mysql> DELETE from article  where name='article2';
Query OK, 1 row affected (0.00 sec)

mysql> SELECT * FROM article
+----+------- +----------------+-----------+-------------+
| id | name   | number         | page      |wrinting_date|
+----+------- +----------------+-----------+-------------+
| 1 |article1 | 1              | a          | 2012-04-13 |
| 3 |article3 | 3              | c          | 2012-04-15 |
| 4 |article4 | 4              | d          | 2012-04-16 |
+----+--------+----------------+-----------+-------------+
3 rows in set (0.00 sec)

You can also delete a column using this command

ALTER TABLE  [column name];

And type this command if you want to delete all table

ALTER TABLE ;

That’s all for this article.


Advertise here with BSA

---------------------------------------------------------------------
An Introduction To MySQL Database

John The Ripper: The Fast, Multi-platform Password Cracking Tool

$
0
0

Weak passwords are the most common threats to the Information Security. Many users, still, are using the weak passwords which contains their first or last name, DOB, mobile number, father’s/mother’s maiden name, birth place, crush name, so and so. In this fast-faced technology world, it is such a worst idea to have these kind of silly and weak passwords.

As we all know, “the passwords should be easy to remember, but hard to guess”. The strong password should consists of;

  • At-least 12 or more characters,
  • Upper/lower characters,
  • Numeric characters,
  • Special characters etc.

Also, it is very very bad idea to have the same password for multiple accounts.

But, how do we know the passwords are really strong? Is there any programs or tools to test the strength of the passwords? Indeed, Yes!! Here is where John the Ripper comes in handy. Using this tool, we can easily check the strength of the passwords. John the Ripper will break or crack the simple passwords in minutes, whereas it will take several hours or even days for the complex passwords.

About John the Ripper

John the Ripper is a fast password cracker that can be used to detect weak Unix passwords. Besides several crypt(3) password hash types most commonly found on various Unix systems, supported out of the box are Windows LM hashes, plus lots of other hashes and ciphers in the community-enhanced version. It is currently available for many flavors of Unix, Windows, DOS, BeOS, and OpenVMS.

Install John the Ripper In Linux

John the Ripper is available in the default repositories of the most modern Linux distributions. So, we can easily install it with ‘root’ privileges as shown below depending upon your distribution type.

On DEB based systems, Ex. Ubuntu:

apt-get install john

On RPM based systems, Ex.CentOS:

yum install epel-release
yum install john

On SUSE/openSUSE:

zypper install john

On Arch Linux:

pacman -S john

On Gentoo:

emerge johntheripper

Usage

John the Ripper’s usage is quite simple. You don’t have to use any special cryptographic methods or don’t have to memorize lot of commands to find and break a weak password.

Before Using John tool, It is recommended to check John the Ripper’s efficiency and capabilities.To do this, run:

john -test

Sample output:

Benchmarking: descrypt, traditional crypt(3) [DES 128/128 SSE2-16]... DONE
Many salts:    3144K c/s real, 3150K c/s virtual
Only one salt:    3005K c/s real, 3011K c/s virtual

Benchmarking: bsdicrypt, BSDI crypt(3) ("_J9..", 725 iterations) [DES 128/128 SSE2-16]... DONE
Many salts:    102809 c/s real, 102809 c/s virtual
Only one salt:    100352 c/s real, 100553 c/s virtual

Benchmarking: md5crypt [MD5 32/64 X2]... DONE
Raw:    8897 c/s real, 8915 c/s virtual

Benchmarking: bcrypt ("$2a$05", 32 iterations) [Blowfish 32/64 X2]... DONE
Raw:    566 c/s real, 567 c/s virtual

Benchmarking: LM [DES 128/128 SSE2-16]... DONE
Raw:    41587K c/s real, 41670K c/s virtual

Benchmarking: AFS, Kerberos AFS [DES 48/64 4K]... DONE
Short:    292147 c/s real, 292732 c/s virtual
Long:    936089 c/s real, 936089 c/s virtual

Benchmarking: tripcode [DES 128/128 SSE2-16]... DONE
Raw:    2770K c/s real, 2770K c/s virtual

Benchmarking: dummy [N/A]... DONE
Raw:    50894K c/s real, 50996K c/s virtual

Benchmarking: crypt, generic crypt(3) [?/64]... DONE
Many salts:    240480 c/s real, 240480 c/s virtual
Only one salt:    238982 c/s real, 239461 c/s virtual

As you in the above output, this will give the insights about how many username/password combinations per second (c/s) your system will theoretically run for each password hash encryption type.

Well, now, I will show you how to break a simple, weak password.

Let me create a ‘test’ user.

sudo useradd test

Set password to the ‘test’ account:

sudo passwd test

Here, I set the password to the ‘test’ user account as ‘test’, i.e the user name and password are both ‘test’.

There are two ways to break the password.

Method 1:

First, create a text file called ‘recoverpassword.txt‘ in any location.

Then, list the /etc/shadow file contents to find the password entry to the ‘test’ user.

sudo cat /etc/shadow

Sample output:

 root:!:16384:0:99999:7:::
 daemon:*:16273:0:99999:7:::
 bin:*:16273:0:99999:7:::
 sys:*:16273:0:99999:7:::
 sync:*:16273:0:99999:7:::
 games:*:16273:0:99999:7:::
 man:*:16273:0:99999:7:::
 lp:*:16273:0:99999:7:::
 mail:*:16273:0:99999:7:::
 news:*:16273:0:99999:7:::
 uucp:*:16273:0:99999:7:::
 proxy:*:16273:0:99999:7:::
 www-data:*:16273:0:99999:7:::
 backup:*:16273:0:99999:7:::
 list:*:16273:0:99999:7:::
 irc:*:16273:0:99999:7:::
 gnats:*:16273:0:99999:7:::
 nobody:*:16273:0:99999:7:::
 libuuid:!:16273:0:99999:7:::
 syslog:*:16273:0:99999:7:::
 messagebus:*:16273:0:99999:7:::
 usbmux:*:16273:0:99999:7:::
 dnsmasq:*:16273:0:99999:7:::
 ntp:*:16273:0:99999:7:::
 whoopsie:*:16273:0:99999:7:::
 lightdm:*:16273:0:99999:7:::
 sk:$6$9LCW3/tG$uJqyynHfU454yhu5eF3dpUTiZg0cAm7NGJbzV/BsLIsmKACE5wWQgQuUAVHlMGNBzZK5mOV9b3Yt2I5KDJbsG.:16384:0:99999:7:::
 sshd:*:16385:0:99999:7:::
 saned:*:16398:0:99999:7:::
 test:$6$/SjwqqdA$y2VzePBBBiwNpL5D5dSEShqHkk9sT3xpMtz1/wJSsyEV3hYlXveLhs.h8Yh72Pr1dz6iMNprRfrQ1aQOPU05E/:16518:0:99999:7:::

Scroll down to the end. There you’ll find the entry for the ‘test’ user something like below.

[...]
test:$6$/SjwqqdA$y2VzePBBBiwNpL5D5dSEShqHkk9sT3xpMtz1/wJSsyEV3hYlXveLhs.h8Yh72Pr1dz6iMNprRfrQ1aQOPU05E/:16518:0:99999:7:::
[...]

Copy the above line and paste it into the recoverpassword.txt file.

vi recoverpassword.txt

Paste the ‘test’ entry from the /etc/shadow file.

test:$6$/SjwqqdA$y2VzePBBBiwNpL5D5dSEShqHkk9sT3xpMtz1/wJSsyEV3hYlXveLhs.h8Yh72Pr1dz6iMNprRfrQ1aQOPU05E/:16518:0:99999:7:::

Save and close the file.

Now, let us start to break the password using command:

john recoverpassword.txt

Sample output:

 Loaded 1 password hash (crypt, generic crypt(3) [?/64])
 Press 'q' or Ctrl-C to abort, almost any other key for status
 test             (test)
 1g 0:00:00:00 100% 1/3 1.562g/s 150.0p/s 150.0c/s 150.0C/s test..t99999!
 Use the "--show" option to display all of the cracked passwords reliably
 Session completed

Hurray! As you see above, the password for ‘test’ user has been cracked.

Important: Be mindful that this process will take several minutes, or even days to break a complex password.

Let us take another example. I am going to change the password of the ‘test’ user and see whether the John the Ripper would crack the password.

Let us set different password and try to break the password of ‘test’ user.

Change the ‘test’ user password using command:

sudo passwd test

Enter the new password twice, for example I am going to use the password as ‘welcome’.

Now, list out the /etc/shadow file contents. Then, copy the ‘test’ user entry to the recoverpassword.txt file as shown above.

Now, run the following command:

john recoverpassword.txt

Sample output:

 Loaded 1 password hash (crypt, generic crypt(3) [?/64])
 Press 'q' or Ctrl-C to abort, almost any other key for status
 welcome (test)
 1g 0:00:00:15 100% 2/3 0.06591g/s 205.1p/s 205.1c/s 205.1C/s piglet..knight
 Use the "--show" option to display all of the cracked passwords reliably
 Session completed

As you see, the password for ‘test’ user has been displayed. This process could take only a few minutes, because we’re breaking the very simple password. In case of complex passwords, this take several hours or days. So be prepared accordingly.

To view the cracked passwords, run:

john --show revoverpassword.txt

Sample output:

test:welcome:16518:0:99999:7:::
1 password hash cracked, 0 left

Method 2:

This is somewhat similar to method 1.

Create a new text, for example recoverpassword.txt in any location.

Then, append the contents of /etc/passwd and /etc/shadow files using John the Ripper’s effective utility called ‘unshadow’ .

unshadow /etc/passwd /etc/shadow > recoverpassword.txt

Now, run the following commands to crack the passwords.

john recoverpassword.txt

Now,  you can view the cracked passwords using command:

john --show recoverpassword.txt

Just think what if a hacker could get the /etc/passwd and /etc/shadow files of your Linux server? This could lead you to worst nightmare if your system got compromised by hackers using the passwd and shadow files that he/she has. That’s why we need to audit the passwords regularly and must set a strong password to our system.

To know more examples, refer the following link.

John the Ripper’s Cracking Modes

John the Ripper combines several cracking modes in one program and is fully configurable for your particular needs.

  1. Wordlist mode
  2. Single Crack mode
  3. Incremental mode
  4. External mode

1. Wordlist mode

It is the Simplest mode supported by John the Ripper. In this mode, you have to specify a wordlist ( i.e a text file containing one word per line) and some password files.

Example:

john --wordlist=mywordlist.lst --rules recoverpassword.txt

Be mindful that the wordlist should not contain any duplicate entries.

2. Single Crack mode

It is the recommended and fastest mode of all. You can even make the cracking process much faster by specifying multiple password files. John the Ripper will start to crack the passwords first using this mode.

3. Incremental mode

In this mode, John the Ripper will try with multiple combination of words to crack the passwords. It is the most powerful of all modes.

Example:

john --incremental recoverpassword.txt

4. External mode

In this mode, you have to create a configuration file section called [List.External:MODE], where MODE is any name that you assign to the mode. The section should contain some functions programmed in a subset of the C language. John will compile and use the functions if you enable this cracking mode via the command line.

For more details about the John the Ripper’s modes can be found here.

Conclusion

What we have seen so far is how to test the strength of the passwords using John the Ripper command line utility. You can come to a conclusion if this tool cracks your passwords in minutes, then it will definitely be a weak password. If it took long time, then you, somewhat, have a strong password and you’re safe. I suggest you to periodically audit and change the passwords.

I sincerely recommend you to use this tool for a good cause. Please don’t attempt to break or steal passwords of others using this tool.

References:


Advertise here with BSA

---------------------------------------------------------------------
John The Ripper: The Fast, Multi-platform Password Cracking Tool

Viewing all 343 articles
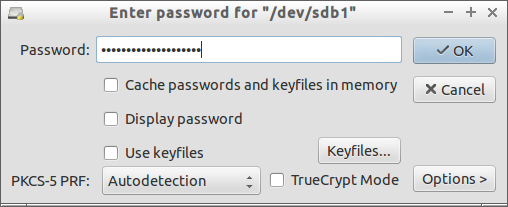
Browse latest View live


Latest Images