Quantcast
Channel: Unixmen » Fedora
Viewing all 343 articles
Browse latest View live

How To Install Zabbix Server On CentOS 7

$
0
0


About Zabbix

Zabbix is an enterprise-class open source distributed monitoring solution that can be used to monitor and track performance and availability of network servers, devices and other IT resources. It supports distributed and WEB monitoring, auto-discovery, and more.

Install Zabbix Server

I tested this how-to On CentOS 7 minimal server, although it should work on other RHEL/Scientific Linux 7.x versions.

For the testing purpose, I will use two machines.

Zabbix Server System:

  • Operating system: CentOS 7 64bit server
  • IP Address: 192.168.1.150/24
  • Hostname: server1.unixmen.local

Zabbix Client System:

  • Operating system: CentOS 7 64bit server
  • IP Address: 192.168.1.152/24
  • Hostname: server2.unixmen.local

First let us start from server side.

Prerequisites

Before installing Zabbix, we should have install and configure LAMP stack.

To install and configure LAMP server On CentOS 7, refer the following link.

Server Side Configuration

Zabbix is not available in the default repositories of CentOS. So, we will add EPEL and Zabbix official repository in order to install Zabbix server.

To install EPEL repository, run the following command:

yum install epel-release

Configure the ZabbixZone package repository and GPG key using command:

rpm --import http://repo.zabbix.com/RPM-GPG-KEY-ZABBIX
rpm -Uv  http://repo.zabbix.com/zabbix/2.4/rhel/7/x86_64/zabbix-release-2.4-1.el7.noarch.rpm

Now, Install Zabbix server and agent using command:

yum install zabbix-server-mysql zabbix-web-mysql zabbix-agent zabbix-java-gateway

Edit file /etc/httpd/conf.d/zabbix:

vi /etc/httpd/conf.d/zabbix.conf

Update your timezone:

php_value date.timezone Asia/Kolkata

Restart the httpd

systemctl restart httpd

Create MySQL database and user for Zabbix

Login to MariaDB prompt with command:

mysql -u root -p

Create a database called ‘zabbixdb’ and database user called ‘zabbixuser’.

Welcome to the MariaDB monitor. Commands end with ; or \g.
Your MariaDB connection id is 10
Server version: 5.5.41-MariaDB MariaDB Server

Copyright (c) 2000, 2014, Oracle, MariaDB Corporation Ab and others.

Type 'help;' or '\h' for help. Type '\c' to clear the current input statement.

MariaDB [(none)]> create database zabbixdb character set utf8;
Query OK, 1 row affected (0.05 sec)

MariaDB [(none)]> grant all privileges on zabbixdb.* to 'zabbixuser'@'localhost' identified by 'password';
Query OK, 0 rows affected (0.21 sec)

MariaDB [(none)]> flush privileges;
Query OK, 0 rows affected (0.00 sec)

MariaDB [(none)]> exit
Bye

Import zabbix templates to Zabbix database

Let us import the following templates. It will ask you the zabbixuser’s password during importing templates.

mysql -u zabbixuser -p zabbixdb < /usr/share/doc/zabbix-server-mysql-2.4.5/create/schema.sql
mysql -u zabbixuser -p zabbixdb < /usr/share/doc/zabbix-server-mysql-2.4.5/create/images.sql
mysql -u zabbixuser -p zabbixdb < /usr/share/doc/zabbix-server-mysql-2.4.5/create/data.sql

Configure Zabbix server

Edit file /etc/zabbix/zabbix_server.conf,

vi /etc/zabbix/zabbix_server.conf

Set the database name, user and password which you’ve created earlier. If the lines are commented out, uncomment and set the correct values.

[...]
DBName=zabbixdb
[...]
DBUser=zabbixuser
[...]
DBPassword=password
[...]

Save and close the file.

Now, we have to set Zabbix server to monitor itself.

To do that, edit file /etc/zabbix/zabbix_agentd.conf,

vi /etc/zabbix/zabbix_agentd.conf

Do the following changes.

[...]

## Line 85 - Specify Zabbix server ##
Server=127.0.0.1

[...]

## Line 126 - Specify Zabbix server ##
ServerActive=127.0.0.1

[...]

## Line 137 - Specify Zabbix server Hostname or IP address ##
Hostname=server1.unixmen.local
[...]

Save and close the file.

Adjust PHP settings

We should adjust phip.ini file as per zabbix recommended settings.

Edit file php.ini,

vi /etc/php.ini

Set the values as shown below. If the lines doesn’t exist, add them.

max_execution_time = 600
max_input_time = 600
memory_limit = 256M
post_max_size = 32M
upload_max_filesize = 16M
date.timezone = Asia/Kolkata

Save and close the file.

Adjust Firewall and SELinux settings

Adjust iptables to allow the zabbix ports 10050 and 10051.

firewall-cmd --permanent --add-port=10050/tcp
firewall-cmd --permanent --add-port=10051/tcp

Restart iptables service to take effect the changes.

systemctl restart firewalld

If you SELinux, run the following command to allow Apache to communicate with Zabbix.

setsebool -P httpd_can_connect_zabbix=1

Allow Zabbix web console for particular IP range (Optional)

Edit file /etc/httpd/conf.d/zabbix.conf,

vi /etc/httpd/conf.d/zabbix.conf

Add the ip range that you want to allow to access zabbix web interface. This is optional. If you set ‘Allow from All’, you can access zabbix’s web console from any network.

In my case, I allowed the 192.168.1.0/24 series.

Alias /zabbix /usr/share/zabbix

<Directory "/usr/share/zabbix">
 Options FollowSymLinks
 AllowOverride None
 Order allow,deny
 Allow from 192.168.1.0/24
</Directory>

Save and close the file. Start/Restart zabbix and httpd services and make them to start automatically on every reboot.

systemctl start zabbix-server
systemctl start zabbix-agent
systemctl restart httpd
systemctl restart mariadb
systemctl enable zabbix-server
systemctl enable zabbix-agent

Configure Zabbix via Web console

We have completed the installation and configuration part. Now let us configure the zabbix web console.

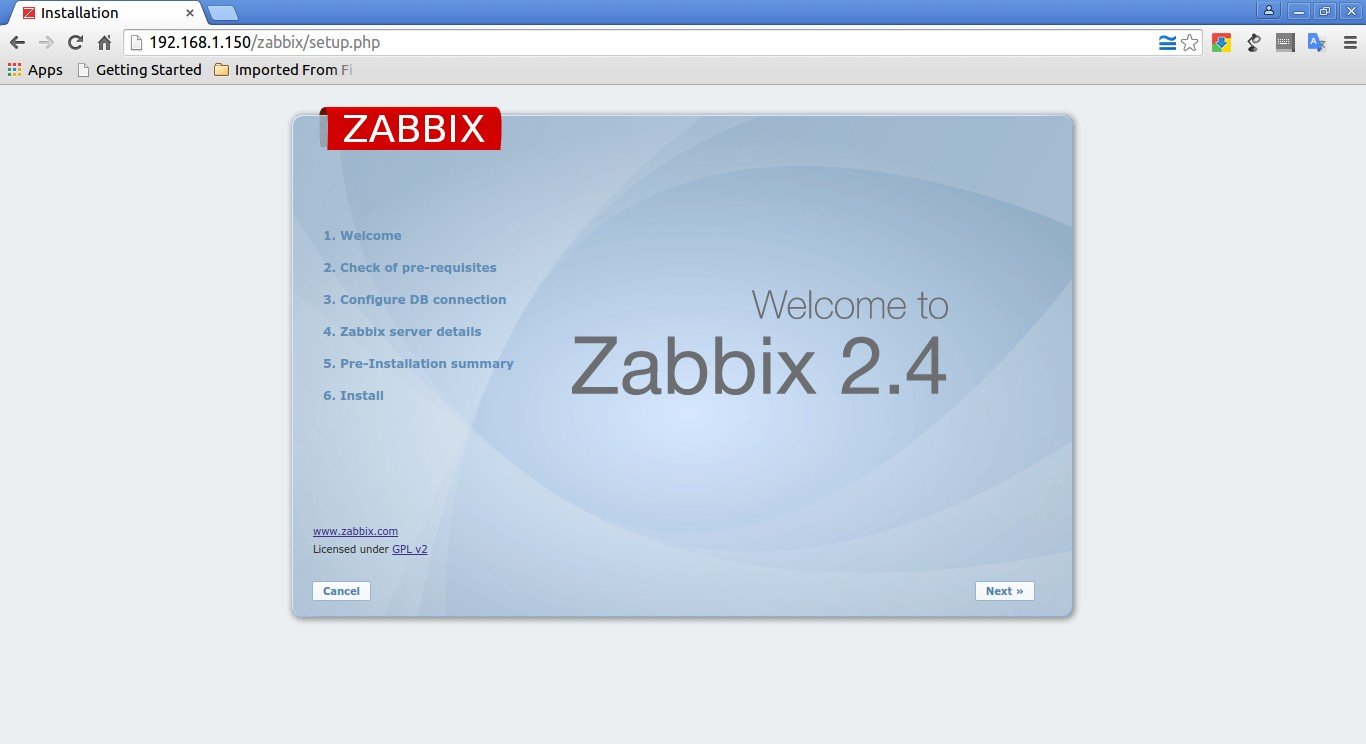
Navigate tohttp://ip-address/zabbix or http://domain-name/zabbix.

Click Next.

Installation - Google Chrome_001

The installer will check for necessary prerequisites. If everything seems OK, click Next to continue, else go back and install the necessary packages.

Installation - Google Chrome_002

Enter the zabbix database name, database user and password and click Test connection. If you entered the correct values, it will show a message that says: OK.

Click Next to continue.

Installation - Google Chrome_004

Enter your server name and Click Next:

Installation - Google Chrome_005

Check the pre-installation summary, if everything good, click Next to continue or click Previous to change the parameters.

Installation - Google Chrome_006

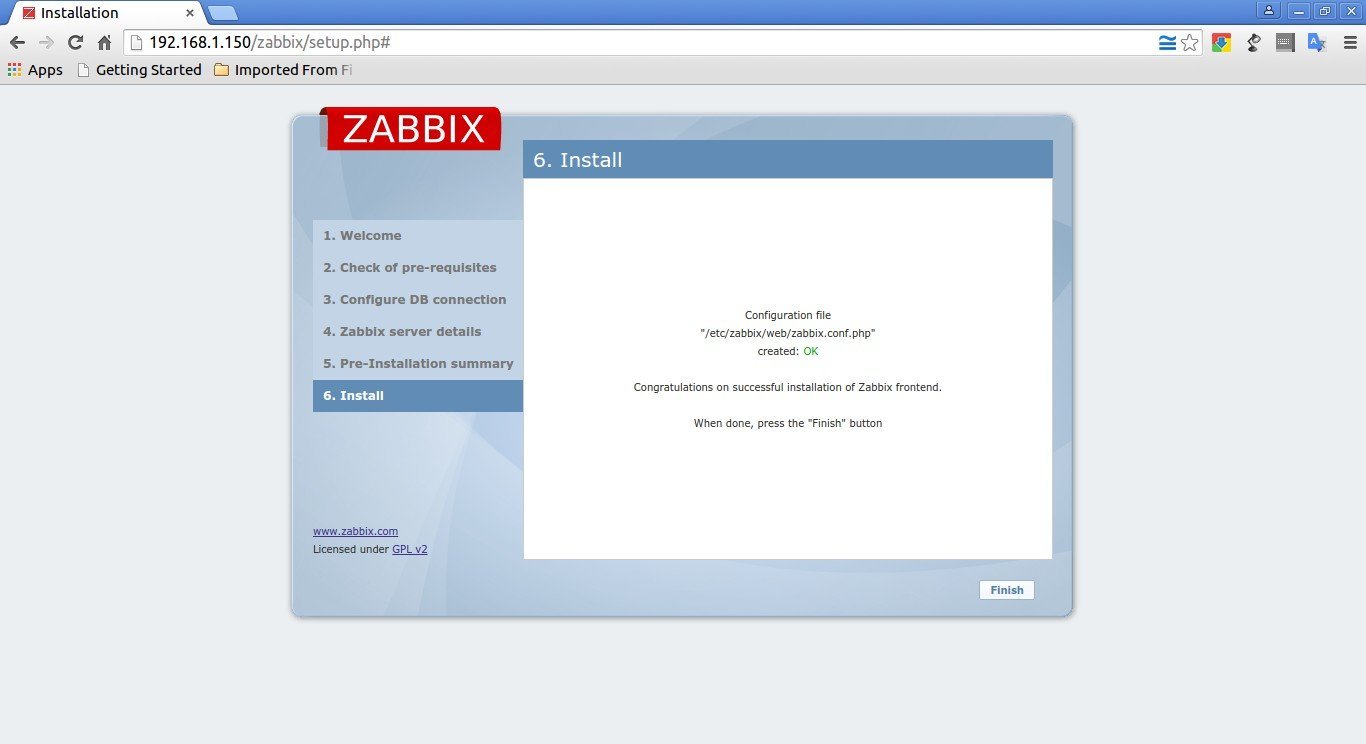
Congratulations! You’ve have successfully completed the installation. Click Finish to complete the installation.

Installation - Google Chrome_007

Now you’ll be redirected to the zabbix web console page. Enter the username and password.

The default username/password is admin/zabbix.

Zabbix - Google Chrome_008

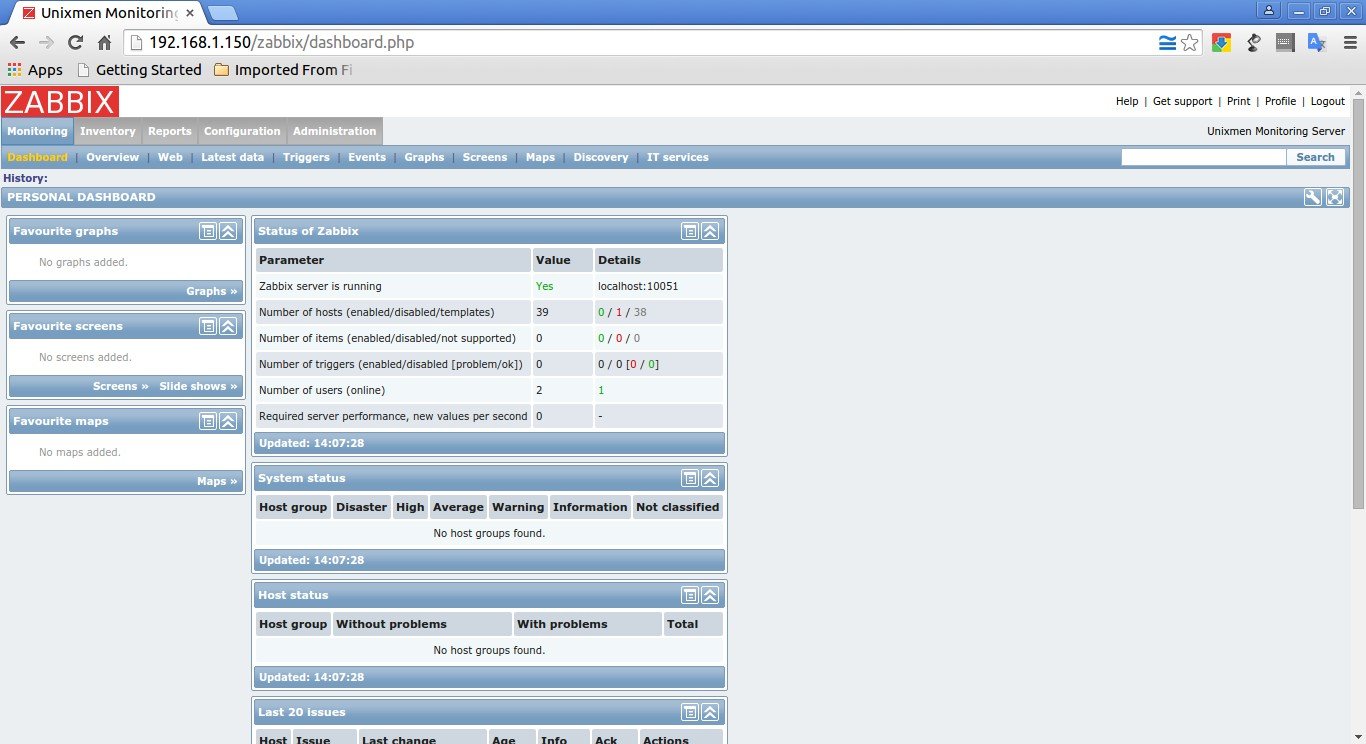
This is how the admin dashboard looks:

Unixmen Monitoring Server: Dashboard - Google Chrome_001

Activate Zabbix server

Initially, the zabbix server is deactivated from being monitored.

To activate it, go to Configuration -> Hosts. Select the host (zabbix server) and choose Activate selected from the drop-down box and click Go.

Unixmen Monitoring Server: Configuration of hosts - Google Chrome_010

Now, you should see your Zabbix server is being monitored.

Unixmen Monitoring Server: Configuration of hosts - Google Chrome_011

Check Zabbix server Statistics

After a few seconds, click on the Monitoring tab on the top menu bar and select “Latest data”.

You’ll see the zabbix server’s details:

Unixmen Monitoring Server: Latest data [refreshed every 30 sec.] - Google Chrome_002

To view the screens, go to Monitoring -> Screens from the Zabbix’s dashboard.

Unixmen Monitoring Server: Custom screens [refreshed every 30 sec.] - Google Chrome_003

That’s it. We’re done in the server side. Let us go to client side configuration.

Client Side Configuration

Let us install zabbix agent on our client systems.

To install zabbix agent packages on Fedora/RHEL clients, enter the following commands in Terminal:

rpm --import http://repo.zabbix.com/RPM-GPG-KEY-ZABBIX
rpm -Uv  http://repo.zabbix.com/zabbix/2.4/rhel/7/x86_64/zabbix-release-2.4-1.el7.noarch.rpm
yum install zabbix-agent -y

On Ubuntu/Debian clients, run:

sudo apt-get install zabbix-agent

Configure Clients

Next edit file /etc/zabbix/zabbix_agentd.conf,

sudo vi /etc/zabbix/zabbix_agentd.conf

Add the server ip address and client hostname.

[...]
## Specify Zabbix's server IP address ##
Server=192.168.1.150
[...]
##Specify Zabbix's server IP address ##
ServerActive=192.168.1.150
## Specify client system hostname ##
Hostname=server2.unixmen.local
[...]

Where,

  • 192.168.1.150 – My Zabbix server IP address
  • server2 – My Zabbix client’s hostname

Now restart zabbix-agent service with command:

In Ubuntu/Debian:

sudo service zabbix-agent start

In CentOS 7:

systemctl start zabbix-agent
systemctl enable zabbix-agent

Add Monitoring hosts

Go to your zabbix server dashboard.

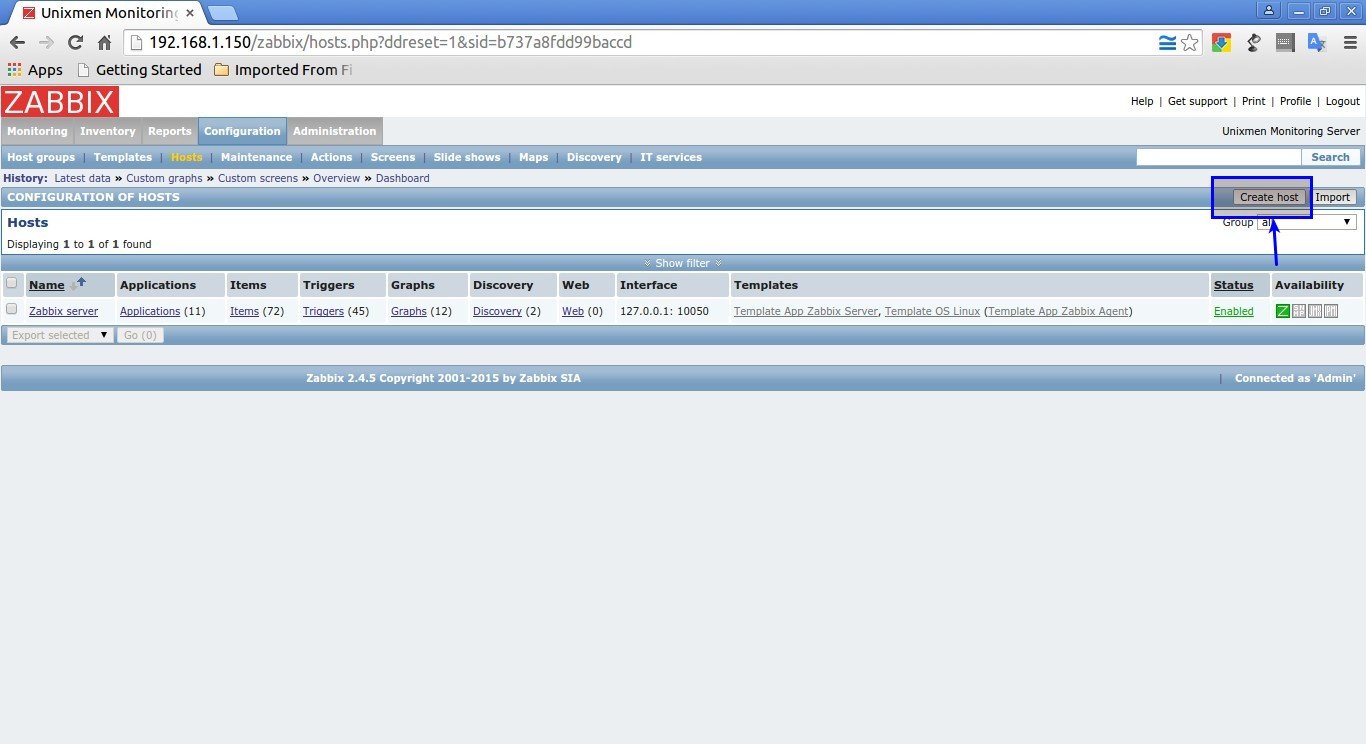
To add a monitoring target, navigate to Configuration -> Hosts. Click on Create Host on the right side.

Unixmen Monitoring Server: Configuration of hosts - Google Chrome_004

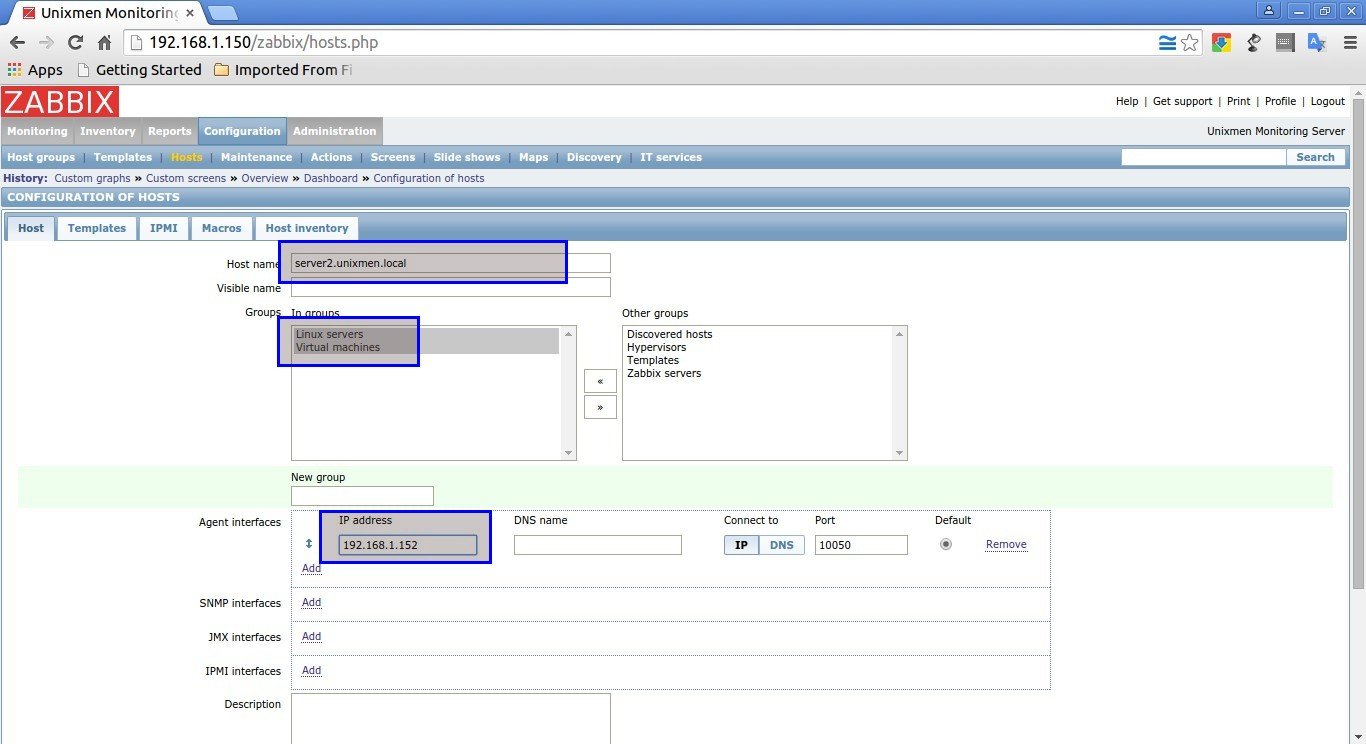
Enter Hostname, select Groups and IP address in the Host section as shown below.

Unixmen Monitoring Server: Configuration of hosts - Google Chrome_006

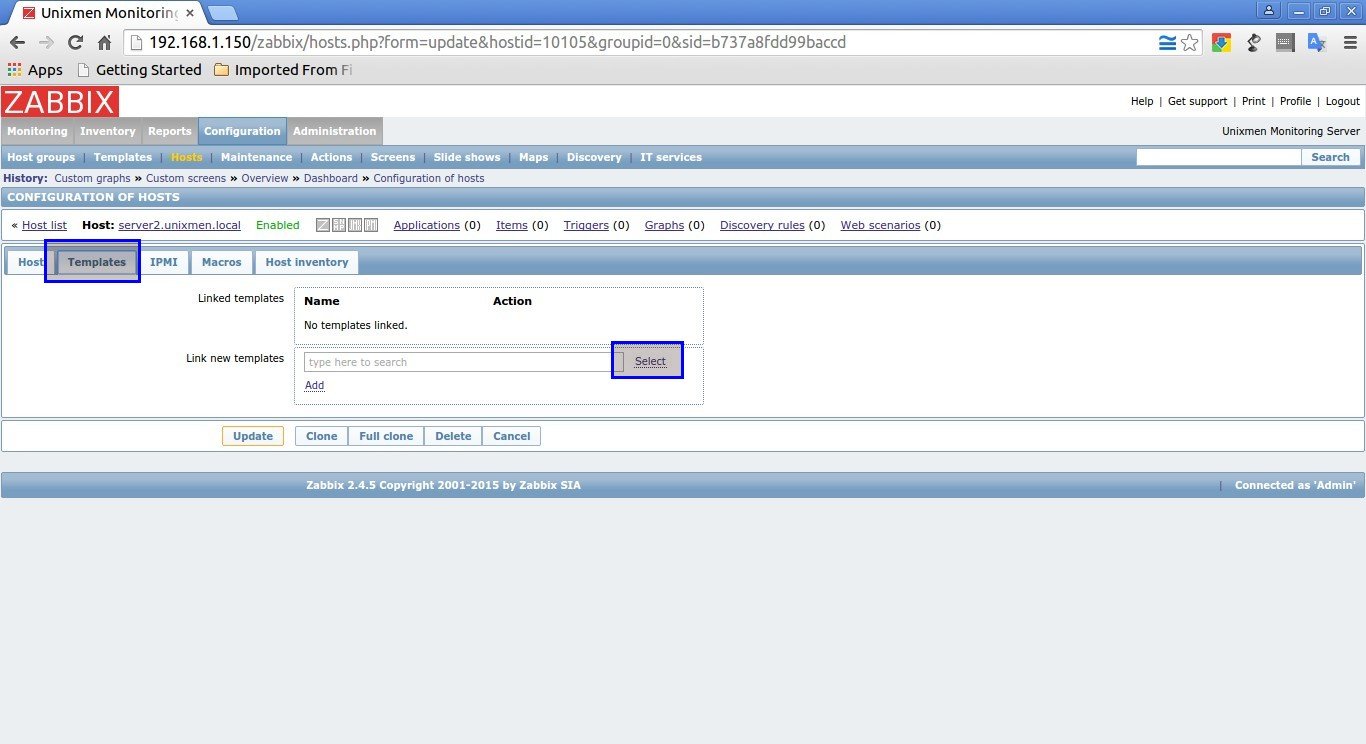
Next, In the Templates section select your Template.

Unixmen Monitoring Server: Configuration of hosts - Google Chrome_008

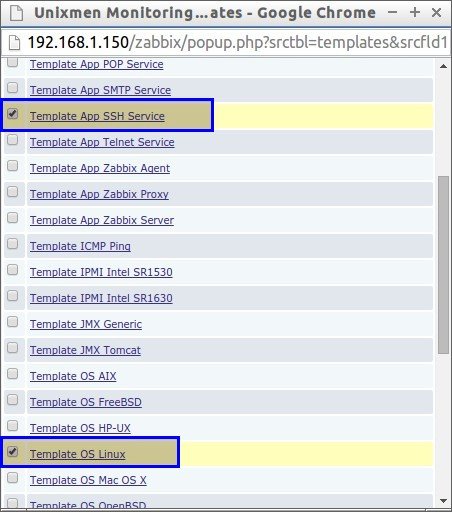
In my case, I selected Linux Template and SSH template. After selecting your Template choice click Select button in the bottom.

Unixmen Monitoring Server: Templates - Google Chrome_010

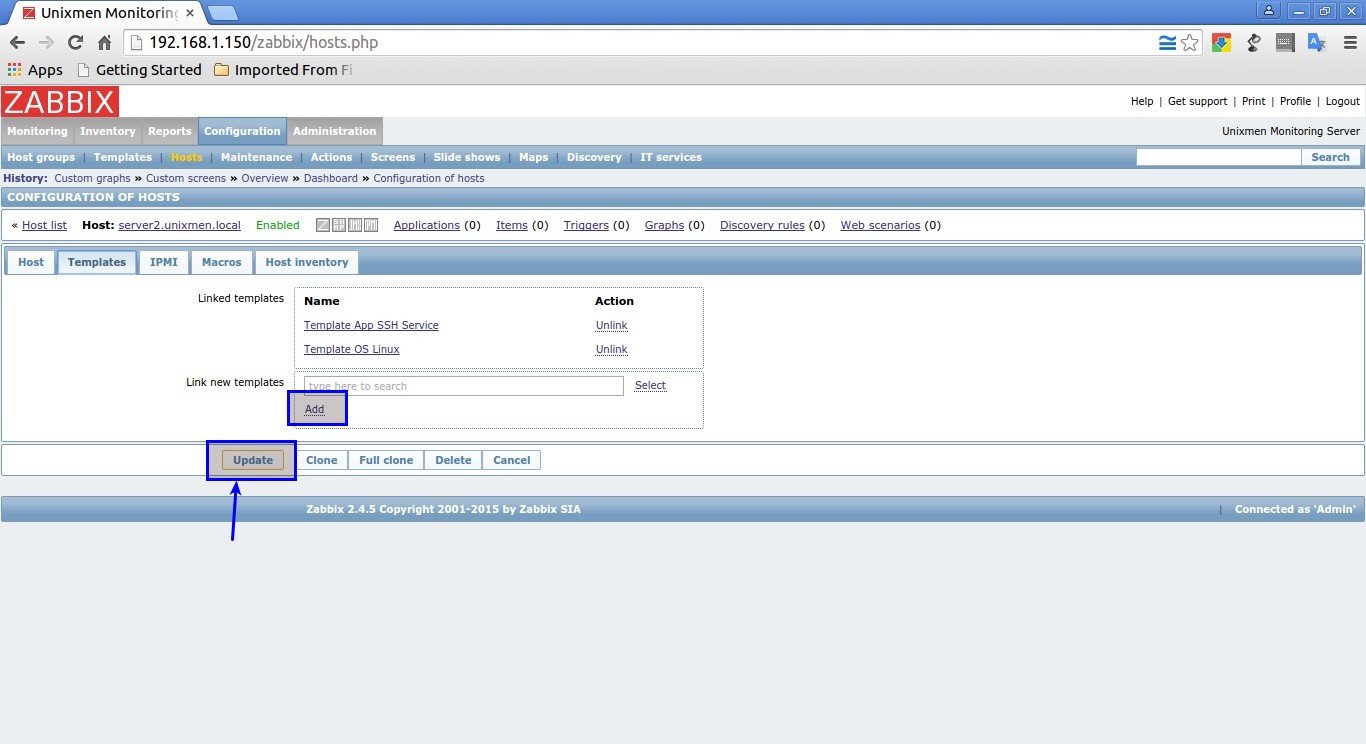
In the next window, click Add and click Update buttons.

Unixmen Monitoring Server: Configuration of hosts - Google Chrome_011

Now, you will see that the new host has been added to the Monitoring list.

Unixmen Monitoring Server: Configuration of hosts - Google Chrome_001

That’s it.

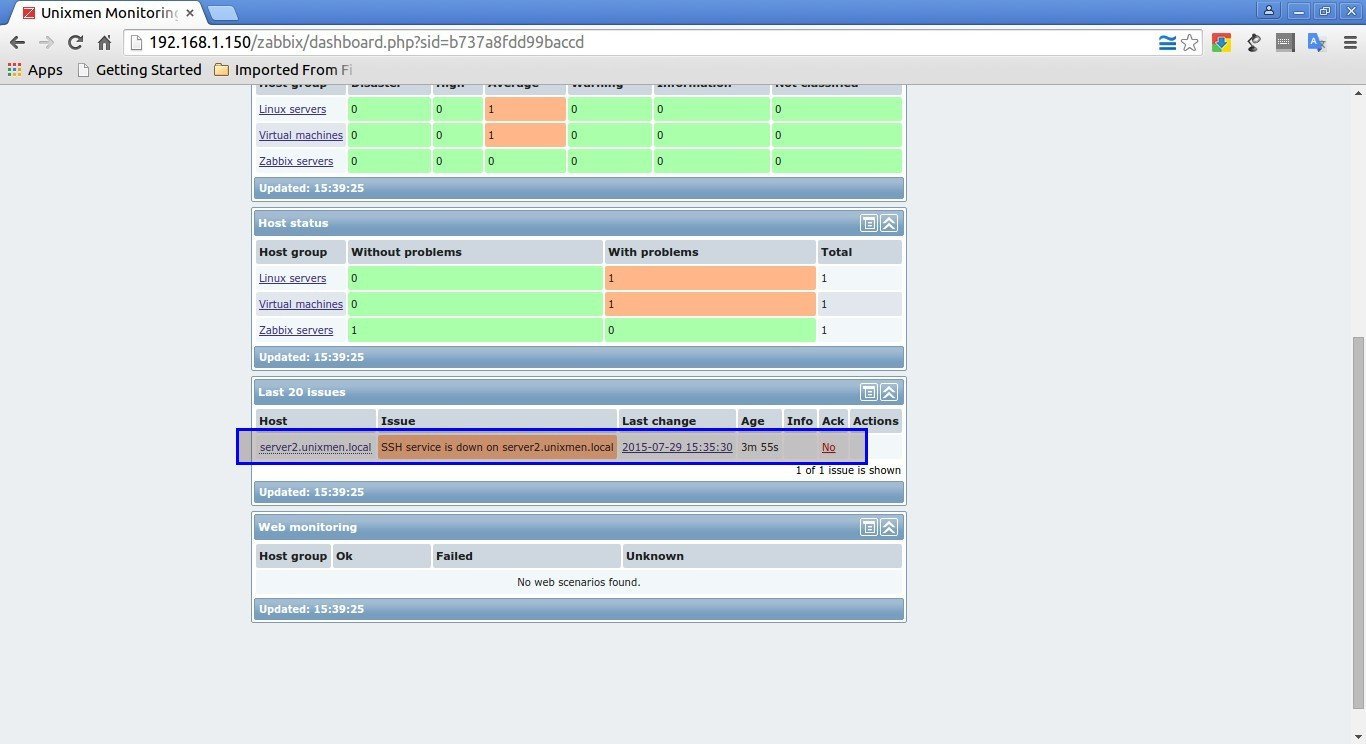
If there is any problem in the Client system, you can view them in the main Dashboard of your Zabbix’s server.

Unixmen Monitoring Server: Dashboard - Google Chrome_013

Go to Monitoring -> Latest data to check the details of client.

Unixmen Monitoring Server: Latest data [refreshed every 30 sec.] - Google Chrome_002

You can view the list of all warnings and information in Monitoring -> Triggers location.

Unixmen Monitoring Server: Status of triggers [refreshed every 30 sec.] - Google Chrome_003

Conclusion

In this tutorial, we have covered only installation part and basic configuration of Zabbix. To learn more about Zabbix, explore all the options in the Zabbix’s dashboard one by one and set up a best monitoring solution that suits your requirement.

For more details about configuration and usage, refer Zabbix Official manual.

Good luck.

If you want to deploy Zabbix in CentOS 6.x systems, refer the following link.

Reference Links:

The post How To Install Zabbix Server On CentOS 7 appeared first on Unixmen.

Basics Of NetworkManager Command Line Tool, Nmcli

$
0
0


Introduction

In this tutorial, we will discuss NetworkManager command line tool, aka nmcli, in CentOS / RHEL 7. Users who are using ifconfig should avoid this command in Centos 7.

Lets configure some networking settings with nmcli utility.

To get all address information of all interfaces connected with System

[root@localhost ~]# ip addr show

Sample Output:

1: lo: <LOOPBACK,UP,LOWER_UP> mtu 65536 qdisc noqueue state UNKNOWN 
 link/loopback 00:00:00:00:00:00 brd 00:00:00:00:00:00
 inet 127.0.0.1/8 scope host lo
 valid_lft forever preferred_lft forever
 inet6 ::1/128 scope host 
 valid_lft forever preferred_lft forever
2: eno16777736: <BROADCAST,MULTICAST,UP,LOWER_UP> mtu 1500 qdisc pfifo_fast state UP qlen 1000
 link/ether 00:0c:29:67:2f:4c brd ff:ff:ff:ff:ff:ff
 inet 192.168.1.51/24 brd 192.168.1.255 scope global eno16777736
 valid_lft forever preferred_lft forever
 inet6 fe80::20c:29ff:fe67:2f4c/64 scope link 
 valid_lft forever preferred_lft forever

To retrieve packets statistics related with connected interfaces

[root@localhost ~]# ip -s link show eno16777736

Sample Output:

unxmen_(011)

Get routing configuration

[root@localhost ~]# ip route

Sample Output:

default via 192.168.1.1 dev eno16777736 proto static metric 100 
192.168.1.0/24 dev eno16777736 proto kernel scope link src 192.168.1.51 metric 100

Analyze path for some host/website

[root@localhost ~]# tracepath unixmen.com

Output will be just like traceroute but in more managed form.

unxmen_0121

nmcli utility

Nmcli is a very rich and flexible command line utility. some of the terms used in nmcli are:

  • Device – A network interface being used.
  • Connection – A set of configuration settings, for a single device you can have multiple connections, you can switch between connections.

Find out how many connections are available for how many devices

[root@localhost ~]# nmcli connection show

unxmen_(013)

Get details of a specific connection

[root@localhost ~]# nmcli connection show eno1

Sample output:

unxmen_(014)

Get the Network device status

[root@localhost ~]# nmcli device status
 DEVICE               TYPE              STATE          CONNECTION 
eno16777736            ethernet      connected              eno1 
lo                     loopback      unmanaged               --

Create a new connection with “dhcp”

[root@localhost ~]# nmcli connection add con-name "dhcp" type ethernet ifname eno16777736

Where,

  • Connection add – To add new connection
  • con-name – connection name
  • type – type of device
  • ifname – interface name

This command will add connection with dhcp protocol.

Sample output:

Connection 'dhcp' (163a6822-cd50-4d23-bb42-8b774aeab9cb) successfully added.

Instead of assigning an IP via dhcp, you can add ip address as “static”

[root@localhost ~]# nmcli connection add con-name "static" ifname eno16777736 autoconnect no type ethernet ip4 192.168.1.240 gw4 192.168.1.1

Sample Output:

Connection 'static' (8e69d847-03d7-47c7-8623-bb112f5cc842) successfully added.

Update connection:

[root@localhost ~]# nmcli connection up eno1

Again Check, whether ip address is changed or not.

[root@localhost ~]# ip addr show

unxmen_(015)

Add DNS settings to Static connections.

[root@localhost ~]# nmcli connection modify "static" ipv4.dns 202.131.124.4

Add additional DNS value.

[root@localhost ~]# nmcli connection modify "static" +ipv4.dns 8.8.8.8

Note: For additional entries + symbol will be used and +ipv4.dns will be used instead on ip4.dns

Put an additional ip address:

[root@localhost ~]# nmcli connection modify "static" +ipv4.addresses 192.168.200.1/24

Refresh settings using command:

[root@localhost ~]# nmcli connection up eno1

unxmen_(016)

You will see, setting are effective now.

That’s it.


The post Basics Of NetworkManager Command Line Tool, Nmcli appeared first on Unixmen.

Install PXE Server And Configure PXE Client On CentOS 7

$
0
0


About PXE Server

PXE Server, stands for preboot execution environment, will help to install a system in the network without having a physical media. Unlike traditional installation methods, we can install any system in the network without having CD/DVD or USB drives. It is used to enable a network computer to boot only from a network interface card. This method will be very helpful, if a System Administrator want to install many systems which doesn’t have a CD/DVD device on the network. PXE environment needs a DHCP server that distributes the IP addresses to the client systems, and a TFTP server that downloads the installation files to the PXE clients. You don’t need any CD/DVD or USB bootable drives to install client systems. Just, copy the ISO images on the PXE server and start installing your Linux clients via network using PXE server.

Scenario

My test box (pxe server) details are given below:

  • Operating System : CentOS 7 Minimal server.
  • IP Address : 192.168.1.150/24.
  • SELinux disabled on the PXE server.
  • IP tables stopped on the PXE server.

In this tutorial, we are going to see how to setup a PXE server On CentOS 7 server, and install CentOS 7 64 bit edition on our client system using the PXE server.

Install PXE Server

First, you should Install and configure DHCP server on your PXE server. To install and configure DHCP server, refer the following link:

Now, install the following packages for setting up PXE environment:

yum install httpd xinetd syslinux tftp-server -y

Configure PXE Server

Go to /usr/share/syslinux/ directory:

cd /usr/share/syslinux/

Copy the following TFTP configuration files to the /var/lib/tftpboot/ directory.

cp pxelinux.0 menu.c32 memdisk mboot.c32 chain.c32 /var/lib/tftpboot/

Edit file /etc/xinetd.d/tftp

vi /etc/xinetd.d/tftp

Enable TFTP server. To do this, change “disable=yes” to “no”.

 # default: off
 # description: The tftp server serves files using the trivial file transfer \
 #       protocol.  The tftp protocol is often used to boot diskless \
 #       workstations, download configuration files to network-aware printers, \
 #       and to start the installation process for some operating systems.
 service tftp
 {
 socket_type             = dgram
 protocol                = udp
 wait                    = yes
 user                    = root
 server                  = /usr/sbin/in.tftpd
 server_args             = -s /var/lib/tftpboot
 disable                 = no
 per_source              = 11
 cps                     = 100 2
 flags                   = IPv4
}

Mount CentOS installation ISO file to any directory of your choice, for example /mnt. I already have CentOS 7 64 bit ISO image on my /root directory.

mount -o loop /root/CentOS-7.0-1406-x86_64-DVD.iso /mnt/

Next, create a directory to store CentOS installation ISO image.

mkdir /var/lib/tftpboot/centos7_x64

Note: If you want to install CentOS 32 bit edition, make a relevant directory called centos7_i386 (Ex. /var/lib/tftpboot/centos7_i386).

Copy the ISO file contents to /var/lib/tftpboot/centos7_x64/.

cp -fr /mnt/* /var/lib/tftpboot/centos7_x64/

Set the proper permissions to the above directory.

chmod -R 755 /var/lib/tftpboot/centos7_x64/

Create a apache configuration file for PXE server under /etc/httpd/conf.d/ directory:

vi /etc/httpd/conf.d/pxeboot.conf

Add the following lines:

Alias /centos7_x64 /var/lib/tftpboot/centos7_x64/

<Directory /var/lib/tftpboot/centos7_x64>
Options Indexes FollowSymLinks
Order Deny,Allow
Deny from all
Allow from 127.0.0.1 192.168.1.0/24
</Directory>

Save and close the file.

Then, create a configuration directory for PXE server:

mkdir /var/lib/tftpboot/pxelinux.cfg

Now, create PXE server configuration file under the pxelinux.cfg:

vi /var/lib/tftpboot/pxelinux.cfg/default

Add the following lines:

default menu.c32
prompt 0
timeout 300
ONTIMEOUT local

menu title ########## PXE Boot Menu ##########

label 1
menu label ^1) Install CentOS 7
kernel centos7_x64/images/pxeboot/vmlinuz
append initrd=centos7_x64/images/pxeboot/initrd.img method=http://192.168.1.150/centos7_x64 devfs=nomount

label 2
menu label ^2) Boot from local drive localboot

Save and close the file.

Configure DHCP Server

Now, we have to configure the DHCP server to work with PXE server.

Edit file /etc/dhcp/dhcpd.conf,

vi /etc/dhcp/dhcpd.conf

Add the following lines at the end:

allow booting;
allow bootp;
option option-128 code 128 = string;
option option-129 code 129 = text;
next-server 192.168.1.150;
filename "pxelinux.0";

Save and close the file.

Now, We have come to the end of PXE server configuration. Restart all the services to complete the configuration.

systemctl restart xinetd
systemctl restart httpd
systemctl restart dhcpd

Enable all services to start automatically on every reboot.

systemctl enable xinetd
systemctl enable httpd
systemctl enable dhcpd

Congratulations! We have completed the PXE server configuration.

Disable Firewall and SELinux

To reduce complexity, I have disabled both firewall and SELinux in my PXE server.

To disable firewall, run the following commands:

systemctl disable firewalld
systemctl stop firewalld

To disable SELinux, edit file /etc/sysconfig/selinux:

vi /etc/sysconfig/selinux

Find the line: SELINUX=enforcing and change it to SELINUX=disabled

# This file controls the state of SELinux on the system.
# SELINUX= can take one of these three values:
# enforcing - SELinux security policy is enforced.
# permissive - SELinux prints warnings instead of enforcing.
# disabled - No SELinux policy is loaded.
SELINUX=disabled
# SELINUXTYPE= can take one of these two values:
# targeted - Targeted processes are protected,
# minimum - Modification of targeted policy. Only selected processes are protected.
# mls - Multi Level Security protection.
SELINUXTYPE=targeted

Save and close the file. Reboot your PXE server to take effect the saved changes.

Now, let us configure PXE clients.

PXE Client Configuration

The client may be any system that has network boot enabled option (PXE boot). You can enable this option in your Bios settings.

For testing purpose, I have created a Virtual Machine client on my Oracle VirtualBox.

Open up the Oracle VirtualBox. Click on the New button in the menu bar.

Oracle VM VirtualBox Manager_003

Enter the Virtual machine name.

Create Virtual Machine_005

Enter the RAM size to the Virtual machine.

Create Virtual Machine_006

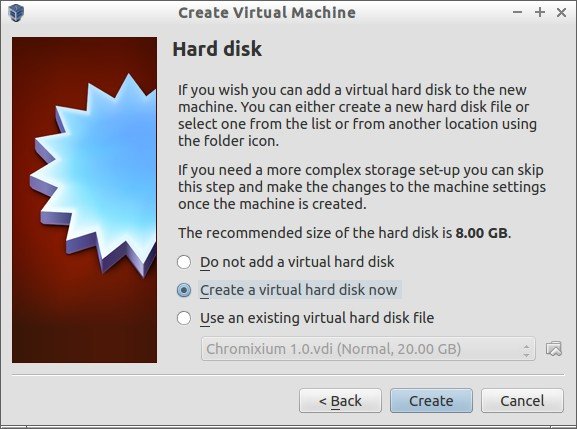
Select “Create a virtual hard drive now” option and click Create.

Create Virtual Machine_007

Select the Virtual hard drive file type. If you don’t know to what to select, leave the default option and click Next. Select whether the new virtual hard drive file should grow as it is used or if it should be created as fixed size.

Enter the Virtual hard drive size.

Create Virtual Hard Disk_009

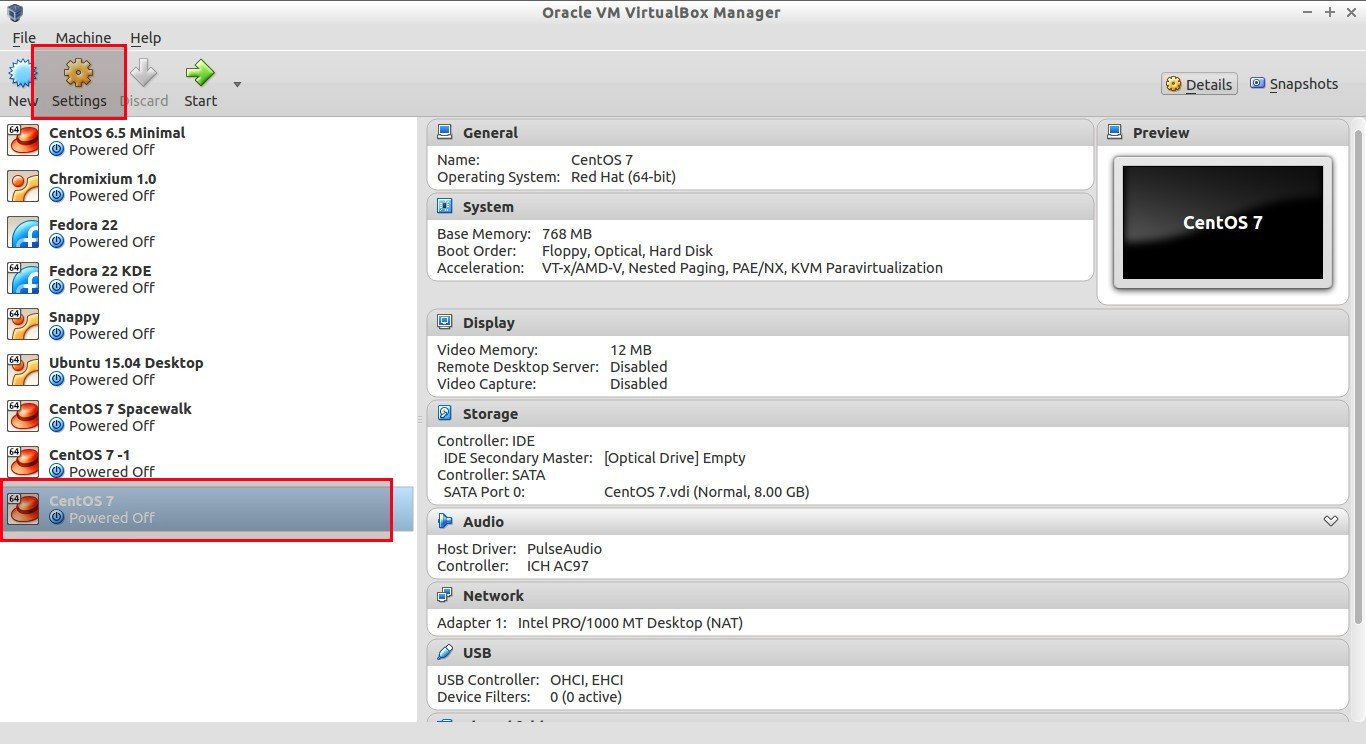
That’s it. Our Virtual Client machine has been created. Now, we should make the client to boot from the network. To do that, go to the Vitual machine Settings option.

Oracle VM VirtualBox Manager_010

Select the System tab on the left, and Choose Network from the boot order option on the right side.

CentOS 7 - Settings_011

Then, go to the Network tab and select “Bridged Adapter” from the “Attached to” drop down box.

CentOS 7 - Settings_012

Once you done all the above steps, click OK to save the changes.

That’s it. Now, power on the Virtual client system. You should see the following screen.

CentOS 7 [Running] - Oracle VM VirtualBox_014

That’s it. Now you know what to do next. Start installing CentOS on your client using the PXE server.

In case, you want to serve CentOS ISO over FTP server instead of web server, and want to include a kickstart file to automate the PXE client installation, refer the following link.

Conclusion

Setting up network installation using PXE server is fun, efficient and time saving method. You can install as many as clients you want at a time in your local area network. All you need to do is sufficient hardware configuration server and pxe enabled clients. Also, PXE server and client configuration is not that difficult.

Good luck!

To setup PXE server in CentOS 6.x systems, refer the following link.

Reference:


The post Install PXE Server And Configure PXE Client On CentOS 7 appeared first on Unixmen.

Citadel – A Free, Open Source, Email And Collaboration Suite

$
0
0


About Citadel

Citadel is a free, open source Collaboration suite that can be used to setup and manage Email server, Calendars, address books, Instant messenger, mailing lists and much more. It is written mostly using “C” language and is a highly integrated Groupware Platform with a AJAX-powered “Web 2.0” interface, but also providing SMTP, IMAP, POP3, and GroupDAV access to its content.

Citadel offers versatile email services with very low administration needed. It provides its own implementations of these server protocols:

  • IMAP
  • POP3
  • SMTP
  • ManageSieve
  • XMPP
  • Citadel

It works well on most Linux operating systems, Solaris, and *BSD systems.

Prominent Features

Citadel has lot of useful features. Here, I list some important features.

  • Email
  • Calendar/scheduling
  • Address books
  • Bulletin boards (forums)
  • Mailing list server
  • Instant messaging
  • Wiki and blog engines
  • Multiple domain support
  • A powerful web interface
  • RSS aggregation
  • and more…

Installation

1. Install required prerequisites

Log on to your system as root user and install the following prerequisites.

In DEB based systems:

apt-get update
apt-get upgrade
apt-get install build-essential curl g++ gettext shared-mime-info libssl-dev

In RPM based systems:

yum update
yum groupinstall "Development Tools"

The following additional packages are also recommended:

yum install gettext shared-mime-info openssl-devel

If you want to use system icons such as the GNOME File Icons in WebCit, install:

yum install gnome-icon-theme

Then, create proper symlinks as shown below in RPM based systems such as RHEL, CentOS.

cd /usr/local/webcit/static
ln -s /usr/share/icons/gnome/24x24/mimetypes icons

In Arch Linux:

pacman -S curl expat libical libsieve perl-berkeleydb

2. Install Citadel using Easy install script

After installing the required prerequisites, run the following command to install Citadel.

wget -q -O - http://easyinstall.citadel.org/install | sh

Press Enter to start:

Welcome to Citadel Easy Install
Running on: Linux Debian jessie/sid ( 3.19.0-15-generic x86_64)
We will perform the following actions:

Installation:
* Download/install supporting libraries (if needed)
* Download/install Citadel (if needed)
* Download/install WebCit (if needed)

Configuration:
* Configure Citadel
* Configure WebCit

Perform the above installation steps now? ## Press Enter ##

Accept License terms:

[...]

Do you accept the terms of this license?
If you do not accept the General Public License, Easy Install will exit.
Enter Y or Yes to accept: Y ## Type Y and Press Enter key ##

Be mindful that it will take lot of time, because this command will compile a lot of code.

Please enter the name of the Citadel user account that should be granted administrative privileges once created.

root@server: -home-sk_001

Enter a password for the system administrator.

root@server: -home-sk_002

Citadel needs to run under its own user ID. This would typically be called “citadel”, but if you are running Citadel as a public site, you might also call it “bbs” or “guest”. The server will run under this user ID. Please specify that user ID here. You may specify either a user name or a numeric UID.

root@server: -home-sk_003

Please specify the IP address which the server should be listening to. You can name a specific IPv4 or IPv6 address, or you can specify “*” for “any address”, “::” for “any IPv6 address”, or simply “0.0.0.0” for “any IPv4 address”.

If you leave this blank, Citadel will listen on all addresses. This can usually be left to the default unless multiple instances of Citadel are running on the same computer.

root@server: -home-sk_004

Specify the TCP port number on which your server will run. Normally, this will be port 504, which is the official port assigned by the IANA for Citadel servers. You will only need to specify a different port number if you run multiple instances of Citadel on the same computer and there is something else already using port 504.

root@server: -home-sk_005

Please choose the user authentication mode. By default Citadel will use its own internal user accounts database. If you choose Host, Citadel users will have accounts on the host system, authenticated via /etc/passwd or a PAM source.

LDAP chooses an RFC 2307 compliant directory server, the last option chooses the nonstandard MS Active Directory LDAP scheme. Do not change this option unless you are sure it is required, since changing back requires a full reinstall of Citadel.

  • 0 – Self contained authentication
  • 1 – Host system integrated authentication
  • 2 – External LDAP – RFC 2307 compliant directory
  • 3 – External LDAP – nonstandard MS Active Directory

root@server: -home-sk_006

Select Yes and press enter.

root@server: -home-sk_007

Select Yes and press enter to automatically start Webkit (Web console for Citadel) at every reboot.

root@server: -home-sk_008

Select the locale webcit should use. In my case, I selected “en_US”.

root@server: -home-sk_010

Select on which port do you want WebCit to listen for HTTP requests. You can use the standard port (80) if you are not running another web server (such as Apache), otherwise select another port.

I go with defaults, because I don’t have any existing web server.

root@server: -home-sk_011

Select On which port do you want WebCit to listen for HTTPS requests.

root@server: -home-sk_012

Congratulations! Citadel has been installed.

root@server: -home-sk_013

Please note that Citadel will be installed to ”/usr/local/citadel” directory, WebCit will be installed to ”/usr/local/webcit”, and the supporting libraries will be installed to ”/usr/local/ctdlsupport”.

Now, let us go further and configure Citadel for daily usage.

Accessing Citadel Web console

Open your web browser and navigate to http://ip-address:2000/ or http://domain:2000.

The following page should appear. Enter your administrative account name and it’s password which we have created during the installation process. In my case, my administrative account is “sk”, and it’s password is “ubuntu”. I recommend you to set any strong password to tighten your security.

- Citadel Server - Google Chrome_001

This is how my Citadel Dashboard looks.

Lobby - Citadel Server - Google Chrome_002

From here, you can create multiple domains if you want, create users, create blog posts and so on.

First, let us create some domains and users.

Creating new domains

To create a domain, click on the Administration button on the bottom of the left column menu.

Lobby - Citadel Server - Google Chrome_002

In the next window, click “Domain names and Internet mail configuration” link in the Global Configuration section.

Lobby - Citadel Server - Google Chrome_003

In the Local host aliases and Directory domains sections, enter your domain name without prefix www and click Add button.. For example, in my case I entered unixmen.local.

Lobby - Citadel Server - Google Chrome_006

You can add as many domains as you want.

Next, we need to create some users.

Creating new users

Go back to Administration page and click on the link that says “Add, change, delete user accounts” in the User account management section.

Enter your desired username and click Create button.

Lobby - Citadel Server - Google Chrome_008

In the next window, set password for the newly created user account. Also, make sure the Permission to send internet mail option is checked. Click the Save changes button.

Lobby - Citadel Server - Google Chrome_009

Similarly, you can create as many users as you want.

Now, let us check whether the newly created user is able to send and receive mail.

Composing a Test mail

Click on Mail button in the left column box of Citadel dashboard. Click Writemail to compose a mail.

Mail - Citadel Server - Google Chrome_010

Enter the recipient’s mail id (Ex. senthil@server.unixmen.local) and compose your message and finally click Send message.

Mail - Citadel Server - Google Chrome_011

Now, log off from the current user and log in again as a new user. In my case, my newly created user is “senthil”.

Go to the Mail section and check for the new mail.

Mail - Citadel Server - Google Chrome_012

As you see in the above screenshot, I got a new mail. To read the mail, just click on it.

Mail - Citadel Server - Google Chrome_013

Congratulations! Our mail server is working!!

Citadel screenshots

Here is some sample screenshots that will give a basic ideas of it’s various features.

Citadel Calendar:

Calendar - Citadel Server - Google Chrome_014

Citadel Contacts:

Contacts - Citadel Server - Google Chrome_015

Citadel Notes:

Notes - Citadel Server - Google Chrome_016

Citadel Tasks:

Tasks - Citadel Server - Google Chrome_017

Citadel Chat room:

Tasks - Citadel Server - Google Chrome_018

For more usage details, I recommend you to refer the official documentation page.

Also, refer Citadel FAQ/Knowledge base page for any kind of troubleshooting.

Uninstalling Citadel

I hope you won’t do it. In case, you don’t like Citadel, you can easily uninstall it simply by deleting the following directories.

  • /usr/local/citadel
  • /usr/local/webcit
  • /usr/local/ctdlsupport

Then, remove the entries for “citadel” and “webcit” in your init scripts (/etc/init.d) directory.

Conclusion

As far as I know, Citadel is an impeccable groupware solution and it just works out of the box. It is one of the most easiest suite ever I have tried. Even, a novice user can easily install and configure Citadel in few hours. If you’re looking for a Groupware, Citadel might be suitable solution. Give it a try, you won’t be disappointed.

Cheers!

Reference links:


The post Citadel – A Free, Open Source, Email And Collaboration Suite appeared first on Unixmen.

SiteBios – A Free, Open Source, Linux Control Panel

$
0
0


About SiteBios

SiteBios is a free, open source, Linux control panel that comes with useful Server management tools by default. Unlike other free or paid control panels, It comes only with mandatory and most commonly used features. It isn’t bloated with any unnecessary tools and features. It ships with only what is required and what is important to host a Domain. As the name implies, SiteBios name comes from “Basic Input and Output System” (BIOS). Similar to the bios on your PC, SiteBios is designed to be a “Basic Input Output System” for your website, domain, email and database server.

SiteBios has dual interface namely User control panel and Admin server management panel.

The user control panel includes:

  • Add/Remove Email Accounts
  • RoundCube and SquirrelMail webmail interfaces
  • Email Forwarders, Auto-responders, Filters
  • Spam Assassin spam filtering
  • ClamAV virus scanning
  • Create/Manage Redirects
  • MariaDB (mySQL) Databases
  • Add/Remove Database users
  • Addon, Parked and SubDomains
  • AWStats web traffic stats
  • Create/Manage Backups

And, the Admin panel include:

  • Create/Remove/Manage Accounts
  • Add Packages
  • Add/Remove/Manage IPs
  • Manage Backups
  • Perform a restore, single or multiple sites
  • Multiple Backups
  • Create a CSR
  • Install and SSL
  • Create a reseller account
  • Add/Remove/Manage DNS Zones
  • View Server info
  • Stop, start, restart services

It also comes with a full LAMP (Linux, Apache, MariaDB and PHP) stack and a mail server by default. It is designed only for CentOS 6 and CentOS 7 operating systems at present, and there is no clarity for other platforms. However, I guess It should work on CentOS like OSs such as RHEL, Fedora and Scientific Linux.

Install SiteBios

System Requirements

  • CentOS 6 or CentOS 7 64-bit Linux minimal installation

Download the latest version from SiteBios page.

yum update
yum install wget
wget http://www.sitebios.com/install.tar.gz

Extract the downloaded tar file using command:

tar xvf install.tar.gz

Go to extracted location:

cd install/

Run the following to start installing SiteBios:

./install.sh

It will ask you the series of questions. Read carefully and answer them accordingly.

Press Enter to continue.

root@server1:~-install_001

Type Yes and press enter to accept the license agreement:

root@server1:~-install_002

Now, sit back and relax. SiteBios installer will script will start to full and install all required packages along with dependencies. This will take a while depending upon your Internet speed. Be patient and have a cup of coffee.

root@server1:~-install_003

Finally, you’ll see the SiteBios installation completed message. Wait for few minutes for freshcalm and updatedb to finish the update process.

Finally, press Y to update the SiteBios.

Thank you for installing SiteBios
Please review the license file for Terms of Use
If you do not agree to the terms of use you must not use the software and uninstall it immediately
To get started:
1.) set a password for the SSH user "sbadmin" with the command: "passwd sbadmin"
2.) Wait 60 seconds, and then use that login for the Admin URL: https://server1.unixmen.local:5001
3.) Upon entering the admin area proceed to "Settings" tab to update your settings
4.) You can also use a reseller's username for port 5001
5.) Client URL: https://server1.unixmen.local:5000
6.) User: varies per account, created in the admin panel
7.) For security please setup an ACL for the 2 ports above
8.) After the installation finishes, please reboot (we recommend waiting for freshclam and updatedb to finish running before rebooting)
9.) Press 'y' to update SiteBios, start SiteBios, and finish the installation

Reboot your system.

Now, let us setup password for the SiteBios administrative account, which is: sbadmin.

To do that, run the following command as root user from your Terminal:

passwd sbadmin

Next, we’ll go for the web based configuration.

Accessing SiteBios dashboard

Like I said before, SiteBios comes with dual interface, namely User panel and panel. The User panel can be accessed with URL: https://IP-address:5000/, and the Admin panel can be accessed with URL: https://ip-address:5001/.

First, let us see what’s in Admin panel.

Access SiteBios Admin panel

Open up your web browser and navigate to https://IP-address:5001/.

The following screen should appear. Enter the username as sbadmin and it’s password which we created using command “passwd sbadmin”.

Sitebios - Google Chrome_004

This is how SiteBios Admin dashboard looks.

Sitebios - Google Chrome_005

As you see in the above screenshot, SiteBios admin panel totally has 11 tabs namely:

  1. Accounts : Create new accounts, and manage existing accounts
  2. Packages : Add, modify, delete packages
  3. Backups : Create and configure backups,
  4. DNS : Add, edit, copy, delete DNS zones
  5. Server Info : View server version, view service, start/stop/restart services.
  6. Resellers : Add, edit, modify, delete resellers
  7. IPs : Add new IPs, remove IPs
  8. SSL : Install SSLs, View installed SSLs, and generate CSRs
  9. Other : Change sbadmin’s password, unlock accounts, and terminate multiple accounts.
  10. Settings : Settings related to SiteBios server
  11. View Usage : View disk and bandwidth usage

Now, go to the Settings tab in the Admin panel and update your server settings. Refer the following screenshot.

Sitebios - Google Chrome_012

Let us create a new account to access User panel.

Click on the plus sign (+) on the Accounts tab.

Sitebios - Google Chrome_005

Enter the domain name ,username, password , user type, select IP address and package details etc.

Sitebios - Google Chrome_014

You should see the following confiramtion message after creating the new user.

Selection_015

Click the cross button (X) to close the window. Now, you will see the newly created user in the Accounts tab.

Sitebios - Google Chrome_016

Similarly, you can create as many users as you want.

Access User panel

Navigate to https://ip-address:5000/.

The following screen should appear. Now, enter the username and password which you created in the Admin panel.

Sitebios - Google Chrome_017

This is how User panel looks.

Sitebios - Google Chrome_018

From here, you can create/delete,  new add-on and sub domains, mail accounts, databases and so on. Also, you can check the other useful features such as AWstats, Backup, change password, Cron tabs, and phpMyAdmin and more.

I recommend you to refer the SiteBios official documentation page for more details about SiteBios usage and configuration. And, I also recommend you to check out the comparison chart to find the difference between SiteBios and other cPanel and the location of important files and logs of SiteBios as well.

Conclusion

SiteBios is still in development stage and is not recommend to try in production environment. The developers have added only the important features, however you can request them if you want any additional feature you would like to see in the upcoming versions.

Cheers!

Reference links:


The post SiteBios – A Free, Open Source, Linux Control Panel appeared first on Unixmen.

Gnome Boxes – A Front-end Tool For QEMU And KVM

$
0
0


About Gnome Boxes

As we all know, there are is no doubt that Linux has tremendous support for Virtualization. There are so many virtualization softwares available including VMWare, VirtualBox, OpenVZ, XEN, KVM, Docker and the list goes. These software are mainly for intermediate and advanced Linux users. If you’re a beginner and having very little knowledge in Virtualization, then it is bit difficult to use the above mentioned tools. You may, probably, need an Intermediate or an expert user’s help. I bet you what? you don’t need anyone help. Yes. Meet Gnome Boxes, a beginner friendly, lightweight, graphical tool that makes virtualization lot easier.

Gnome Boxes is a graphical front-end tool similar to Virt-manager that can be used to create, view, access and manage Virtual machines based on QEMU and KVM. KVM, aka Kernel-based virtual machines, is an open source virtualization technology built into the Linux kernel. KVM is the fork of QEMU and Virt-manager is a graphical front-end of KVM and QEMU.

For more details about KVM and QEMU refer the following links.

Using Boxes, any Linux user, even a novice, can easily try and test different operating systems in their Linux box without having any help from a system administrator. And the good news is you can run Gnome Boxes almost on all Linux operating systems. Be mindful that Gnome Boxes requires either the Intel VT-x or AMD-V hardware virtualization extensions in your Computer.

Why Gnome Boxes?

You might wonder why should we use Boxes, while Virt-manager has many advantages. The answer is simple. Gnome Boxes is light weight, and comes with selective options only for beginners who just want an easy way to create VMs or access remote machines. Gnome Boxes will not provide many of the advanced options to tweak virtual machines provided by virt-manager, but It will focus on getting things working out of the box with very little input from user. This is where Boxes comes in handy.

Features

Concerning about features, we can list the following:

  • View, access, and use:
    • remote machines
    • remote virtual machines
    • local virtual machines
    • When technology permits, set up access for applications on local virtual machines
  • View, access, and use virtual machines on removable media
  • View, access, and use shared connection / machines
  • Upload / publish virtual machines
  • and many.

Install Gnome Boxes

We can install Gnome Boxes either using distribution’s package manager or directly compile from the source.

1. Install using package manager

Gnome Boxes is available in the default repositories of all modern Linux distributions.

To install it on Debian/Ubuntu and derivatives, run:

sudo apt-get install gnome-boxes

On RHEL/CentOS/Fedora:

sudo yum install gnome-boxes

Or,

sudo dnf install gnome-boxes

On SUSE/openSUSE:

sudo zypper in gnome-boxes

On Mageia:

sudo urpmi gnome-boxes

2. Compile the latest version from Source

Gnome Boxes might be out-dated in the distribution’s repositories. If you want most recent version, it is good idea to compile it from the Source.

Download the latest version from here.

wget https://git.gnome.org/browse/gnome-boxes/snapshot/gnome-boxes-3.17.90.tar.xz

Once the download process is complete, launch your terminal and run following command to extract the downloaded file.

tar xvf gnome-boxes-3.17.90.tar.xz

Go to the extracted directory:

cd gnome-boxes

Then, run the following command to start the installation process.

./configure

Once “configure” is completed successfully, run following command:

make

Finally, run the following command to complete the installation of Gnome Boxes.

make install

Usage

After installing Gnome Boxes, launch it either from Menu or Dash. Probably it will be found in Applications > System Tools.

The default interface of Boxes look like below.

This interface shows the list of available guest virtual machines.

The right-hand side of the screen has two buttons:

  • The search button, to search for guest virtual machines by name.
  • The selection button.

Boxes_001

Click on the New button on the top right corner of Boxes window. The following screen will appear. Click Continue.

Boxes_002

Now, select the Installation source.

You may either select the installation ISO from your local system or specify an URL or path to an ISO file. This can also be used to access a remote machine. The address should follow the pattern of protocol://IPaddress?port;, for example:

spice://192.168.1.100?port=5906;

Here, I am going to select an ISO from my local system

Boxes_003

In the Next screen, you’ll see the details of newly created VM details. You can either continue with the default values or you can customize the RAM, disk size details of the VM as per your liking.

Boxes_005

After customizing your VM settings, click on the reverse arrow button (<) on the top left corner to go back to the previous screen.

Boxes_007

Finally, click on the Create button on the top right corner.

Boxes_008

That’s it. Now, newly created will start to boot.

Boxes_009

Now, continue the installation as the way you do in the physical machine.

Conclusion

Gnome Boxes is a great application designed with simplicity and ease of use in mind. Though it doesn’t has many advantages than any other virtualization tools, it just works out of the box and ideal to test or try various operating systems without having to pollute your system or without having to install third party softwares like VirtualBox, VMWare, and XEN etc..

That’s all for now.

Cheers! Happy weekend!!


The post Gnome Boxes – A Front-end Tool For QEMU And KVM appeared first on Unixmen.

How To Install Snort NIDS On CentOS 7

$
0
0


Introduction

There are few and straight forward administration guides are available for snort on the web. Today, we will try to explain anatomy of snort step by step. Snort is an NIDS (Network Intrusion and Detection System) used to detects and prevent intrusions over the network. Through protocol searching, content analysis and various preprocessors, snort detects thousands of worms and vulnerability attempts. Snort comes with an excellent feature including detection of various types of attacks, buffer overflow, stealth port scan, CGI Attacks etc.

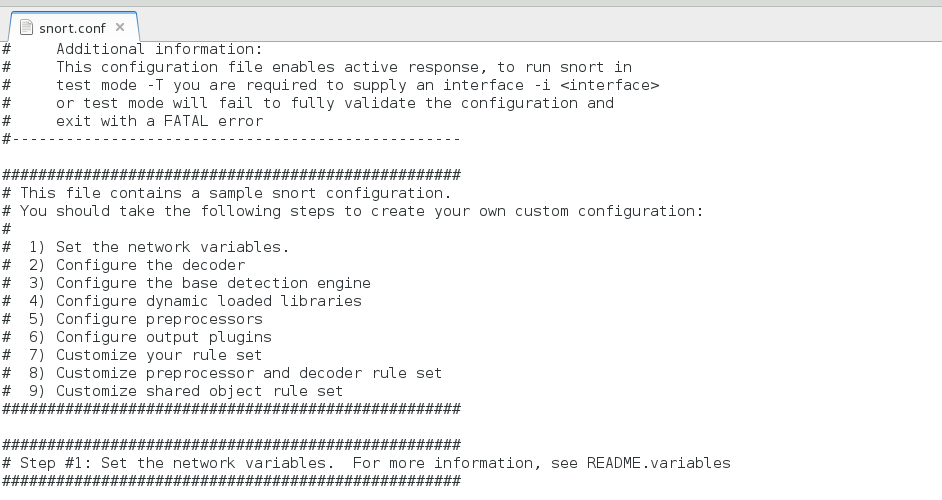
Configuration file of Snort configuration is /etc/snort/snort.conf in which information of network under investigation is determined.

Sample configuration file

Selection_006

Snort can be configured in three modes.

A. Sniffer Mode

Output will dump to the terminal in this mode, it is used to display packets in continuous flow to the user in live mode, in live mode or sniffer mode data packet losses are very high so it is recommended to used sniffer mode NIDS only for small networks only.

B. Packet Logger Mode

Output will get logged to the disk, which can be monitored later on.

snort -l  <Log_Directory>  is the option which is used for logging mode.

C. Network IDS Mode

In IDS mode some parameters are configured that allow snort to match defined parameters while scanning the network, parameters are used defined in this mode.

Prerequisites for Installation

Make sure that following packages are already installed with the system you  are going to configure snort-

CentOS 7.0, Snort latest, DAQ (Data Acquisition Package) Available with  Snort.

Snort  and DAQ latest version can be obtain from this link.

Download and Install DAQ

[root@localhost ~]# yum install https://www.snort.org/downloads/snort/daq-2.0.6-1.centos7.x86_64.rpm Download Snort

 Download and Install Snort

[root@localhost ~]# yum install https://www.snort.org/downloads/snort/snort-2.9.7.5-1.centos7.x86_64.rpm

Important: If you install snort first instead of DAQ there could be some decency issue with yum.

Install Snort Rules

To install snort rules you must register to this link then we will be able to download rules for snort configuration.

Download Rules

Selection_007

To manage Snort rules pulledpork package is available on Git hub, which can be downloaded with following command.

[root@localhost ~]# git clone https://github.com/shirkdog/pulledpork.git

Selection_008

Let us Configure pulledpork

Go to the downloaded directory
[root@localhost ~]# cd pulledpork/
Copy pulledpork.pl to /usr/local/bin
[root@localhost pulledpork]# cp pulledpork.pl /usr/local/bin
Change permissions of pullerpork.pl
[root@localhost pulledpork]# chmod +x /usr/local/bin/pulledpork.pl
Copy contents of etc directory from pulledpork to system default snort /etc/snort
[root@localhost pulledpork]# cp -v etc/*.conf /etc/snort
Output:
‘etc/disablesid.conf’ -> ‘/etc/snort/disablesid.conf’ 
‘etc/dropsid.conf’ -> ‘/etc/snort/dropsid.conf’ 
‘etc/enablesid.conf’ -> ‘/etc/snort/enablesid.conf’ 
‘etc/modifysid.conf’ -> ‘/etc/snort/modifysid.conf’ 
‘etc/pulledpork.conf’ -> ‘/etc/snort/pulledpork.conf’
Create a directory under /etc/snort named as iplists, this directory will be used by Pulledpork.
[root@localhost snort]# mkdir /etc/snort/rules/iplists
Go to this newly created file and create a file named ‘default.blacklists’
[root@localhost iplists]# touch /etc/snort/rules/iplists/default.blacklist
Test pulledPork Configuration
[root@localhost iplists]# /usr/local/bin/pulledpork.pl -V
 Output
Selection_009

Configure Dynamic Rules for Snort

Edit /etc/snort/snort.conf to enable dynamic rules setup, search and  make sure following  three line are uncomment in /etc/snort/snort.conf.  

# path to dynamic preprocessor libraries 
dynamicpreprocessor directory /usr/lib64/snort-2.9.7.5_dynamicpreprocessor/ 
 
# path to base preprocessor engine 
dynamicengine /usr/lib64/snort-2.9.7.5_dynamicengine/libsf_engine.so 
 
# path to dynamic rules libraries 
dynamicdetection directory /usr/local/lib/snort_dynamicrules
Execute following Command
[root@localhost rules]#  echo "include \$RULE_PATH/so_rules.rules" >> /etc/snort/snort.conf
[root@localhost rules]#  echo "include \$RULE_PATH/local.rules" >> /etc/snort/snort.conf
[root@localhost rules]# echo "include \$RULE_PATH/snort.rules" >> /etc/snort/snort.conf
Restart Snort Service
[root@localhost rules]# systemctl restart snortd

Some Snort Examples

To get TCP/IP header in report,  You can see IP address with this option,  type

# snort -v

Sample Output:

Selection_012

To get application Layer information along-with IP related info, type

# snort -vd

Selection_013

To get rid of hex in output, type

# snort -vdC

-C option will remove hex valued from output

Sample Output:

Selection_014

You can get information of all 6 Layers of OSI Model Except Layer 1, with:

# snort -vdeC

Selection_015

Have a try! and let us know what do you think about Snort.

Reference links:


The post How To Install Snort NIDS On CentOS 7 appeared first on Unixmen.

Cockpit: A Beginner Friendly Server Administration Tool

$
0
0


About Cockpit

Cockpit is a free and open source web-based system management application. It is actively being developed by Red Hat. Using Cockpit, anyone can easily monitor and manage multiple servers at the same time via a Web browser. It will perfectly suitable for new system administrators to perform simple tasks such as storage administration, inspecting journals and starting and stopping services. On the other hand, a service started from the Terminal can also be stopped or monitored from the Cockpit and vice versa. Also, if an error occurs in the terminal, it can be seen in the Cockpit journal interface.

Cockpit

Cockpit provides:

  • Systemd service management
  • Docker management
  • Journal log viewercockpit-a-beginner-friendly-server-management-tool
  • Storage setup, including LVM
  • Basic Network configuration
  • Add and Remove local users

In this tutorial, we will see how to install Cockpit on a CentOS 7 server, and how to monitor and administer the server using Cockpit. These steps might work on RHEL 7 and Scientific Linux, and Fedora, but I am not sure.

Install Cockpit On CentOS 7

Open up the Terminal, and run the following command as root user to install Cockpit.

yum install cockpit

Start Cockpit daemon using command:

systemctl start cockpit

To start Cockpit automatically on every reboot, run:

systemctl enable cockpit.socket

Add Cockpit to the list of trusted services in firewallD.

firewall-cmd --permanent --zone=public --add-service=cockpit

Restart firewallD to take effect the changes.

firewall-cmd --reload

Access Cockpit web console

Now, open your web browser and point it to: https://Cockpit-server-ip-address:9090/.

You’ll be pleased with the Cockpit log in screen. Enter your server’s user name and password.

server1.unixmen.local - Google Chrome_001

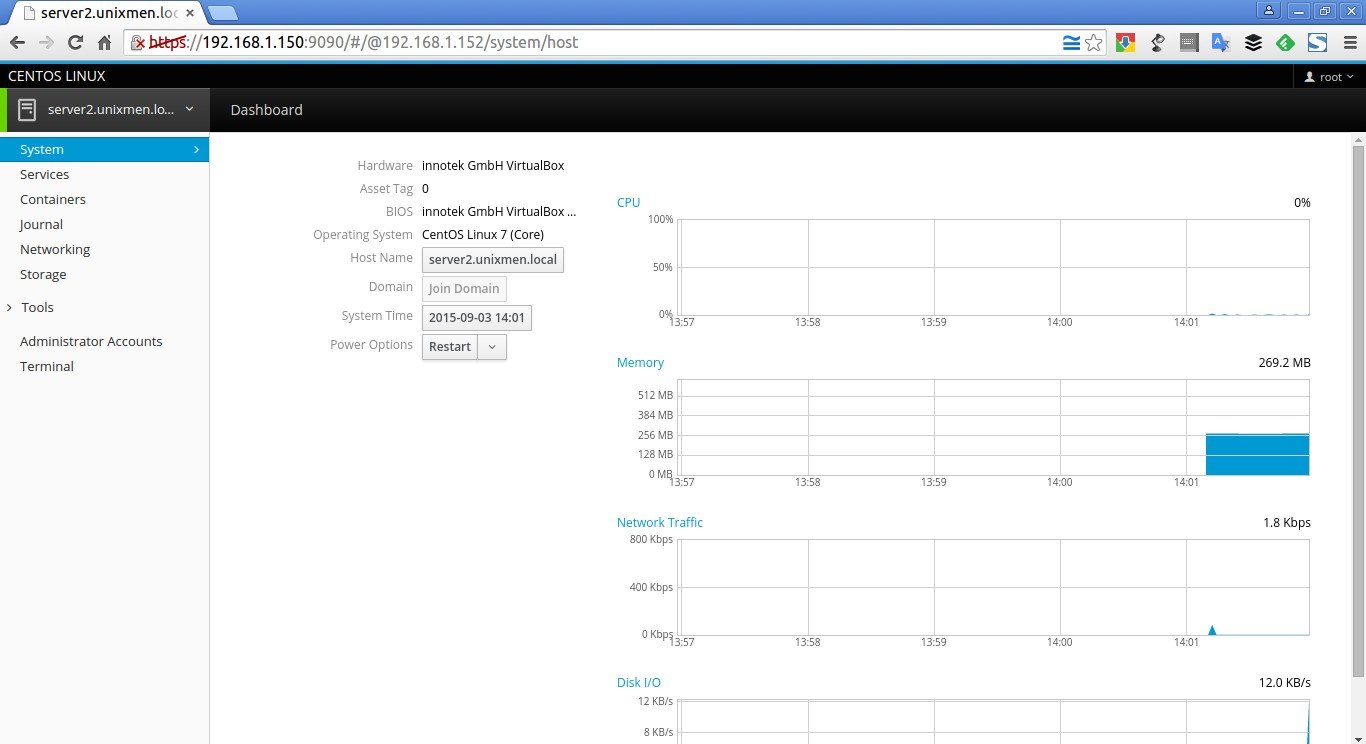
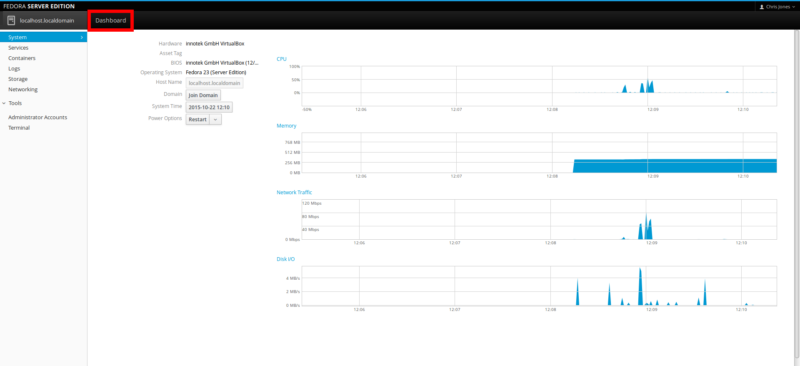
Here it is what Cockpit dashboard looks like.

server1.unixmen.local

That’s it. From here, you can do administrative tasks such as adding/deleting users, starting/stopping services, configuring network and so on.

Here is some screnshots of Cockpit.

Cockpit Services tab:

server1.unixmen.local services

Cockpit Containers tab:

server1.unixmen.local - Google Chrome_002

Cockpit Journal tab:

server1.unixmen.local - Google Chrome_003

Cockpit Networking tab:

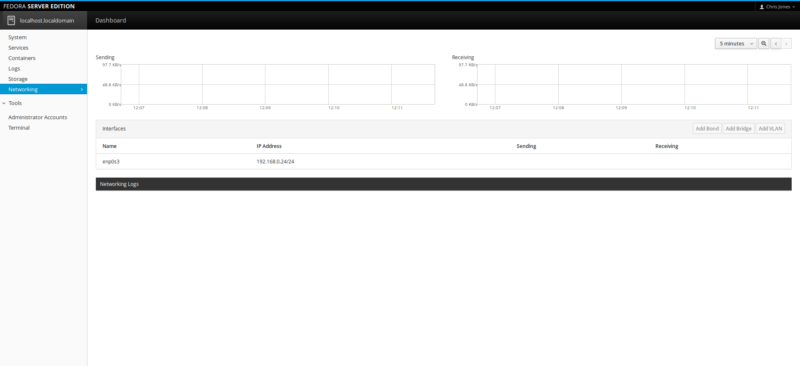
server1.unixmen.local - Google Chrome_004

Cockpit Storage tab:

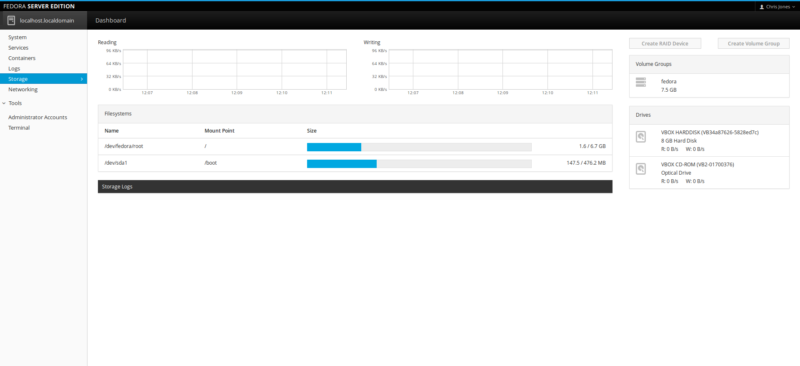
server1.unixmen.local - Google Chrome_005

Cockpit Administrator Accounts tab:

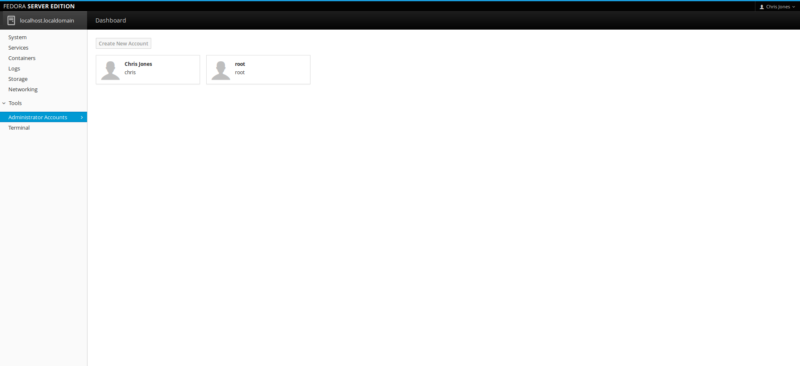
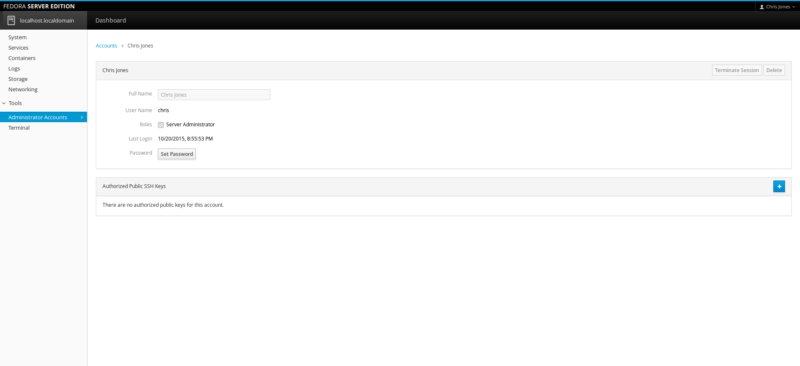
server1.unixmen.local - Google Chrome_006

Cockpit Terminal:

server1.unixmen.local - Google Chrome_007

As you see above, Cockpit provides a Terminal inside its console. So you don’t need SSH or any other communication tools. We can directly install any software from the Cockpit Terminal.

server1.unixmen.local - Google Chrome_008

Adding multiple servers to Cockpit

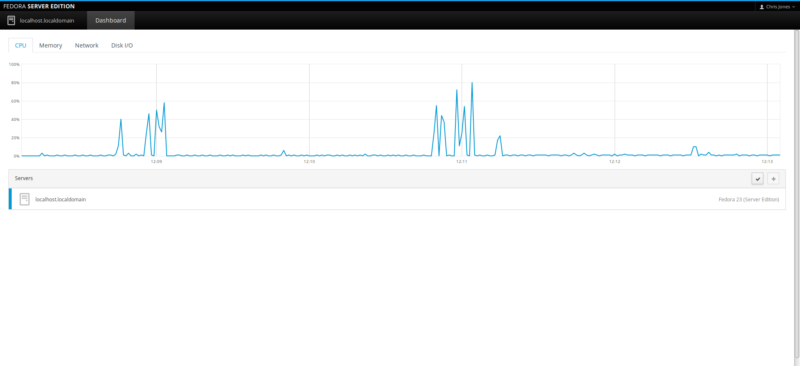
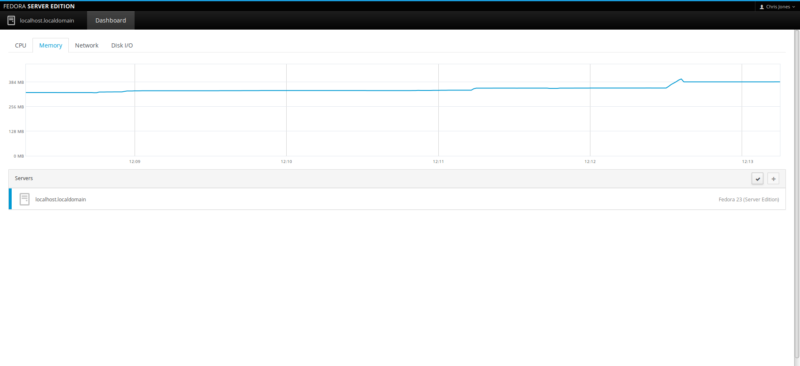
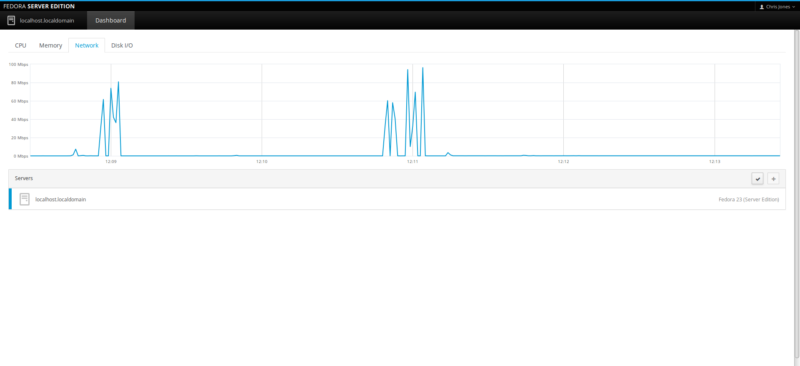
To add a new server, click on the Dashboard on the top. The Dashboard will show you list of servers added to the Cockpit.

Click on the plus (+) sign on the bottom to add new server.

CentOS Linux - Google Chrome_009

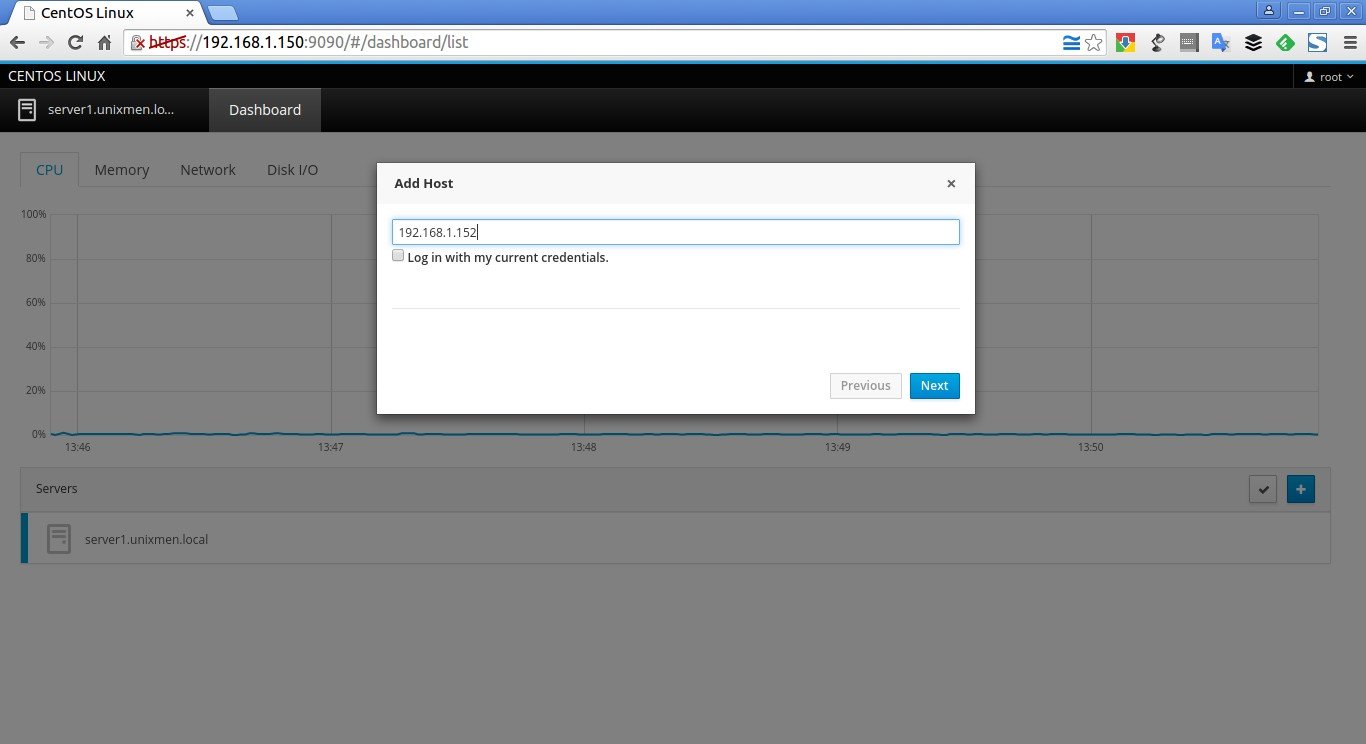
Uncheck the option that says: Log in with my current credentials. Enter your remote server IP address or Hostname.

Be mindful that you must install Cockpit on all of your remote servers in order to monitor them via Cockpit.

CentOS Linux - Google Chrome_012

Enter your remote server’s username and password.

CentOS Linux - Google Chrome_013

Finally click Add host to add your remote server.

CentOS Linux - Google Chrome_014

Click Close to close the Add host window.

CentOS Linux - Google Chrome_015

Now, you’ll see that the new server has been added to the Cockpit dashboard.

CentOS Linux - Google Chrome_016

Just click on the remote server’s hostname to monitor or manage it.

server2.unixmen.local - Google Chrome_017

Similarly, you can add as many servers as you want to manage via Cockpit. Just install Cockpit on the server or system that you want to manage and manage it like a boss anywhere on your network.

Conclusion

Cockpit is a useful tool for less experienced system administrators and makes the system administration task easier and even better. Using this application, anyone can easily administer multiple remote headless servers on the go. Don’t compare it with advanced server management tools like Webmin or anything, Cockpit is just a beginner friendly server management interface tool for managing the remote servers, not to manage the remote server’s applications. However, you can install any applications from the Cockpit Terminal as the way you do in your remote system’s Terminal.

Give it a try, you won’t be disappointed.

Have a good day!

Reference links:

Featured Image: Dirk-Jan Kraan via Flickr.


The post Cockpit: A Beginner Friendly Server Administration Tool appeared first on Unixmen.


Installing Novius OS CMS In CentOS 7

$
0
0


About Novius OS

Novius OS is a CMS (Content Management System) and it designed as application platform hence termed as OS. Contents prepared with Novius OS are ready to publish to any platform like Websites, news letters, social media and blogs.

Features

Centralized and reusable media files

All media files are organized in the media center, no matter with which channel they are being used, you can reused them, search engine optimization is an inbuilt feature.

Multi Tasking

A smart interface, you can work with your pc or tablet, it allow you for multitasking because of its  tab enables smart interface which saves lots of time.

Comes with Development Tools

Based upon latest web technology,  comes with built in development tools along with ‘Build your app’ feature.

Multiple Language support

No extra plugin is required to manage multilingual contents, updated with new translations. You can manage multiple sites in different languages with one tool.

Installation

Configuration will involve following steps

  1. Installation of Platform CentOS 7 Virtual Machine
  2. Install php package
  3. Install MariaDB database
  4. Configure Apache Server
  5. Download Package
  6. Create Database for package
  7. Configure Package
Step 1
Install and update your CentOS 7 server
[root@localhost snort]# yum update
Install php related packages:
[root@localhost snort]# yum install php php-mysql php-common
Step 2
Configure and install MariaDB Server
[root@localhost snort]# yum install mariadb mariadb-server
Start Mariadb service:
[root@localhost snort]# systemctl start mariadb
Assign Mysql root password:
[root@localhost snort]# mysqladmin -u root password "P@ssw0rd"
Enable Mariadb service for next boot.
[root@localhost snort]# systemctl enable mariadb
Create new database user for Novius OS.
[root@localhost snort]# mysql -u root -p 
Enter password:  
Welcome to the MariaDB monitor.  Commands end with ; or \g. 
Your MariaDB connection id is 3 
Server version: 5.5.44-MariaDB MariaDB Server 
 
Copyright (c) 2000, 2015, Oracle, MariaDB Corporation Ab and others. 
 
Type 'help;' or '\h' for help. Type '\c' to clear the current input statement. 
 
MariaDB [(none)]> CREATE DATABASE noviusos; 
Query OK, 1 row affected (0.00 sec) 
 
MariaDB [(none)]> CREATE USER 'noviusosuser'@'localhost' IDENTIFIED BY 'PASSWORD'; 
Query OK, 0 rows affected (0.00 sec) 
 
MariaDB [(none)]> GRANT ALL PRIVILEGES ON `noviusos`.* TO 'noviusosuser'@'localhost'; 
Query OK, 0 rows affected (0.00 sec) 
 
MariaDB [(none)]> FLUSH PRIVILEGES; 
Query OK, 0 rows affected (0.00 sec) 
 
MariaDB [(none)]> quit 
Bye
Step 3
Install and Configure apache server
[root@localhost snort]# yum install httpd
Start and enable httpd service:
[root@localhost snort]# systemctl start httpd 
[root@localhost snort]# systemctl enable httpd
Change current working directory to /var/www/html:
[root@localhost snort]# cd /var/www/html/
Download Installation script for novius os.
[root@localhost html]# wget http://raw.github.com/novius-os/ci/master/dubrovka/tools/install.sh

Run the script:

[root@localhost html]# sh install.sh
Sample Output:
Selection_018
This Script will install install  novius-os Directory in /var/www/html
Change ownership of that directory.
[root@localhost html]# chown -R apache:apache novius-os/

Edit /etc/php.ini:

Make sure that value of  ‘short_open_tag’ is set to be on.
Selection_019
Restart Apache Service:
[root@localhost html]# systemctl restart httpd
Before starting  installation make sure php5-gd is installed. 

Open  Browser and type

http://<your_ip>/novius-os/public/htdocs/install.php

Some Installation wizard snapshots

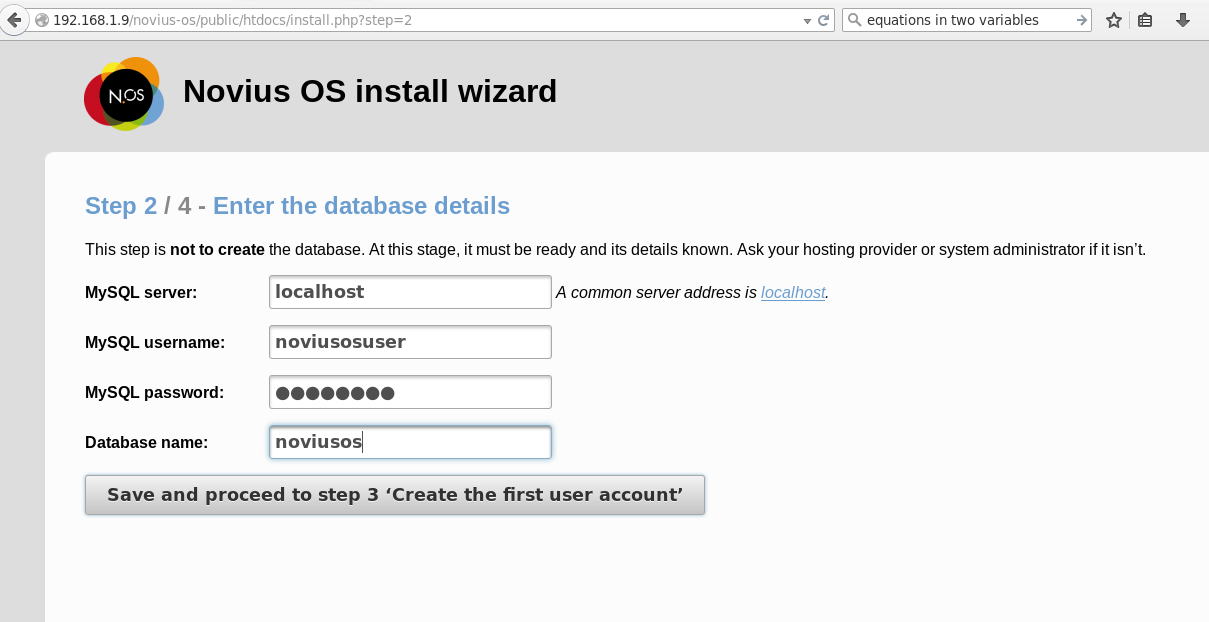
Selection_024Selection_025Selection_026Selection_027Selection_028

Have a Nice day!!


The post Installing Novius OS CMS In CentOS 7 appeared first on Unixmen.

How To Install Foreman With Puppet In CentOS And Ubuntu

$
0
0


The objective of this tutorial

The main goal of this tutorial is to discuss what is Foreman and Puppet tools, it’s usage in real time, how to manage nodes using Foreman, and how to automate repetitive tasks.

About Foreman

Foreman is an open source application that can be used to manage, provision, configure, and monitor a single or group of servers. Foreman smart proxy architecture allows you to automate repetitive tasks, quickly deploy applications, proactively manage change using configuration management systems such as Puppet, Chef and Salt. Foreman has an interactive and robust web front-end, API, CLI to manage, provision servers in private or public clouds.

Using Foreman, we can:

  • Discover, provision and upgrade your IT infrastructure
  • Create and manage instances both in private and public clouds
  • Group your hosts and manage them in bulk, regardless of location
  • Review historical changes for auditing or troubleshooting
  • Extend as needed via a robust plugin architecture
  • Automatically build images (on each platform) per system definition to optimize deployment

Foreman will run on almost all modern Linux operating systems, such as:

  • RHEL / CentOS / Fedora / Oracle Enterprise Linux / Scientific Linux
  • SUSE/openSUSE
  • Debian/Ubuntu
  • CoreOS
  • JunOS

And, It can provision on physical as well as the following cloud providers, such as:

  • VMWare
  • Amazon EC2
  • Libvirt
  • OpenStack
  • oVirt and RHEV
  • Rackspace
  • Google Compute engine

Using Foreman, we can manage 10s to 10,000s of physical or virtual servers via a web browser.

About Puppet

Puppet is an open source configure management tool developed by Puppet Labs, founded by Luke Kanies in 2005. It is written in Ruby and released as free software under the GNU General Public License (GPL) until version 2.7.0 and the Apache License 2.0 after that. The main goal of Puppet is to simplify a system administrator’s work who manages a large scale IT infrastructure. Puppet can be used to manage the configuration of physical or virtual servers. With Puppet, you define the state of your IT infrastructure, and Puppet automatically enforces the desired state. Puppet automates every step of the software delivery process, from provisioning of physical and virtual machines to orchestration and reporting; from early-stage code development through testing, production release and updates.

Puppet comes as two flavors:

  1. Puppet Open Source Edition
  2. Puppet Community Edition

Puppet open source edition is free to use, and it helps system administrators to automate repetitive tasks easily. Enterprise edition has all the features of open source edition plus Puppet Apps, commercial-only enhancements, supported modules and integrations etc. Puppet will run almost all Unix-like systems, Microsoft Windows, and Solaris.

Well, I hope you have a basic knowledge of Fireman and Puppet utilities. Now, let us see how to install Foreman with Puppet in CentOS and Ubuntu.

Installation

I tested this tutorial in CentOS 7 and Ubuntu 14.04 systems, however these steps would be same to other distributions too. In case these steps didn’t work for you, I suggest you to refer the official Quickstart guide which I mentioned in the end of this tutorial.

Prerequisites

Before installing Foreman, we need to do some important prerequisites which will help you to setup a proper Foreman. These steps needs to be run on both CentOS and Ubuntu.

First of all, make sure you have setup a proper FQDN for your server.

To do that, edit /etc/hosts:

vi /etc/hosts

Enter your FQDN as shown below.

[...]

192.168.1.150 server1.unixmen.local server1

Save and close the file. Like wise edit /etc/hostname and setup valid FQDN.

server1.unixmen.local

Save and close the file.

Install Foreman In CentOS 7

There are several different methods of installing Foreman. The recommended way is with the puppet based Foreman Installer but you may also use your distribution’s package manager or install directly from source. Let us proceed with Foreman installer.

The Foreman installer is a collection of Puppet modules that installs everything required for a full working Foreman setup. It uses native OS packaging (e.g. RPM and .deb packages) and adds necessary configuration for the complete installation.

The Foreman installer will install the following necessary components:

  • Foreman web UI
  • Smart Proxy
  • Passenger (for the puppet master and Foreman itself)
  • TFTP
  • DNS
  • DHCP

Add the Foreman, Puppet and EPEL repositories.

rpm -ivh http://yum.puppetlabs.com/puppetlabs-release-el-7.noarch.rpm
yum -y install epel-release 
rpm -ivh http://yum.theforeman.org/releases/1.9/el7/x86_64/foreman-release.rpm

Next, run the following command to download Foreman installer:

yum -y install foreman-installer

Then, run the Foreman installer to start installing Foreman:

foreman-installer

The installation run is non-interactive. But you can run “foreman-installer -i” without quotes for interactive mode. For more details run: foreman-installer –help.

The Foreman-installer command will start to download and install all necessary softwares to setup a working Foreman environment. After few minutes, you will see a output something below.

[...]

Success!
 * Foreman is running at https://server1.unixmen.local
 Initial credentials are admin / pKmHDXnRDFnR5xhR
 * Foreman Proxy is running at https://server1.unixmen.local:8443
 * Puppetmaster is running at port 8140
 The full log is at /var/log/foreman-installer/foreman-installer.log

Note down the initial credentials which are shown in bold. We need them later to access the Foreman’s dashboard.

Next, you need to allow the following ports through your FirewallD/Router.

Port Protocol Required For
53 TCP & UDP DNS Server
67, 68 UDP DHCP Server
69 UDP * TFTP Server
80, 443 TCP * HTTP & HTTPS access to Foreman web UI – using Apache + Passenger
3000 TCP HTTP access to Foreman web UI – using standalone WEBrick service
3306 TCP Separate MySQL database
5910 – 5930 TCP Server VNC Consoles
5432 TCP Separate PostgreSQL database
8140 TCP * Puppet Master
8443 TCP Smart Proxy, open only to Foreman
firewall-cmd --permanent --add-port=53/tcp
firewall-cmd --permanent --add-port=67-69/udp
firewall-cmd --permanent --add-port=80/tcp
firewall-cmd --permanent --add-port=443/tcp
firewall-cmd --permanent --add-port=3000/tcp
firewall-cmd --permanent --add-port=3306/tcp
firewall-cmd --permanent --add-port=5910-5930/tcp
firewall-cmd --permanent --add-port=5432/tcp
firewall-cmd --permanent --add-port=8140/tcp
firewall-cmd --permanent --add-port=8443/tcp

Restart Firewall to take effect the changes.

firewall-cmd --reload

Next, we will see how to install Foreman in Ubuntu.

Install Foreman In Ubuntu 14.04

Make sure you have completed the prerequisites steps as shown above.

Now we will install Foreman in Ubuntu 14.04 LTS server.

The following commands needs to be run as root user.

To switch to root user run:

sudo su

or

su

Enable Puppet labs and Foreman repositories:

apt-get -y install ca-certificates
wget https://apt.puppetlabs.com/puppetlabs-release-trusty.deb
dpkg -i puppetlabs-release-trusty.deb
echo "deb http://deb.theforeman.org/ trusty 1.9" > /etc/apt/sources.list.d/foreman.list
echo "deb http://deb.theforeman.org/ plugins 1.9" >> /etc/apt/sources.list.d/foreman.list
wget -q http://deb.theforeman.org/pubkey.gpg -O- | apt-key add -

Update the source lists using command:

apt-get update

Download the Foreman-installer script.

apt-get -y install foreman-installer

Finally, run Foreman-installer using command:

foreman-installer

After a few minutes, you’ll see an output something like below.

[...]

Success!
 * Foreman is running at https://server.unixmen.local
 Initial credentials are admin / jrPiWSpSBXBdzv57
 * Foreman Proxy is running at https://server.unixmen.local:8443
 * Puppetmaster is running at port 8140
 The full log is at /var/log/foreman-installer/foreman-installer.log

Note down the initial credentials which are shown in bold. We need them later to access the Foreman’s dashboard.

Configure Foreman

First of all, we need to enable “diffs”, which will help you to see configuration file changes from within Foreman’s Reports view.

To do that, edit /etc/puppet/puppet.conf file:

vi /etc/puppet/puppet.conf

Find the following line and change its value to true.

[...]

show_diff = true

[...]

Save and close the file.

Next, we’ll need to add Foreman host to Foreman’s database. To do that, run:

puppet agent --test

Sample output:

Warning: Unable to fetch my node definition, but the agent run will continue:
Warning: Error 400 on SERVER: Failed to find server1.unixmen.local via exec: Execution of '/etc/puppet/node.rb server1.unixmen.local' returned 1: 
Info: Retrieving pluginfacts
Info: Retrieving plugin
Info: Caching catalog for server1.unixmen.local
Info: Applying configuration version '1441613934'
Notice: Finished catalog run in 0.22 seconds

Note: Puppet 3+ versions will show a warning message the first time that the node can’t be found. Just ignore the warning and continue.

Access Foreman Web console

Open up your web browser and navigate to: https://IP-address/ or https://FQDN/.

The following screen should appear.

Enter your Foreman credentials.

Login - Google Chrome_001

Here it is what my Foreman’s web console looks. Here you can see the Overview of your Puppet environment.

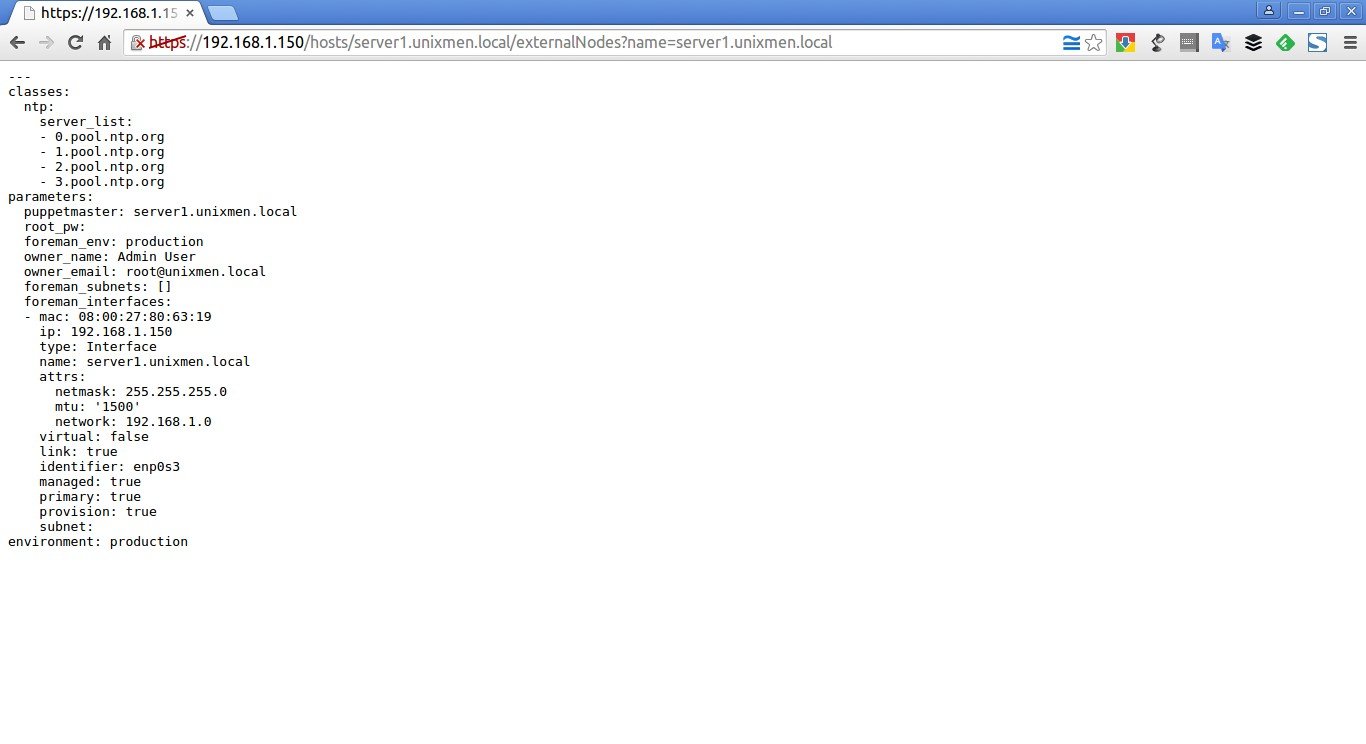
Overview

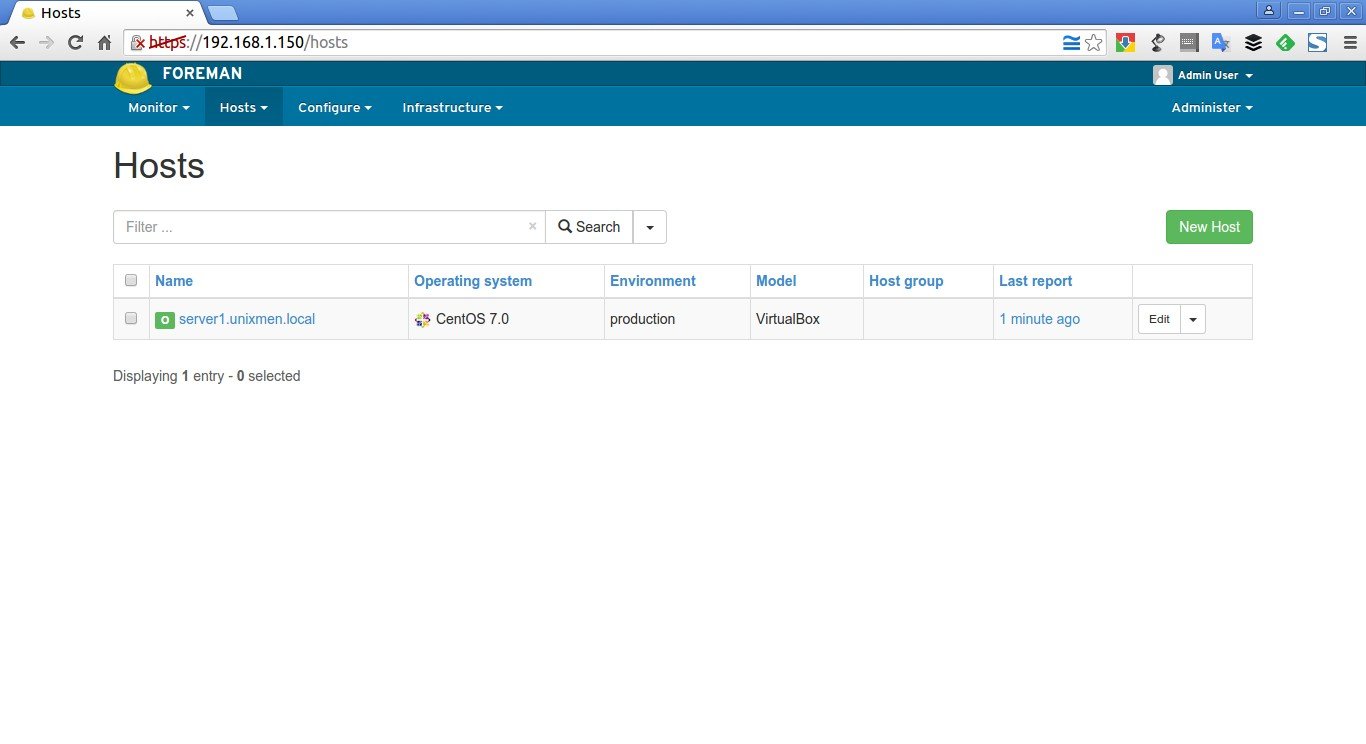
This Overview section will display the list of Puppet agent nodes and their configuration statuses. Now, we only have the Foreman host itself, so It shows the total hosts as 1.

To view the list of available hosts, go to Hosts > All hosts from the Menu bar.

Hosts - Google Chrome_004

Change Admin user’s default password

After logging in to the Dashboard, the very first step is to change the admin user’s default password. To do that, click on the Admin user’s drop down box and select My account on the top-right corner.

Menu_002

Enter a strong password of your choice twice and click Submit.

Edit User - Google Chrome_003

That’s it. Log out and log in back to your Foreman’s web console using the new password.

In our next tutorial, we’ll see how to add nodes to Foreman.

Reference links:


The post How To Install Foreman With Puppet In CentOS And Ubuntu appeared first on Unixmen.

Install Trident Social Network Platform In CentOS 7

$
0
0


Greetings Unixmen readers!

In our previous tutorial we discussed what is Trident social network platform and how to install it in Debian based systems like Ubuntu. Today, we will see how to install it in RPM based systems, for example CentOS 7.

Here is my testbox details:

  • Operating System : CentOS 7 64 bit minimal installation
  • Hostname : server1.unixmen.local
  • IP Address : 192.168.1.150/24

Prerequisites

First, setup LAMP or LEMP stack in your CentOS server. For the purpose of this tutorial, I am going to setup LAMP (Linux, Apache, MariaDB and PHP) stack in CentOS 7.

To do that, refer the following link.

Also, install the following PHP modules and some required packages if you haven’t installed them yet:

yum install php-curl php-gd php-mbstring unzip wget

Since I am testing it for demo purpose, I disabled SELinux to reduce the complexity.

To do that, edit /etc/sysconfig/selinux file:

vi /etc/sysconfig/selinux

Set SELinux value as “disabled”.

[...]
SELINUX=disabled
[...]

Reboot your server to take effect the changes.

Then, Log in to your MariaDB console using command:

mysql -u root -p

Create a new MySQL database for Trident to use and assign a user to it with full permissions as shown below.

For example, I am going to create a database called “tridentdb” and a user called “tridentuser” with password “centos”. I recommend you to use any strong password that make it so difficult to guess.

Welcome to the MariaDB monitor. Commands end with ; or \g.
Your MariaDB connection id is 10
Server version: 5.5.44-MariaDB MariaDB Server

Copyright (c) 2000, 2015, Oracle, MariaDB Corporation Ab and others.

Type 'help;' or '\h' for help. Type '\c' to clear the current input statement.

MariaDB [(none)]> CREATE DATABASE tridentdb;
Query OK, 1 row affected (0.01 sec)

MariaDB [(none)]> GRANT ALL PRIVILEGES ON tridentdb.* TO 'tridentuser'@'localhost' IDENTIFIED BY 'centos';
Query OK, 0 rows affected (0.00 sec)

MariaDB [(none)]> FLUSH PRIVILEGES;
Query OK, 0 rows affected (0.01 sec)

MariaDB [(none)]> quit
Bye

Download Trident

Download the latest version from Trident download page

At the time of writing this tutorial, the latest version was 8.0 beta version 2.

wget http://ci.boonex.com/builds/Trident-v.8.0.0-B2.zip

Extract the archive using command:

unzip Trident-v.8.0.0-B2.zip

The above command will extract the archive in the current directory. Copy the entire extracted folder to your web root directory.

Note: If you want to install Trident to a subfolder (i.e. example.com/trident), create a subfolder in “/var/www/html/” directory and copy files to it. Don’t just copy the Trident folder. Open it on your computer and copy the entire folder contents – all the files and folders inside of it to your hosting server. Pay attention to .htaccess file, it maybe hidden on *nix systems and in some FTO clients.

I am going to deploy the site in a sub-folder. So, I moved the extracted folder’s contents to a sub folder of Apache root directory as shown below.

mv Trident-v.8.0.0-B2/ /var/www/html/trident

Set the proper permission to the Trident folder as shown below.

chown apache:apache -R /var/www/html/trident/

Access web-based Trident installer

Open your favourite web browser and navigate to http://domain-name/trident/ or http://ip-address/trident/. If you copied the Trident folder contents to the main apache root folder, then the URL will be: http://domain-name/.

The following screen should appear.

Trident 8.0.0-B2 Installation – Google Chrome_001

Now, you may start click “Start installation” button to install Trident or click “Server audit” to check for any software incompatibilities or incorrect settings. Hence, I don’t have any issues, i clicked “Server installation”.

In the Next window, the installer will verify that all permissions have been properly set to the files and folders and displays the result.

As you see in the following screenshot, I need to set writable permissions to the following file.

Trident 8.0.0-B2 Installation – Google Chrome_001

Open your Terminal and run the following command to set writable permission to the file.

chmod 777 /var/www/html/trident/plugins/ffmpeg/ffmpeg.exe

Now, restart Apache server to take effect the changes.

systemctl restart httpd
Note: Do not change permissions for any files or folders except for those listed in Permissions list of the installation script.

Go back to your web browser with installation page and click “Refresh” button to re-check permissions. If everything is correct, click “Continue”.

Trident 8.0.0-B2 Installation – Google Chrome_002

Next, enter your site details such as database name, database user and it’s password, site tittle, site email, admin email, administrative account name and it’s password etc.

Also, you need to enter BoonEx key and BonEx secret values. These numbers are required for Trident to check software version updates, buy and download Extensions and check licenses. Just click “Get BoonEx Key And Secret” link to get the numbers via your registered BoonEx account.

To get your Keys an Secrets, go to the link: http://www.boonex.com/oauth/key_and_secret.

Log in to your account or create a new user account if you don’t have one.

BoonEx-Dolphin-›-Social-Network-Software-Social-CMS-Google-Chrome_004

Enter the username and password if you already have or click on the Join button to create a new account. Enter your username, password and a valid email Id to get the secret key.

You’ll be redirected to the your Boonex account dashboard. Click on the link that says: Keys & Secrets.

Selection_006

You’ll see your Keys and Secrets.

Selection_005

Now, copy the Keys & Secrets and head back to your Trident installer wizard and paste them in the required boxes and click Submit. Refer the following screenshot.

trident_install_index.php

Congratulations! Trident has been successfully installed on your CentOS server.

Trident 8.0.0-B2 Installation – Google Chrome_003

Post installation instructions

1. Setup the following cron jobs command:

crontab -e

Add the following lines:

MAILTO=sk@unixmen.com
* * * * * /usr/bin/php -q /var/www/html/trident/periodic/cron.php

Replace sk@unixmen.com with your own mail id.

Restart cron service.

sudo systemctl restart cron

2. Remove /install/ folder from the script root folder.

rm -rf /var/www/html/trident/install/

Access Trident admin console

Now, go to Trident Studio for further customization by navigating to the URL: http://IP-address/trident/studio/ or http://domain-name/trident/studio/.

You’ll be pleased with the following screen. It will show a small snippet of each module. If you want to know what each module does, click Next or Click the Close button to go to the Trident Studio dashboard.

Studio – Google Chrome_004

Here it is what Trident Studio dash board looks like.

Studio – Google Chrome_005

That’s it. Now, start adding extensions; adjusting site settings; setting membership levels and access permissions; building pages and enjoying your Social network.

Once you done, you can visit the newly created site using URL: http://domain-name/trident.

http___192.168.1.150_trident

Congratulations! Now, ask your friends, and colleagues to register on your Social network and start sharing your news, status, updates and have fun!

Cheers!

Reference link:


The post Install Trident Social Network Platform In CentOS 7 appeared first on Unixmen.
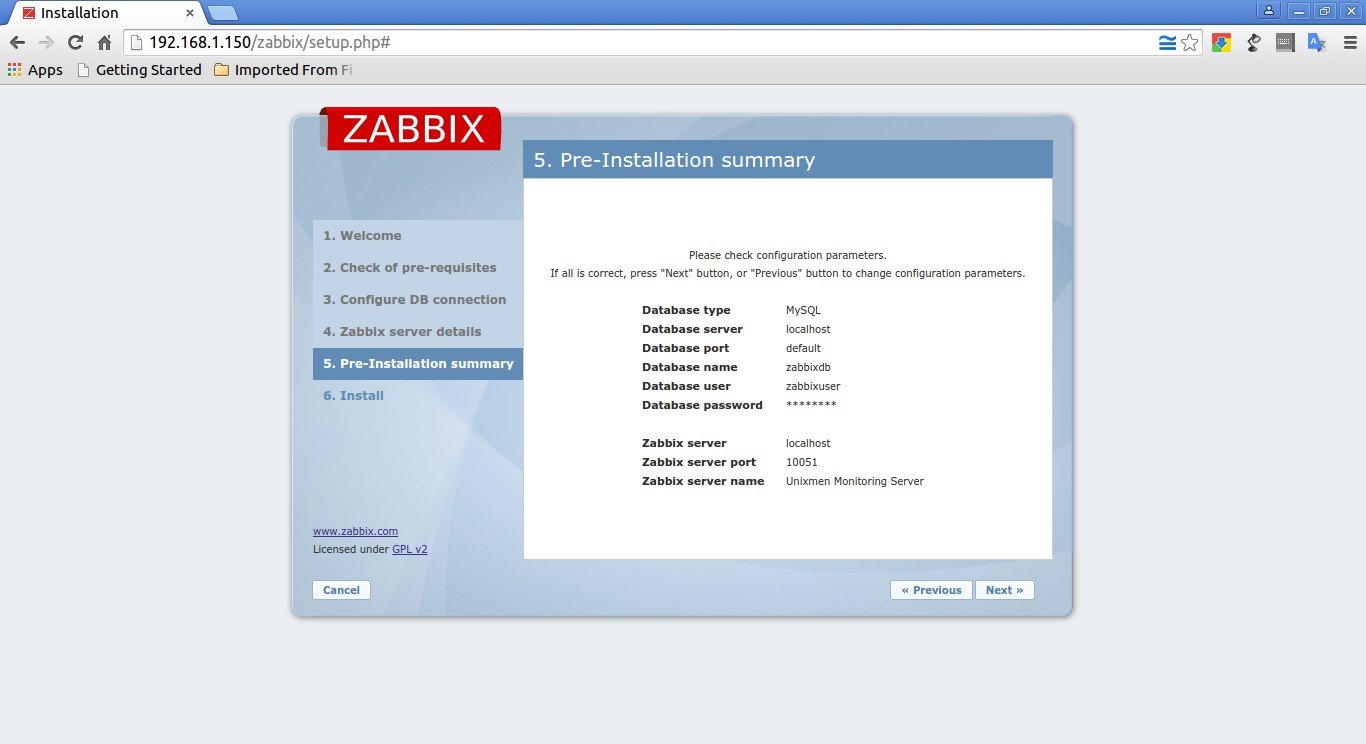
How To Add Puppet Nodes To Foreman

$
0
0


This is the second part of the Foreman tutorial. In the first part, we discussed how to install Foreman with Puppet in CentOS 7 and Ubuntu 14.04 LTS server. In this tutorial, we will be discussing how to add puppet nodes or agents to Foreman i.e the Puppet master.

Add and configure NTP module

As you may know, Puppet needs accurate time-keeping, so we will install Puppet NTP module for managing the NTP service. If you have Puppet 2.7.14 or higher, install the module automatically from Puppet Forge repository. This repository has plethora of Puppet modules written by community members for Puppet Open Source and Enterprise versions.

Well, now let us install NTP module using the following command in our Foreman host (Now It is also Puppet master).

To do that, run the following command from your Foreman host’s Terminal:

puppet module install -i /etc/puppet/environments/production/modules saz/ntp

Sample output:

Notice: Preparing to install into /etc/puppet/environments/production/modules ...
Notice: Downloading from https://forgeapi.puppetlabs.com ...
Notice: Installing -- do not interrupt ...
/etc/puppet/environments/production/modules
└── saz-ntp (v2.3.2)

After installing it, let us add it to Foreman host. Log in to the Foreman Admin console. From the Admin console, go to Configure > Puppet classes.

Menu_001

Click on the button Import from server1.unixmen.local.

Puppet classes – Google Chrome_003

Select the NTP module that you installed earlier and click Update.

Changed environments – Google Chrome_004

After updating the NTP module to the Foreman, you will see something like below. Now, click on the NTP class on the left

Puppet classes – Google Chrome_005

Then, change to the Smart Class Parameters tab and select the server_list parameter on the left. Tick the Override checkbox and click Submit.

Edit Puppet Class ntp – https___192.168.1.150_puppetclasses_1-ntp_edit

Again, go back to the Hosts > All hosts tab and click Edit on the Foreman host.

Hosts – Google Chrome_006

On the Puppet Classes tab, expand the ntp module and click the + icon to add the ntp class to the host, then click Submit to save the host.

Edit server1.unixmen.local – Google Chrome_007

After adding the ntp class, you’ll be automatically redirected to the host’s details section. Clicking the YAML button will show you the ntp class and the server_list parameter, as passed to Puppet via the ENC (external node classifier) interface.

server1.unixmen.local – Google Chrome_010

Sample output:

https:–192.168.1.150-hosts-server1.unixmen.local-externalNodes?name=server1.unixmen.local – Google Chrome_008

Finally, run the following command on the Foreman host to see the NTP service automatically reconfigured by Puppet and the NTP module.

puppet agent --test

Wait for few minutes to complete.

To check whether the NTP module was installed, restarted and configured, click on the Reports button near the YAML button.

server1.unixmen.local – Google Chrome_011

Sample output:

server1.unixmen.local – Google Chrome_012

That’s it. Now, Puppet master is ready to accept agents or nodes. Let us add some new hosts to Foreman.

Add Puppet Nodes to Foreman

My Puppet node details are:

  • Operating system : Ubuntu 14.04 LTS server
  • IP Address : 192.168.1.103/24
  • FQDN : server.unixmen.local

To install Puppet agent package on your nodes, run the following commands from your Terminal.

On Ubuntu 14.04 node:

Add Puppetlabs repository using command:

wget https://apt.puppetlabs.com/puppetlabs-release-trusty.deb

Update the source lists using command:

sudo apt-get update

Finally, install puppet agent as shown below.

sudo apt-get install puppet

On CentOS 7 node:

Add Puppetlabs repository:

rpm -ivh http://yum.puppetlabs.com/puppetlabs-release-el-7.noarch.rpm

Update the sources list:

yum update

Finally install puppet agent using command:

yum install puppet

Configure Puppet agents

First of all you should lock your puppet agent version update to avoid puppet agent automatic update. It is because, the automatic update will hamper your configurations, so it is very good idea to keep the Puppet agent and Puppet server version same.

To find the Puppet version, run:

puppet --version

Sample output:

3.8.2

To lock the agent version update, create a file as shown below:

sudo vi /etc/apt/preferences.d/00-puppet.pref

Add the following lines.

# /etc/apt/preferences.d/00-puppet.pref
Package: puppet puppet-common
Pin: version 3.8*
Pin-Priority: 501

Since my Puppet server and Puppet agent version is 3.8.2, I have added the line “Pin: version 3.8*”. Please match this line with your installed Puppet server and agent version.

Save and close the file.

Puppet agent is disabled by default. So, we need to enable it.

sudo vi /etc/default/puppet

Change the value to yes.

[...]
START=yes
[...]

Next, edit Puppet agent’s configuration file:

sudo vi /etc/puppet/puppet.conf

Delete or Comment out the templatedir line and complete [master] section and add your Puppet master’s IP address as shown below.

[main]
logdir=/var/log/puppet
vardir=/var/lib/puppet
ssldir=/var/lib/puppet/ssl
rundir=/var/run/puppet
factpath=$vardir/lib/facter
#templatedir=$confdir/templates --> comment out or delete

#[master] --> comment out or delete
# These are needed when the puppetmaster is run by passenger --> Comment out or delete
# and can safely be removed if webrick is used.  --> Comment out or delete
#ssl_client_header = SSL_CLIENT_S_DN  --> Comment out or delete
#ssl_client_verify_header = SSL_CLIENT_VERIFY  --> Comment out or delete

## Add the following lines
[agent]
server = 192.168.1.150

Here, 192.168.1.150 is my Puppet master’s IP address. You can also include Puppet master’s FQDN.

Save and close file. Start puppet agent service using command:

sudo service puppet start

Or

sudo systemclt start puppet

If you didn’t see any output, congratulations! Your puppet node is working and is successfully configured.

Exchanging certificates from Puppet master to agents

At the first time, Puppet agents will send certificate signing request to puppet master. You must allow the agent’s certificate in order to communicate with the Puppet master.

To do that, go to Puppet master, and run the following command to check for any unsigned certificates.

puppet cert list

Sample output:

"server.unixmen.local" (SHA256) F3:2E:84:5E:74:AD:DE:E8:4B:F8:DB:C3:88:63:3A:77:03:C1:8B:7C:FE:49:B3:D7:46:D9:E1:D2:58:95:A7:2E
Since, we just installed our first Puppet agent, we got the first certificate sign request as shown above. Here, server.unixmen.local is my Puppet agent’s FQDN.

To accept the certificate request of the Agent, enter:

puppet cert sign server.unixmen.local

Sample output:

As you in the below output, our Puppet agent’s sign request has been accepted.

Notice: Signed certificate request for server.unixmen.local
Notice: Removing file Puppet::SSL::CertificateRequest server.unixmen.local at '/var/lib/puppet/ssl/ca/requests/server.unixmen.local.pem'

Now, the Puppet master and Puppet agent will be able to communicate with each other.

If you want to accept all requests at once, run:

puppet cert sign --all

Similarly, to remove a agent from the Puppet master, run:

puppet cert clean server.unixmen.local

Here, server.unixmen.local is my puppet agent.

To view all signed certificates, run:

puppet cert list --all

Sample output:

+ "server.unixmen.local" (SHA256) A8:4C:CA:B4:83:31:80:3A:72:3B:FB:35:33:69:92:D8:D6:CF:6F:72:AA:5C:54:1F:19:63:73:07:3E:8C:20:DD
+ "server1.unixmen.local" (SHA256) 6A:56:65:62:B6:63:5E:25:67:BC:11:D6:27:6E:38:C3:7E:F3:AF:73:14:82:B9:43:41:32:B0:B5:33:4A:14:B0 (alt names: "DNS:puppet", "DNS:puppet.unixmen.local", "DNS:server1.unixmen.local")

As you see in the above output, there is a plus sign in-front of each FQDNs. This means that the agents have been signed and added successfully to the Puppet master.

To view the signed puppet agents on the Foreman’s interface, go to Infrastructure > Smart proxies and click Certifications button

Smart Proxies – Google Chrome_015

As you see below, the new agent (server1.unixmen.local) has been accepted.

PuppetCA on server1.unixmen.local – Google Chrome_016

That’s it. We have added a new Puppet agent to Puppet master. In our next article, let us see basic getting started guide with Puppet master and Puppet agent.

Cheers!

Reference links:


The post How To Add Puppet Nodes To Foreman appeared first on Unixmen.

How To Upgrade From Oracle 11g To Oracle 12c

$
0
0


Hello all.

Today we will go through how to upgrade from oracle 11g to Oracle 12c. Let’s start then.

For this, I will use CentOS 7 64 bit Linux distribution.

I am assuming that you have already installed Oracle 11g on your system. Here I will show what I did when I installed Oracle 11g.

I select “Create and configure a database” for Oracle 11g just like below image.

11g212cimage1

Then I select “Desktop Class” for my Oracle 11g installation. For production you must select “Server Class”.

11g212cimage2

Then you must enter all the paths for the Oracle 11g and your password as well. Below is mine for my Oracle 11g installation. Make sure you meet the Oracle password methodology for placing your password.

11g212cimage3

Next, I set Inventory Directory path as below.

11g212cimage4

Till now, I showed you what I had done to install Oracle 11g as we are going to upgrade to 12c.

Let’s upgrade to Oracle 12c from Oracle 11g.

You must download the two (2) zip files from this link. Download and unzip both files to the same directory. Files names are linuxamd64_12c_database_1of2.zip & linuxamd64_12c_database_2of2.zip respectively. After extracting or unzipping, It will create a folder called database.

Note: Before upgrading to 12c, make sure you have all the necessary packages installed for your CentOS and all the path variable are OK and all other prerequisites are done before beginning.

These are the following packages must be installed with correct version

  • binutils
  • compat-libstdc++
  • gcc
  • glibc
  • libaio
  • libgcc
  • libstdc++
  • make
  • sysstat
  • unixodbc

Search for your correct rpm version on the internet.

You can also combine a query for multiple packages, and review the output for the correct versions. For example:

Type the following command to check in the terminal

rpm -q binutils compat-libstdc++ gcc glibc libaio libgcc libstdc++ make sysstat unixodbc

The following packages (or later or earlier versions) must be installed on your system

  • binutils-2.23.52.0.1-12.el7.x86_64
  • compat-libcap1-1.10-3.el7.x86_64
  • gcc-4.8.2-3.el7.x86_64
  • gcc-c++-4.8.2-3.el7.x86_64
  • glibc-2.17-36.el7.i686
  • glibc-2.17-36.el7.x86_64
  • glibc-devel-2.17-36.el7.i686
  • glibc-devel-2.17-36.el7.x86_64
  • ksh
  • libaio-0.3.109-9.el7.i686
  • libaio-0.3.109-9.el7.x86_64
  • libaio-devel-0.3.109-9.el7.i686
  • libaio-devel-0.3.109-9.el7.x86_64
  • libgcc-4.8.2-3.el7.i686
  • libgcc-4.8.2-3.el7.x86_64
  • libstdc++-4.8.2-3.el7.i686
  • libstdc++-4.8.2-3.el7.x86_64
  • libstdc++-devel-4.8.2-3.el7.i686
  • libstdc++-devel-4.8.2-3.el7.x86_64
  • libXi-1.7.2-1.el7.i686
  • libXi-1.7.2-1.el7.x86_64
  • libXtst-1.2.2-1.el7.i686
  • libXtst-1.2.2-1.el7.x86_64
  • make-3.82-19.el7.x86_64
  • sysstat-10.1.5-1.el7.x86_64

You will also need unixODBC-2.3.1 or later driver.

I hope you already have a user on your CentOS 7 named oracle when you installed Oracle 11g.

Let’s login onto CentOS by using user oracle.

After login to your CentOS by user oracle, open a terminal on your CentOS.

Now change directory and navigate to your extracted directory where you extracted both the zip files by using terminal. Now type the following in the terminal to begin installation of 12c.

./runInstaller

11g212image5

If everything goes right then you will see something like below which will start the installation process of 12c.

11g212cimage6

Then you can skip the updates or you can download the latest update. It is recommended that you must update it for production server. Though I am skipping it.

11g212cimage7

Now, select upgrade an existing database.

11g212cimage8

For language, English is already there. Click next to continue or you can add according to your need.

11g212cimage9

Now, select Enterprise Edition. You can select upon your requirements.

11g212cimage10

Then select your path for Software location. This is pretty much self-explanatory.

11g212cimage11

For step 7, keep moving with the default options just like below.

11g212cimage12

In step 9, you will get a summary report like below image.

11g212cimage13

If everything is fine, you can start your installation by clicking install on step 9 and which will take you to step 10.

11g212cimage14

In the process you might encounter some errors and you need to Goggle it for fix those errors. There are a number of errors you may encounter and hence I am not covering those here.

Keep your patience and it will show Succeeded one by one for step 10. If not, search it on Google and do necessary steps to fix it. Again, as there are a number of errors you may encounter and I can’t provide all the details over here.

Now, configure the listener just simply following on screen instruction.

After finishing the process for listener, it will start the Database Upgrade Assistant. Select Upgrade Oracle Database.

DUAimage15

In step 2, you will find that it will show the 11g location path along with 12c location path. Also you will find that it is indicating Target Oracle Home Release 12 from Source Oracle Home Release 11. Click next step 2 and move to step 3.

DUAimage16

Follow the on screen instructions and finished it.

In the last step, you will get a success window where you will find that the update of oracle database was successful.

A word of caution: Before upgrading to 12c for your production server, please make sure you have done it some other workstation so that you can fix all the errors, which you will encounter on the way of upgrading. Never try upgrading a production server without knowing all the details.


The post How To Upgrade From Oracle 11g To Oracle 12c appeared first on Unixmen.

Fedora 23 Beta Is Out! Upgrade To Fedora 23 From Fedora 22

$
0
0


Good news Fedora lovers!!

Yes, Fedora 23 beta was released a few days ago and while new users can simply download, install and play it, those running Fedora 22 Server or workstation may want to upgrade their systems. The final release of Fedora 23 will be available in October 27.

Fedora up-gradation task is really easy. This tutorial describes how to upgrade to Fedora 23 beta from Fedora 22.

Can’t wait to try the new Fedora beta, just jump over to Fedora 23 download page and get it, install it and use it.

The Fedora spins have also been released along with the official release. Spins are alternative desktop environments for Fedora, including KDE, Xfce, LXDE, MATE-Compiz, and SOAS (Sugar on a Stick).

Like its predecessors, Fedora 23 comes as three different editions, Fedora 22 workstation, Fedora 22 Server, and Fedora 22 Cloud, targeted to different segment. As the name of each edition implies, each edition comes with respective packages for the particular segment.

Fedora 22 Workstation targets to desktop and laptop users, and Server edition targets to the server, virtualization and storage section, and the Cloud edition targets to the Cloud environment.

What’s new in Fedora 23 beta?

Here is the list of new changes and feature updates in Fedora 23.

  • Linux Kernel 4.2;
  • GNOME 3.18 ;
  • systemd 209 ;
  • Mesa 11.0-rc2 ;
  • Mono stack 4 ;
  • LibreOffice 5 ;
  • LLVM 3.6.1 ;
  • GCC 5.1.1 ;
  • Updated DNF package manager ;
  • Perl 5.22 ;
  • Python 3 ;
  • SSL3 and RC4 has been disabled by default ;
  • Unicode 8.0 ;
  • Docker 1.8 ;
  • Fedup tool has been removed ;
  • And many new improved features.

For more details, check the Fedora 22 release notes.

Upgrade From Fedora 22 to Fedora 23

Well, now let us see how to upgrade from Fedora 22 to 23.

Step 1: Update your system

Log in as root user and install Screen software. The screen tool will help you to reconnect to your server, in case you’re disconnected from it while upgrading.

dnf install screen

Then, start screen session using command:

screen

If you’re disconnected from your Fedora system, you can re-connect to it using command:

screen -Dr

Well, now let us dive into Fedora upgrade task.

Here is my current system (Fedora 22) system details. Execute all commands with root privileges.

cat /etc/redhat-release

Sample output:

Fedora release 22 (Twenty Two)

Or,

cat /etc/*-release

Sample output:

Fedora release 22 (Twenty Two)
NAME=Fedora
VERSION="22 (Twenty Two)"
ID=fedora
VERSION_ID=22
PRETTY_NAME="Fedora 22 (Twenty Two)"
ANSI_COLOR="0;34"
CPE_NAME="cpe:/o:fedoraproject:fedora:22"
HOME_URL="https://fedoraproject.org/"
BUG_REPORT_URL="https://bugzilla.redhat.com/"
REDHAT_BUGZILLA_PRODUCT="Fedora"
REDHAT_BUGZILLA_PRODUCT_VERSION=22
REDHAT_SUPPORT_PRODUCT="Fedora"
REDHAT_SUPPORT_PRODUCT_VERSION=22
PRIVACY_POLICY_URL=https://fedoraproject.org/wiki/Legal:PrivacyPolicy
VARIANT="Server Edition"
VARIANT_ID=server
Fedora release 22 (Twenty Two)

Update your system using the following command:

dnf update

Reboot your system to apply the changes.

Step 2: Start Upgrade

Fedup, the Fedora updater, has been replaced by ‘dnf’ in Fedora 23. fedup is being redesigned and integrated into DNF. For more details, visit here.

First of all, add the Fedora 23 GPG key.

rpm --import /etc/pki/rpm-gpg/RPM-GPG-KEY-fedora-23-$(uname -i)

Upgrade your Fedora server using command:

dnf upgrade

Clean up the cache with command:

dnf clean all

Finally, upgrade Fedora 22 to 23 using the following command:

dnf --releasever=23 --setopt=deltarpm=false distro-sync --nogpgcheck

The DNF will start to fetch the latest packages. This will take quite a long time depending upon your Internet connection speed. So be patient.

[screen 0: root@server:~] _002

After downloading and installing all packages, reboot your system.

Select the Fedora 23 from the boot menu.

Fedora 22 [Running] – Oracle VM VirtualBox_003

Congratulations! We did it. Our Fedora system has been upgraded to the current release i,e Fedora 23 beta.

Fedora 22 [Running] – Oracle VM VirtualBox_004


As you see in the above screenshot, Fedora 23 ships with preinstalled web based administration tool called Cockpit in its Server edition by default. So that you can manage it directly via web browser. How cool, isn’t it?

To access the Fedora admin console, open up your web browser and navigate to: https://ip-address:9090. The following screen should appear. Log in using your root user.

server.unixmen.local – Google Chrome_005

Here it is how my Fedora Cockpit admin console looks like.

server.unixmen.local – Google Chrome_006

For more details about Cockpit, please refer the following link.

Now, let us login to our Fedora 23 server and check the version using the following command:

cat /etc/redhat-release

Sample output:

Fedora release 23 (Twenty Three)

Or,

cat /etc/*-release

Sample output:

Fedora release 23 (Twenty Three)
NAME=Fedora
VERSION="23 (Server Edition)"
ID=fedora
VERSION_ID=23
PRETTY_NAME="Fedora 23 (Server Edition)"
ANSI_COLOR="0;34"
CPE_NAME="cpe:/o:fedoraproject:fedora:23"
HOME_URL="https://fedoraproject.org/"
BUG_REPORT_URL="https://bugzilla.redhat.com/"
REDHAT_BUGZILLA_PRODUCT="Fedora"
REDHAT_BUGZILLA_PRODUCT_VERSION=23
REDHAT_SUPPORT_PRODUCT="Fedora"
REDHAT_SUPPORT_PRODUCT_VERSION=23
PRIVACY_POLICY_URL=https://fedoraproject.org/wiki/Legal:PrivacyPolicy
VARIANT="Server Edition"
VARIANT_ID=server
Fedora release 23 (Twenty Three)

That’s it. It is time to play with the new Fedora system.

Since ,this is an Beta release, you may encounter bugs or missing features. To report issues encountered during testing, contact the Fedora QA team via the test mailing list or in #fedora-qa on freenode.

As testing progresses, common issues are tracked on the Common F23 Bugs page.

For tips on reporting a bug effectively, read “how to file a bug report.”

Cheers!!


The post Fedora 23 Beta Is Out! Upgrade To Fedora 23 From Fedora 22 appeared first on Unixmen.

How To Install And Configure Kolab Groupware Solution

$
0
0


About Kolab Groupware Solution

Kolab Groupware Solution is free, open source, secure, scalable and reliable groupware server. It offers Email, Directory or LDAP server, Contacts, events and appointments etc. It comes with a default configuration and default components, but everything is modular and can easily be changed.

Kolab comes in two different editions:

  • Kolab Community edition
  • Kolab Enterprise edition

As the name implies, Community edition is maintained by group of community volunteers in their free time, whereas Enterprise edition is the full-fledged edition which is maintained by Kolab systems. The enterprise edition is professionally supported for up to 5 years and you’ll receive regular updates.

For more details about Kolab Enterprise edition, visit this link.

You can either host and run your own collaboration server using Community or Enterprise editions. Or, you can directly purchase a hosted service at MyKolab.com and run your groupware server immediately.

Concerning about Kolab features, we can list the following:

  • Email ;
  • Contacts ;
  • Calendars ;
  • Files, Tasks, Notes ;
  • Cloud ready and highly customizable ;
  • Multi-platform desktop clients ;
  • and more

Technically, Kolab consists of many components.

Here is the Kolab groupware component overview.

KolabServer-Component-Overview

I hope you now you got the basic idea about what is Kolab and what it does actually. Now, we’ll see how to install it.

Install Kolab On Ubuntu

Kolab can be installed on all modern Linux operating systems such as Debian, Ubuntu, CentOS, RHEL, and SUSE/OpenSUSE.

In this tutorial, let us see how to install Kolab groupware in Ubuntu 14.04 LTS server.

Switch to the root user using command:

sudo su

Search for Kolab GPG key using command:

gpg --search devel@lists.kolab.org

Sample output:

As you see below, there is one key available. So, just enter “1” to get the key.

 gpg: searching for "devel@lists.kolab.org" from hkp server keys.gnupg.net
 (1) Kolab Development Coordination Mailing List <devel@lists.kolab.org>
 2048 bit RSA key 446D5A45, created: 2014-08-20
 Keys 1-1 of 1 for "devel@lists.kolab.org". Enter number(s), N)ext, or Q)uit > 1
 gpg: requesting key 446D5A45 from hkp server keys.gnupg.net
 gpg: /root/.gnupg/trustdb.gpg: trustdb created
 gpg: key 446D5A45: public key "Kolab Development Coordination Mailing List <devel@lists.kolab.org>" imported
 gpg: no ultimately trusted keys found
 gpg: Total number processed: 1
 gpg: imported: 1 (RSA: 1)

Now, import the key using command:

gpg --export --armor devel@lists.kolab.org | apt-key add -

Update the source list:

apt-get update

Install Kolab collaboration suite using command:

apt-get install kolab

During installation, you’ll be asked to setup the MySQL root user password.

root@server: -home-sk_001

Re-enter the password:

root@server: -home-sk_002

Next, we need to configure the Postfix mail server. Click Ok to continue.

root@server: -home-sk_003

Select the type of postfix mail configuration. I go with defaults.

root@server: -home-sk_004

Enter your System FQDN:

root@server: -home-sk_005

That’s it. Kolab groupware has been installed.

To install Kolab on other Linux distributions, refer the following links.

Setup Kolab

Run the following command to set up Kolab Groupware:

setup-kolab

The installer will ask you series of questions. Answer them accordingly.

First, specify the LDAP admin password:

Please supply a password for the LDAP administrator user 'admin', used to login
to the graphical console of 389 Directory server.

Administrator password [jkhByPCV_cPXohZ]: ## Enter password
Confirm Administrator password: ## Re-enter password

Specify a password for the LDAP Directory Manager user:

Please supply a password for the LDAP Directory Manager user, which is the
administrator user you will be using to at least initially log in to the Web
Admin, and that Kolab uses to perform administrative tasks.

Directory Manager password [PHvk0gnEqvKdRKf]: ## Enter password
Confirm Directory Manager password: ## Re-enter password

Choose the system user and group. In my case, I left the default values.

Please choose the system user and group the service should use to run under.
These should be existing, unprivileged, local system POSIX accounts with no
shell.

User [dirsrv]: ## Press Enter
Group [dirsrv]: ## Press Enter

Confirm this is the appropriate domain name space:

This setup procedure plans to set up Kolab Groupware for the following domain
name space. This domain name is obtained from the reverse DNS entry on your
network interface. Please confirm this is the appropriate domain name space.

unixmen.local [Y/n]: y ## Type Y and press enter

Confirm the root dn:

The standard root dn we composed for you follows. Please confirm this is the root
dn you wish to use.

dc=unixmen,dc=local [Y/n]: y ## Type Y and press enter

Please be patient. The installer is going to set up the 389 Directory Server. This may take a little while (during which period there is no output and no progress indication).

After a while, specify a Cyrus Administrator password. This password is used by Kolab to execute administrative tasks in Cyrus IMAP.

Please supply a Cyrus Administrator password. This password is used by Kolab to
execute administrative tasks in Cyrus IMAP. You may also need the password
yourself to troubleshoot Cyrus IMAP and/or perform other administrative tasks
against Cyrus IMAP directly.

Cyrus Administrator password [EzP686XNm3cH7A8]: ## Enter password
Confirm Cyrus Administrator password: ## Re-enter password

Specify Kolab Service account password. This account is used by various services such as Postfix, and Roundcube.

Please supply a Kolab Service account password. This account is used by various
services such as Postfix, and Roundcube, as anonymous binds to the LDAP server
will not be allowed.

Kolab Service password [oqD_X55ICo5GBU6]: ## Enter password
Confirm Kolab Service password: ## Re-enter password

Next, specify what MySQL server are we setting up. As we already setup MySQL server in the Kolab installation part, let us choose the option: Choice 1 (Existing MySQL server).

What MySQL server are we setting up?
 - 1: Existing MySQL server (with root password already set).
 - 2: New MySQL server (needs to be initialized).
 Choice: 1 ## Type 1 and Press Enter

Enter the MySQL root user password:

Please supply the root password for MySQL, so we can set up user accounts for
other components that use MySQL.
MySQL root password: ## Enter MySQL root user password

Specify password for the MySQL user ‘kolab’:

Please supply a password for the MySQL user 'kolab'. This password will be used
by Kolab services, such as the Web Administration Panel.

MySQL kolab password [_kdGDH6sfMrBEEy]: ## Enter password
Confirm MySQL kolab password: ## Re-enter password

Specify your Timezone:

Please supply the timezone PHP should be using. You have to use a Continent or
Country / City locality name like 'Europe/Berlin', but not just 'CEST'.

Timezone ID [UTC]: Asia/Kolkata

Specify a password for the MySQL user ’roundcube’:

Please supply a password for the MySQL user 'roundcube'. This password will be
used by the Roundcube webmail interface.

MySQL roundcube password [QtwYeWy73PpEIJY]: ## Enter password
Confirm MySQL roundcube password: ## Re-enter password

That’s it. Kolab has been successfully configured.

Kolab web mail client is available under the /roundcubemail/ location on your web- server (./var/www/html/ in Ubuntu).

Also, the additional locations for applications installed include:

  • chwala: /chwala/
  • iRony: /iRony/
  • kolab-freebusy: /freebusy/
  • kolab-webadmin: /kolab-webadmin/
  • roundcubemail: /roundcubemail/

Now, it’s time to access Kolab administration console and create some sample users.

Access Kolab Administration console

Navigate to Kolab admin console using URL: http://ip-address/kolab-webadmin or http://domain-name/kolab-webadmin.

The following page should appear.

Login using the username cn=Directory Manager and the corresponding password you supplied during the setup process.

Kolab Web Admin Panel – Google Chrome_001

Here it is how my Kolab administration console looks.

Kolab Web Admin Panel – Google Chrome_002

From here, you can create/edit/delete users, groups, domains, shared folders and roles etc.

That’s all for now. In our next tutorial, let us see how to create users, domains, and roles etc. Also, we will discuss how to send/receive mails via web browser and Kolab desktop clients and many more features of Kolab.

Reference links:

Cheers!

The post How To Install And Configure Kolab Groupware Solution appeared first on Unixmen.


How To Install Linux Kernel 4.2.3

$
0
0


The Linux Kernel development team has announced the latest stable Kernel version 4.2.3 on October 3, 2015. Greg Kroah-Hartman from Linux Kernel development team wrote in the release notes:

I’m announcing the release of the 4.2.3 kernel.

All users of the 4.2 kernel series must upgrade.

The updated 4.2.y git tree can be found at:
git://git.kernel.org/pub/scm/linux/kernel/git/stable/linux-stable.git linux-4.2.y
and can be browsed at the normal kernel.org git web browser:
http://git.kernel.org/?p=linux/kernel/git/stable/linux-stable.git;a=summary

thanks,

Kernel 4.2.3 brings various networking improvements, especially for the IPv6 and IPv4 network protocols, as well as for the Open vSwitch multilayer virtual switch, but also for NetLink, Stream Control Transmission Protocol (SCTP), Bridge, and Scheduler.

For more details, refer the official release notes.

Install Linux Kernel 4.2.3

In this tutorial, we will see how to compile and install Linux Kernel 4.2.3 latest stable version in Ubuntu and CentOS.

First, we will see how to install Kernel 4.2.3 in Ubuntu 14.04 LTS.

1. Install Linux Kernel 4.2.3 in Ubuntu

The following steps are tested in Ubuntu 14.04 LTS server edition. However, the same steps might work on Debian, and other Ubuntu derivatives such as Linux Mint, Elementary OS etc.

Run the following command to find the current Linux kernel version installed on your system:

uname -r

Sample output:stumbleupon

3.13.0-24-generic

As you see in the above input, the currently installed version is 3.13. Let us upgrade it to 4.2.3.

To do that, first download the Kernel 4.2.3 stable version from the official website using the following command.

On 64bit Ubuntu systems:

wget http://kernel.ubuntu.com/~kernel-ppa/mainline/v4.2.3-unstable/linux-headers-4.2.3-040203_4.2.3-040203.201510030832_all.deb
wget http://kernel.ubuntu.com/~kernel-ppa/mainline/v4.2.3-unstable/linux-headers-4.2.3-040203-generic_4.2.3-040203.201510030832_amd64.deb
wget http://kernel.ubuntu.com/~kernel-ppa/mainline/v4.2.3-unstable/linux-image-4.2.3-040203-generic_4.2.3-040203.201510030832_amd64.deb

On 32bit Ubuntu systems:

wget http://kernel.ubuntu.com/~kernel-ppa/mainline/v4.2.3-unstable/linux-headers-4.2.3-040203_4.2.3-040203.201510030832_all.deb
wget http://kernel.ubuntu.com/~kernel-ppa/mainline/v4.2.3-unstable/linux-headers-4.2.3-040203-generic_4.2.3-040203.201510030832_i386.deb
wget http://kernel.ubuntu.com/~kernel-ppa/mainline/v4.2.3-unstable/linux-image-4.2.3-040203-generic_4.2.3-040203.201510030832_i386.deb

After downloading the necessary Kernel packages depending upon your Ubuntu system’s architecture, run the following commands to install Kernel 4.2.3:

sudo apt-get install gdebi
sudo gdebi linux-headers-4.2*.deb linux-image-4.2*.deb

Update the Grub boot loader using command:

sudo update-grub

If you use BURG boot loader, then run:

sudo update-burg

That’s it. Reboot your system to log in to your new Kernel.

After successful log in, run the following command to check if the new Kernel has been updated.

uname -r

Sample output:

4.2.3-040203-generic

Or, use -a flag to view the complete details:

stumbleuponuname -a

Sample output:

Linux server 4.2.3-040203-generic #201510030832 SMP Sat Oct 3 12:34:31 UTC 2015 x86_64 x86_64 x86_64 GNU/Linux

In case, you have some issues or end up with an unresponsive system after installing new Kernel, just reboot your system and login with your old Kernel.

Select ‘Advanced options for Ubuntu’ from the Boot menu to log in to your old Kernel.

Ubuntu 14.04 64bit Server [Running] – Oracle VM VirtualBox_017

Select the previous working kernel version, which is 3.13 in our case.

Ubuntu 14.04 64bit Server [Running] – Oracle VM VirtualBox_018

Then, run the following command to remove the newly installed Kernel:

sudo apt-get remove linux-header-4.2* linux-image-4.2*

Reboot your Ubuntu system to apply the changes.

2. Install Linux Kernel 4.2.3 in CentOS

Now, we will see how to install/update Linux Kernel 4.2.3 in CentOS. The steps are tested in CentOS 7, however the same steps should work on RHEL 7, Scientific Linux 7 and Fedora etc.

Kernel 4.2.3 is not included in the CentOS default repositories. In order to install the Latest stable Kernel version, we will add ELRepo. ELRepo is an RPM repository for Enterprise Linux packages. ELRepo supports Red Hat Enterprise Linux (RHEL) and its derivatives (Scientific Linux, CentOS & others).

To install ELRepo, follow the steps given below.

First of all, Import the public key:

rpm --import https://www.elrepo.org/RPM-GPG-KEY-elrepo.org

To install ELRepo for RHEL/Scientific Linux/CentOS-7:

rpm -Uvh http://www.elrepo.org/elrepo-release-7.0-2.el7.elrepo.noarch.rpm

To make use of ELRepo mirror system, please also install yum-plugin-fastestmirror too.

yum install yum-plugin-fastestmirror

On Fedora 22 or later:

dnf install yum-plugin-fastestmirror

To install ELRepo for RHEL/Scientific Linux/CentOS-6:

rpm -Uvh http://www.elrepo.org/elrepo-release-6-6.el6.elrepo.noarch.rpm

To make use of ELRepo mirror system, please also install yum-plugin-fastestmirror too.

yum install yum-plugin-fastestmirror

To install ELRepo for RHEL/Scientific Linux/CentOS-5:

rpm -Uvh http://www.elrepo.org/elrepo-release-5-5.el5.elrepo.noarch.rpm

To make use of ELRepo mirror system, please also install yum-plugin-fastestmirror too.

yum install yum-plugin-fastestmirror

After installing ELRepo, let us find out the current Kernel version using command:

uname -r

Sample output:

3.10.0-123.9.3.el7.x86_64

Now, let us install the latest stable Kernel version 4.2.3 using command:

yum --enablerepo=elrepo-kernel install kernel-ml

Note: Here, Kernel-ml refers the current mainline stable version i.e 4.2.3. the letter “ml” is the short form of mainline. The kernel-ml packages are built from the sources available from the “mainline stable” branch of The Linux Kernel Archives.

Sample output:

Type ‘Y’ to continue.

Loaded plugins: fastestmirror
Loading mirror speeds from cached hostfile
 * base: centos.excellmedia.net
 * elrepo: ftp.nluug.nl
 * elrepo-kernel: ftp.nluug.nl
 * extras: centos.excellmedia.net
 * updates: centos.excellmedia.net
Resolving Dependencies
--> Running transaction check
---> Package kernel-ml.x86_64 0:4.2.3-1.el7.elrepo will be installed
--> Finished Dependency Resolution

Dependencies Resolved

========================================================================================================================================================================
 Package Arch Version Repository Size
========================================================================================================================================================================
Installing:
 kernel-ml x86_64 4.2.3-1.el7.elrepo elrepo-kernel 37 M

Transaction Summary

========================================================================================================================================================================
Install 1 Package

Total download size: 37 M
Installed size: 167 M
Is this ok [y/d/N]: y

That’s it. Reboot your system after the installation is completed.

Now, you’ll see the Kernel 4.2.3 entry has been added to the Boot menu. Select it and hit enter to log in with new Kernel.

CentOS 7 -1 [Running] – Oracle VM VirtualBox_019

To check the Kernel details, run:

uname -r

Sample output:

4.2.3-1.el7.elrepo.x86_64

Or,

uname -a

Sample output:

Linux server1.unixmen.local 4.2.3-1.el7.elrepo.x86_64 #1 SMP Sat Oct 3 10:19:41 EDT 2015 x86_64 x86_64 x86_64 GNU/Linux

If you have any problem after updating the latest Kernel and want to remove it, then reboot your system. Select your previous working Kernel from the boot menu:

Then, run the following command to remove the newly installed Kernel:

yum remove kernel-ml -y

Reboot once to use the old Kernel.

That’s all for now. Hope this tutorial will be useful for you.

Cheers!

The post How To Install Linux Kernel 4.2.3 appeared first on Unixmen.

BeeBEEP – A Cross Platform Secure LAN Messenger

$
0
0


About BeeBEEP

BeeBEEP is a simple, secure, and fast peer-to-peer messenger that can be used to send/receive messages and files over local network. You can use it anywhere, including your office, home or internet cafe to effectively chat and share files with others. It’s a serverless apllication, so you don’t need any central server to send and receive messages or files. Just download it, extract it, and run it. It’s one of the simplest messenger ever I have used. Moreover, BeeBEEP is completely free, open source, and it supports all modern operating systems, including Linux, Microsoft Windows, Mac OS X, OS/2 and eComStation.

Salient features

Among many salient features, I have listed the following:

  • Free: As I mentioned before, BeeBEEP is completely free and always will be ;
  • Multi-platform support: It supports Linux, Windows, MacOSX, OS/2 and eComStation ;
  • Easy to use: BeeBEEP is a serverless application. Download, unzip and start to use immediately ;
  • Secure: Encryption based on Rijndael Algorithm (AES) ;
  • Instant Messaging: Chat with all people connected, be it is a group or single user ;
  • Groups: Create your favorite group of people and chat with them instantly ;
  • P2P: Send or share your files and folders to anyone, and of-course you can do by simply drag and drop the files and folders to the BeeBEEP interface ;
  • Offline messages: Your recipients need not to be online all time to receive the messages. The messages will be delivered to offline users when they will be online ;
  • Message History: All messages can be saved to read them later in case you want to ;
  • Open source: You’re free to download and modify the source code and redistribute it.

Install BeeBEEP

On Debian/Ubuntu and derivatives:

In Debian and Ubuntu install the following prerequisites in order to run BeeBEEP.

sudo apt-get install libqt5core5a libqt5gui5 libqt5widgets5 libqt5network5 libqt5printsupport5 libqt5multimedia5 libqt5multimedia5-plugins libxcb-screensaver0

In Fedora and other RPM based systems:

Install the following prerequisites.

dnf install libxcb.so.1 libxcb-screensaver.so.0 libQt5PrintSupport.so.5 libQt5Multimedia.so.5 libQt5Widgets.so.5 libQt5Network.so.5 libQt5Gui.so.5 libQt5Core.so.5 -y

Or

yum install libxcb.so.1 libxcb-screensaver.so.0 libQt5PrintSupport.so.5 libQt5Multimedia.so.5 libQt5Widgets.so.5 libQt5Network.so.5 libQt5Gui.so.5 libQt5Core.so.5 -y

Next, download the latest version from the official site. As of writing this tutorial, the latest version was 2.0.4.

wget http://sourceforge.net/projects/beebeep/files/Linux/beebeep-2.0.4-amd64.tar.gz

Go to the download location and extract the tar file.

tar -zxvf beebeep-2.0.4-amd64.tar.gz

Go to the extracted folder and set the executable permission.

cd Downloads/beebeep-2.0.4-amd64/
sudo chmod +x beebeep

Now, run the following command to launch BeeBEEP.

./beebeep

Here it is how BeeBEEP default interface looks like.

First, you’ll asked to set your display name. You can either set an unique name or just continue with the default value.

In the next screen, you’ll be asked whether you want to use Standard session or password protected session. The former session is encrypted session but authentication is not required, whereas the latter is encrypted and password protected too. If you select the second method, you need to provide the password to all users you want to chat.

BeeBEEP - Sk (offline)_001

Usage

 After log in to the Chat, you’ll see all users who have BeeBEEP running on their system on the right pane.

BeeBEEP - Sk (available)_002

Now you can chat with a selected user from the list or all available users.

To chat with a particular user, select the user on the right pane and start chatting.

BeeBEEP - Sk (available)_003

Similarly, you can create a group chat and talk to all users at once.

To send files/folders to any user, just right click on that particular user. In the pop-up window, click the select send a File icon.

Tooltip_005

Select the file you want to send to that user and click Ok.

BeeBEEP - Sk (available)_006

Now, recipient user will get confirmation dialog box to receive the file you sent.

The user can simply download the files by simply clicking on Yes button.

Ubuntu 15.04 desktop [Running] - Oracle VM VirtualBox_008

Ubuntu 15.04 desktop [Running] - Oracle VM VirtualBox_009

The files will be downloaded in the Downloads folder by default.

Ubuntu 15.04 desktop [Running] - Oracle VM VirtualBox_010

You can change the download location by navigating to Main -> Download folder from the BeeBEEP interface.

Menu_011

Conclusion

BeeBEEP is simple, yet useful tool for SMB and home based users who can’t afford the resources to setup up something like a Jabber-based Chat server. I have little issues while testing this application. When I left the application without doing anything, the users were gone offline automatically. I had to restart this application to get all users online. Apart from this issue, BeeBEEP worked perfectly as it is advertised. Give it a try you won’t be disappointed.

Good luck!

Reference:

The post BeeBEEP – A Cross Platform Secure LAN Messenger appeared first on Unixmen.

Setup A Centralized Media Server Using Emby Server

$
0
0


Take your Home media anywhere with Emby

Yes, you read it right. Meet Emby, a free and open source application that let your personal media library, such as home videos, audios and photos, to be accessible from anywhere using any device. Emby Server automatically converts and streams your media on-the-fly to play on any device. You can also manage your Emby server contents from any device using its web-based dashboard.

Emby comes in two different editions, free and paid (Emby premiere). The free edition has almost all features to setup a basic home media server. Only few more additional bonus features such as Cover Art, Mobile Sync, Cloud Sync, and free Android apps are not available in free edition. If you want all features you can buy Emby premiere service.

Emby apps available for almost all devices, including:

  • Android Mobile (Play Store)
  • Android Mobile (Amazon)
  • Android TV
  • Amazon Fire TV
  • HTML5
  • iPad
  • iPhone
  • Kodi
  • Media Portal
  • Roku
  • Windows Desktop
  • Windows Media Center
  • Windows Phone
  • Windows 8

In addition, Emby also offers a service called Emby connect which is similar to Plex Pass in Plex media server. Using this service, you can access your Media server from outside the local network or from mobile devices without having to use the actual IP address (private or public IP) of your Emby server.

Installation

Follow the below steps depending upon the distribution you use to install Emby server.

On Arch Linux:

Run the following command from your Terminal to Emby server:
pacman -S emby-server
Then, start Emby Server using command:
systemctl start emby-server
On CentOS 6:
Install epel repository using command:
yum install epel-release
Add Emby repository and Install Emby Server using the following commands:
wget http://download.opensuse.org/repositories/home:/emby/CentOS_6/home:emby.repo -O /etc/yum.repos.d/emby.repo
yum install emby-server
Start Emby Server:
systemctl start emby-server

OR

service start emby-server

On CentOS 7:

Install epel repository using command:
yum install epel-release
Add Emby repositories and Install Emby Server using the following commands:
wget http://download.opensuse.org/repositories/home:/emby/CentOS_7/home:emby.repo -O /etc/yum.repos.d/emby.repo
yum install emby-server
Start Emby Server:
systemctl start emby-server

OR

service start emby-server

Debian 7:

Add Emby repositories and install Emby server as shown below:

wget -qO - http://download.opensuse.org/repositories/home:emby/Debian_7.0/Release.key | sudo apt-key add -
sudo sh -c "echo 'deb http://download.opensuse.org/repositories/home:/emby/Debian_7.0/ /' >> /etc/apt/sources.list.d/emby-server.list"
sudo apt-get update
sudo apt-get install mono-runtime mediainfo libsqlite3-dev imagemagick-6.q8 libmagickwand-6.q8-2 libmagickcore-6.q8-2
sudo apt-get install emby-server
Start Emby Server:
sudo service emby-server start

Debian 8:

Add Emby repositories and install Emby server as shown below:

wget -qO - http://download.opensuse.org/repositories/home:emby/Debian_8.0/Release.key | sudo apt-key add -
sudo sh -c "echo 'deb http://download.opensuse.org/repositories/home:/emby/Debian_8.0/ /' >> /etc/apt/sources.list.d/emby-server.list"
sudo apt-get update
sudo apt-get install mono-runtime mediainfo libsqlite3-dev imagemagick-6.q8 libmagickwand-6.q8-2 libmagickcore-6.q8-2
sudo apt-get install emby-server
Start Emby Server:
sudo service emby-server start

Fedora 20:

Install epel repository:
yum install epel-release
Add Emby repositories and Install Emby Server as shown below.
wget http://download.opensuse.org/repositories/home:/emby/Fedora_20/home:emby.repo -O /etc/yum.repos.d/emby.repo
yum install emby-server
Start Emby Server:
systemctl start emby-server

OR

service start emby-server

Fedora 21:

Install epel repository:
yum install epel-release
Add Emby repositories and Install Emby Server as shown below.
wget http://download.opensuse.org/repositories/home:/emby/Fedora_21/home:emby.repo -O /etc/yum.repos.d/emby.repo
yum install emby-server
Start Emby Server:
systemctl start emby-server

OR

service start emby-server

Ubuntu 15.04

Add Emby repositories and Install it using the following commands:

wget -qO - http://download.opensuse.org/repositories/home:emby/xUbuntu_15.04/Release.key | sudo apt-key add -
sudo sh -c "echo 'deb http://download.opensuse.org/repositories/home:/emby/xUbuntu_15.04/ /' >> /etc/apt/sources.list.d/emby-server.list"
sudo apt-get update
sudo apt-get install mono-runtime mediainfo libsqlite3-dev imagemagick-6.q8 libmagickwand-6.q8-2 libmagickcore-6.q8-2
sudo apt-get install emby-server
Start Emby Server:
sudo service emby-server start

Ubuntu 14.10:

Add Emby repositories and Install it using the following commands:

wget -qO - http://download.opensuse.org/repositories/home:emby/xUbuntu_14.10/Release.key | sudo apt-key add -
sudo sh -c "echo 'deb http://download.opensuse.org/repositories/home:/emby/xUbuntu_14.10/ /' >> /etc/apt/sources.list.d/emby-server.list"
sudo apt-get update
sudo apt-get install mono-runtime mediainfo libsqlite3-dev imagemagick-6.q8 libmagickwand-6.q8-2 libmagickcore-6.q8-2
sudo apt-get install emby-server
Start Emby Server:
sudo service emby-server start

Ubuntu 14.04:

Add Emby repositories and Install it using the following commands:

wget -qO - http://download.opensuse.org/repositories/home:emby/xUbuntu_14.04/Release.key | sudo apt-key add -
sudo sh -c "echo 'deb http://download.opensuse.org/repositories/home:/emby/xUbuntu_14.04/ /' >> /etc/apt/sources.list.d/emby-server.list"
sudo apt-get update
sudo apt-get install mono-runtime mediainfo libsqlite3-dev imagemagick-6.q8 libmagickwand-6.q8-2 libmagickcore-6.q8-2
sudo apt-get install emby-server
Start Emby Server:
sudo service emby-server start

Ubuntu 12.04:

Add Emby repositories and Install it using the following commands:

wget -qO - http://download.opensuse.org/repositories/home:emby/xUbuntu_12.04/Release.key | sudo apt-key add -
sudo sh -c "echo 'deb http://download.opensuse.org/repositories/home:/emby/xUbuntu_12.04/ /' >> /etc/apt/sources.list.d/emby-server.list"
sudo apt-get update
sudo apt-get install mono-runtime mediainfo libsqlite3-dev imagemagick-6.q8 libmagickwand-6.q8-2 libmagickcore-6.q8-2
sudo apt-get install emby-server
In this tutorial, We’ll be installing Emby server in Ubuntu 14.04 server:

During the installation, you will be asked to create an user who has read and write permissions to any folders you wish to add to your library. By default, Emby runs under a user called “emby”. You can either create the same user (i.e emby) or create a new user.

sk@server: ~_001

I already had a user named “sk”. So, I use this user to configure Emby-server.

sk@server: ~_002

That’s it. Now, It is time to start web based setup.

Start Emby Server:
sudo service emby-server start

Configure Emby

Open up your web browser and navigate to: http://localhost:8096 or http://IP-Address:8096.

Note: In CentOS and other distributions, make sure you have allowed the Emby default ports 8096(http) and 8920(https) through router or firewall in order to access the web installer.

The following wizard should appear.

Select your preferred language and click NEXT.

Emby - Google Chrome_003

Emby includes built-in support for user profiles, enabling each user to have their own display settings, playstate and parental controls. Enter your first name and press Next. This is your personal Empy account user name to access the dashboard. You can add more users later in the Emby dashboard.

Emby - Google Chrome_005

Now, setup your media library. Emby identifies your media according to folder structure, file name, and the type of library to which it is assigned. Once identified, Emby downloads information like posters, descriptions, and ratings that make media selection a rich experience.

Emby - Google Chrome_006

Click on the Add media folder. A media folder is a grouping of one or more physical folders on your file system. Select the type of the media such as videos, audios, TV, or Books from the Content type drop-down box.

Emby - Google Chrome_007

Similarly, you can create as many media folders as you want.

For testing purpose, I have added only two media folders, one for Movies and Videos, and another one for Music.

Emby - Google Chrome_009

Be mindful that, we have only added the media folders, and we haven’t add any medias to those folders yet.

Next, let us specify the physical library paths. Each media folder can have one or more physical library paths. Physical library path is a location where you kept your media files such movies, videos, audios etc., in your local or remote system.

To add the physical library path, click on the plus (+) sign in front of the each media folder. Then, again click the plus (+) in the Media locations entry.

Emby - Google Chrome_010

Select the path and click Ok.

Emby - Google Chrome_011

Similarly, select the library paths to all other media folders too. After specifying library paths to all media folders, click Next to continue.

Emby - Google Chrome_012

Select your Language and Country. Click Next to continue.

Emby - Google Chrome_014

In the next step, you’ll be asked to setup a Live TV. Since, I don’t have TV tuner card in my Ubuntu system, I simply skipped this step.

Emby - Google Chrome_015

Accept the Emby terms and conditions and click Next.

Emby - Google Chrome_016

That’s all we need for now. Emby has begun collecting information about your media library.

click Finish to view the Server Dashboard.

Emby - Google Chrome_018

Click on the user (Ex. Sk) to continue logging.

Sign In - Google Chrome_019

Here it is how my Emby dashboard looks like.

server web_dashboard.html

As you see in the above screenshot, Emby server is up and running. You can either access your Emby server from locally using private address (Ex. http://192.168.1.102:8096 in our case), or public IP address (Ex. http://1xx.1xx.1xx.1x:8096).

Alternatively, you can access your Emby server using a free Emby Connect account with out having to specify Emby server’s IP address from a remote system.

Creating Emby Connect Account

This account will let you to access your media anywhere, anytime using Emby app without having to use your actual Emby server’s IP address.

To create this account got to: https://emby.media/connect/

Click Sign Up.

Emby Connect - Emby - Google Chrome_024

Fill up the registration form or sign in with your Twitter account to save some time. Here, I use my Twitter account to register.

Registration Form - Emby Community - Google Chrome_025

At first login, you’ll be asked to use the existing account or create a new account. Since, It’s my first time I am going to create my new account.

Welcome to our community - Emby Community - Google Chrome_026

Fill up the details and click Create New Account.

Welcome to our community - Emby Community - Google Chrome_027

That’s it. After logging in to your account, you need to setup a local password (If you use Twitter to login).

To do that, click on the on the user name on the right corner and go to Settings.

Menu_028

In the My Settings Window, Click Email & Password link on the left. Then, enter your password twice.

Selection_029

Important Note: Don’t confuse it with your Twitter account’s password. It’s your Emby Connect account password to access Emby server’s media from anywhere using any device.

Now, you can use this account to connect to your Emby server either from a web browser or using an app.

Link Emby Connect Account

Log in to Emby server dashboard. Click on the Users tab on the Left panel. Enter your registered username/Email in the Emby username/email field. Finally, click Save.

SK web_user

The Emby account has been added to this user. An email will be sent to the mail. The invitation will need to be confirmed by clicking a link within the email.

That’s it. Your Emby server is now linked to your Emby Account. You can now access it by logging in with your Connect user name in any supported client app or at http://app.emby.media via a web browser.

Access Emby server via Web browser from a remote system

Open up your web browser and access the URL: http://app.emby.media

The following screen should appear. Enter your Emby account’s name and its password.

Sign In - Google Chrome_030

You can either select your existing server or add a new server by clicking on the ADD SERVER button.

Emby - Google Chrome_031

Enter your Emby server’s IP address, for example http://192.168.1.102 or public IP address. Click Connect.

Sign In - Google Chrome_032

Now, select the username to log in to the Emby dashboard. Remember I have already created the user account sk in the Emby server’s web based installer.

Sign In - Google Chrome_033

Here is my Emby server’s dashboard.

Home - Google Chrome_034

Similarly, you can install client app for Android, iOS, or Windows devices and access the Emby server from anywhere using the Emby Connect account.

That’s all for now. Start using your media server. Hope this article will help you.

Cheers!

Reference links:

The post Setup A Centralized Media Server Using Emby Server appeared first on Unixmen.

Review of Fedora 23

$
0
0


We have tested many versions of Fedora Linux. Yet they have always remained in desktop format. I have been involved with Fedora usage dating right back to the days of Fedora Core 5.

For the release of Fedora 23, we are taking a look at both the Desktop and Server versions. The latter of which admittedly, we will be giving more focus in this Review.

Cockpit

The Fedora 23 package comes with the state-of-the-art Cockpit. It is a web-based management console which is accessed through a web browser and aims to make the server status and monitoring tasks much simpler.

F23-s-1

Fedora Server aims to provide a solid, server focused operating system within the Fedora line-up and also competes with Ubuntu Server. Whilst the latter remains a console-based operating system, Fedora combined with Cockpit does feel like it has filled the void and taken it one step further by including a web-based server management tool by default.

Web server

Once Fedora 23 Server is installed, the Cockpit console can be accessed from a web browser. Once accessed, you can login to the server via the Regular User (with or without administrative privileges) or the Server Administrator account. This will really depend how it has been configured upon installation.

F23-s-2

F23-s-3

Once you log in to Cockpit, you will be presented with the following interface. This presents a Summary of the system specifications and the Fedora software system details.

F23-s-4

You can click on Services to view all running System Services and also change using the displayed buttons, which can modify which Services you see displayed.

F23-s-5

The Storage component of Cockpit can be very useful. We only have a simple setup running and configured inside Oracle VM VirtualBox. But when running in full server mode with multiple or many drives operational, the Storage component and management tool is critical.

F23-s-6

The Networking component is pretty self explanatory. It’s your usual network monitoring tool which displays relevant networking details.

Again, we are running a very simple setup, so our own example details are bare at best. But it’s enough to display Sending/Receive packet data, list the network device and any relevant Logs.

F23-s-7

The Administrator Accounts component simply lists the users who are registered to login to the server. On our server, we have an account for myself and the Root account. My personal account is set for limited role, therefore any proper administrative tasks must be carried out by the Root account to allow for full system access. As we stated earlier in the Review, this will depend on how the server is configured in the early stage of Anaconda.

F23-s-8

F23-s-9

The Terminal component is probably going to be a place of comfort for seasoned Administrators who like to have absolute access to the very core of their system. Usually, this means by having access to a Terminal shell. Cockpit has this covered of course, all accessible from within the Cockpit console and through the web browser interface.

But note, what actions you perform from the Terminal essentially depends on what access the account has that you have logged into Cockpit with. Unless you gain root privileges, of course. We really shouldn’t have to delve into this in great detail, as its behavior is exactly the same as what it is running directly on desktop Linux, only this time its running within the web browser interface of the Cockpit console.

F23-s-10

For system monitoring information and data, you can simply enter the Dashboard tab.

F23-s-4c

Here you will find a set of system monitoring tabs – CPU, Memory (RAM), Network and Disk I/O. This can be useful to have them all in separate tabs, away from the distractions of all the other Cockpit components if you want to specifically focus your monitoring task on one specific area.

CPU monitor:

F23-s-11

Memory (RAM) monitor:

F23-s-12

Network monitor:

F23-s-13

Disk I/O monitor:

F23-s-14

For simple server testing, we attempted to install Apache and did experience some trouble with getting the service to start properly. After several failed attempts, we did decide to drop Apache and give Lighttpd a shot. It worked on first attempt and we were able to get the server directly delivering web files in just minutes.

When you have finished your tasks within Cockpit, the user can easily log out of the interface much like the Desktop version, by using the Username options in the top-right corner.

F23-s-4d

Anaconda – Graphical installer for Server

F23_1-ds

The installer uses the same Anaconda package as the Desktop version of Fedora. This is excellent. Despite our initial gripes we’ve raised in the past about the new Anaconda package, we reckon it has matured very much and is ready to redeem itself as one of the best Linux installers available.

It is interesting tho note that Fedora has chosen to build the Server installation around the Anaconda package and use a graphical installer for a server-based Linux operating system. But like we pointed out earlier, it’s as though the Fedora Developers have looked at Ubuntu Server and taken a more user-friendly approach and direction for a server-based operating system. This is a good thing and the extra attention given, does show.

Desktop

To complement this Review, we decided to additionally run the Desktop version of Fedora 23. This was also installed inside Oracle VM VirtualBox.

F23_2-ds

Fedora 22 was an excellent release. We were so impressed we would declare it our favorite release of Linux to date. Although we missed out on the deadline to publish a review of Fedora 22, we have loved every minute of it and it’s an awesome display of modern Linux, running the very best of everything. It was also one of the first Linux distributions to come through our Labs running the Linux 4.x kernel branch.

It’s a big claim, yes, we know. What does that mean for our thoughts on Fedora 23? Well it’s safe to say that not much has changed. This is nothing bad though as that’s just how good we believe Fedora 22 was. Fedora 23 has built upon that strength and robust reliability and delivered a new release which continues the trend of its predecessor.

Fedora 23 runs excellent. Our Desktop version was installed running a slightly older version of the Linux kernel than what we have installed on the Server version. But this is easily fixed by running a system-wide update using DNF. This will install the latest available kernel for Fedora 23, in addition to all other software packages on the system.

Our Desktop version contained the XFCE desktop-environment, which is nice to see has been updated to the latest package – 4.12.

There’s not much else different other than the usual available packages shipped with Fedora and XFCE, albeit updated versions.

F23_3-ds

Conclusion

Fedora 23 Server can be whatever you want it to be. We put it to work as a simple web server. You can really go full steam ahead and install an entire LAMP stack, but we opted for a limited Lighttpd configuration instead. You could simply leave it on your network as a file server with out-of-the-box SSH access configured. Or you could get more tricky and put it into a full server role which would require a lot more in-depth configuration and detail than what we can cover in this Review. That’s before we have even brushed on its potential for Cloud options. It’s worth noting that this is all deployed and supported completely free of any contract fees associated with Fedora, unlike its big commercial partner, Red Hat.

Fedora 23 is great for small business who are looking at options for cutting down on IT costs related to software. If Fedora doesn’t suit the task at hand, we remind our readers not to forget about CentOS 7.0. Sure, Ubuntu is also an equal potential option with solid and reliable performance. But it’s difficult to look past Fedora’s fine polish and overall friendly take on a server operating system. Additionally, the simple fact that Cockpit is so well equipped and installed by default with the core system, makes Fedora 23 that little bit more tempting.

The post Review of Fedora 23 appeared first on Unixmen.

Fedora 23 Is Out! Upgrade To Fedora 23 From Fedora 22

$
0
0


The wait is over. Fedora 23 final edition was released yesterday and while new users can simply download, install and play it, those running Fedora 22 Server or workstation may want to upgrade their systems.

Fedora up-gradation task is really easy. This tutorial describes how to upgrade to Fedora 23 from Fedora 22.

Can’t wait to try the new Fedora? just skip this guide and click the links given below to download Fedora 23 final edition.

The Fedora spins have also been released along with the official release. Spins are alternative desktop environments for Fedora, including KDE, Xfce, LXDE, MATE-Compiz, and SOAS (Sugar on a Stick).

Like its predecessors, Fedora 23 comes as three different editions, Fedora 23 workstation, Fedora 23 Server, and Fedora 23 Cloud, targeted to different segment. As the name of each edition implies, each edition comes with respective packages for the particular segment.

Fedora 23 Workstation targets to desktop and laptop users, and Server edition targets to the server, virtualization and storage section, and the Cloud edition targets to the Cloud environment.

What’s new in Fedora 23?

Here is the list of new changes and feature updates in Fedora 23.

  • Linux Kernel 4.2;
  • GNOME 3.18 ;
  • systemd 209 ;
  • Mesa 11.0-rc2 ;
  • Mono stack 4 ;
  • LibreOffice 5 ;
  • LLVM 3.6.1 ;
  • GCC 5.1.1 ;
  • Updated DNF package manager ;
  • Perl 5.22 ;
  • Python 3 ;
  • SSL3 and RC4 has been disabled by default ;
  • Unicode 8.0 ;
  • Docker 1.8 ;
  • Fedup tool has been removed ;
  • And many new improved features.

For more details, check the Fedora 23 release notes.

Upgrade to Fedora 23 From Fedora 22

Well, now let us see how to upgrade from Fedora 22 to 23.

Step 1: Update your system

Log in as root user and install Screen software. The screen tool will help you to reconnect to your server, in case you’re disconnected from it while upgrading.

dnf install screen

Then, start screen session using command:

screen

If you’re disconnected from your Fedora system, you can re-connect to it using command:

screen -Dr

Well, now let us dive into Fedora upgrade task.

Here is my current system (Fedora 22) system details. Execute all commands with root privileges.

cat /etc/redhat-release

Sample output:

Fedora release 22 (Twenty Two)

Or,

cat /etc/*-release

Sample output:

Fedora release 22 (Twenty Two)
NAME=Fedora
VERSION="22 (Twenty Two)"
ID=fedora
VERSION_ID=22
PRETTY_NAME="Fedora 22 (Twenty Two)"
ANSI_COLOR="0;34"
CPE_NAME="cpe:/o:fedoraproject:fedora:22"
HOME_URL="https://fedoraproject.org/"
BUG_REPORT_URL="https://bugzilla.redhat.com/"
REDHAT_BUGZILLA_PRODUCT="Fedora"
REDHAT_BUGZILLA_PRODUCT_VERSION=22
REDHAT_SUPPORT_PRODUCT="Fedora"
REDHAT_SUPPORT_PRODUCT_VERSION=22
PRIVACY_POLICY_URL=https://fedoraproject.org/wiki/Legal:PrivacyPolicy
VARIANT="Server Edition"
VARIANT_ID=server
Fedora release 22 (Twenty Two)

Update your system using the following command:

dnf update

Reboot your system to apply the changes.

Step 2: Start Upgrade

Fedup, the Fedora updater, has been replaced by ‘dnf’ in Fedora 23. fedup is being redesigned and integrated into DNF. For more details, visit here.

Enter the following command to upgrade your Fedora system:

dnf upgrade

Then, install DNF plugin with command:

dnf install dnf-plugin-system-upgrade

Finally, upgrade Fedora 22 to 23 using the following command:

dnf system-upgrade download --releasever=23

The DNF will start to fetch the latest packages. This will take quite a long time depending upon your Internet connection speed. So be patient.

Note:

  • If some of your packages have unsatisfied dependencies, the upgrade will refuse to continue until you run it again with an extra –allowerasing option. This often happens with packages installed from third-party repositories for which an updated repositories hasn’t been yet published. Please study very careful the output and examine which packages are going to be removed. None of them should be essential for system functionality, but some of them might be important for your productivity.
  • In case of unsatisfied dependencies, you can see more details if you add –best option to the command line.

[screen 0: root@server:~] _002

Once the above command finishes downloading all latest packages, your system will be ready for rebooting.

[screen 0: root@server:~] _001

To boot your system into the upgrade process, run the following command from the Terminal:

dnf system-upgrade reboot

The upgrade will start now.

Fedora 22 [Running] - Oracle VM VirtualBox_002

Fedora 22 [Running] - Oracle VM VirtualBox_003

After completing the upgrade process, the system will automatically reboot.

Select Fedora 23 from the boot menu.

Fedora 22 [Running] - Oracle VM VirtualBox_004

Congratulations! We’re done!. Our Fedora system has been upgraded to the current release i,e Fedora 23 Final.

Fedora 22 [Running] - Oracle VM VirtualBox_005

As you see in the above screenshot, Fedora 23 ships with preinstalled web based administration tool called Cockpit in its Server edition by default. So that you can manage it directly via web browser. How cool, isn’t it?

To access the Fedora admin console, open up your web browser and navigate to: https://ip-address:9090. The following screen should appear. Log in using your root user.

server.unixmen.local - Google Chrome_006

Here it is how my Fedora Cockpit admin console looks like.

System - server.unixmen.local - Google Chrome_007

For more details about Cockpit, please refer the following link.

Now, let us login to our Fedora 23 server and check the version using the following command:

cat /etc/redhat-release

Sample output:

Fedora release 23 (Twenty Three)

Or,

cat /etc/*-release

Sample output:

Fedora release 23 (Twenty Three)
NAME=Fedora
VERSION="23 (Server Edition)"
ID=fedora
VERSION_ID=23
PRETTY_NAME="Fedora 23 (Server Edition)"
ANSI_COLOR="0;34"
CPE_NAME="cpe:/o:fedoraproject:fedora:23"
HOME_URL="https://fedoraproject.org/"
BUG_REPORT_URL="https://bugzilla.redhat.com/"
REDHAT_BUGZILLA_PRODUCT="Fedora"
REDHAT_BUGZILLA_PRODUCT_VERSION=23
REDHAT_SUPPORT_PRODUCT="Fedora"
REDHAT_SUPPORT_PRODUCT_VERSION=23
PRIVACY_POLICY_URL=https://fedoraproject.org/wiki/Legal:PrivacyPolicy
VARIANT="Server Edition"
VARIANT_ID=server
Fedora release 23 (Twenty Three)

That’s it. Start using your new Fedora system.

Any issues after upgrading to Fedora 23?

First see Common F23 bugs or Common F24 bugs to check if the problem is a very prominent issue. If it is not there, search for an existing bug report. If you do not see a report that matches your symptoms, you can file a new report from the search page.

If you hit issues after upgrade with a specific package, file a bug against the package with which you are having issues.

For tips on reporting a bug effectively, read “how to file a bug report.”

Cheers!!

Reference:

The post Fedora 23 Is Out! Upgrade To Fedora 23 From Fedora 22 appeared first on Unixmen.

Viewing all 343 articles
Browse latest View live